Fine-tuning Phi-3.5-mini LLM at scale: Harnessing Accelerate and Slurm for multinode training#

In this blog you will learn the process of fine-tuning the Phi-3.5-mini-instruct Large Language Model (LLM) from Microsoft, using PyTorch in a multinode environment. The setup leverages the Hugging Face Accelerate library to handle the complexities of multi-GPU and multinode synchronization. Slurm is used to schedule and coordinate the job as a workload manager for high-performance computing environments. A custom Slurm Bash script launches the Docker containers on each node, ensuring the training environment is consistent across all machines. Inside the containers, PyTorch and the Accelerate library split the training data, synchronize the model updates, and optimize performance across the multinode setup. This approach lets you efficiently fine-tune large-scale models and reduce training time while maximizing hardware utilization across the entire cluster.
You can find the necessary files and resources related to this blog post in this GitHub folder. Let’s get started!
Understanding multinode training, Hugging Face Accelerate, and Slurm#
This section describes the key methods and tools needed for scalable model training. Multinode (distributed) training enables the use of multiple machines and/or GPUs to speed up complex tasks. Hugging Face Accelerate simplifies distributed training with PyTorch, while Slurm efficiently manages resource allocation and job scheduling across nodes. Together, these methods and tools provide the foundation for efficient large-scale model training.
Multinode training#
Multinode or distributed training is a method used to train machine learning models across multiple computational units (nodes) in a compute cluster to significantly reduce the training time. Each node in a cluster may contain multiple GPUs, which are used to accelerate the training process. The task of each GPU is to process portions of the data in parallel, while also communicating and synchronizing model updates with other GPUs.
In this setup, the training data is divided and distributed in parallel across the GPUs on different nodes. The synchronization mechanisms ensure that the model updates are consistent. Distributed training enables scaling of large datasets and complex models by utilizing multiple computational resources simultaneously. This approach is essential for training LLMs and other deep learning models that would be resource-intensive or time-consuming to train on a single machine.
Hugging Face Accelerate library#
The Hugging Face Accelerate library simplifies the process of implementing distributed training across multiple GPUs and nodes. Managing the synchronization of models and data across distributed or multinode environments requires significant manual intervention and coding effort. The Accelerate library abstracts away these complexities by providing easy-to-use APIs that handle device placement, data parallelism, and model synchronization consistently. By using Accelerate, you can focus more on the model training logic, while the library takes care of efficiently distributing the workload across all the available GPUs and nodes. For more information, see Accelerate and Transformers: Distributed training with Hugging Face Accelerate.
Slurm workload manager#
Slurm (Simple Linux Utility for Resource Management) is an open-source workload manager designed for large-scale computing environments such as high-performance computing (HPC) clusters. It is responsible for allocating resources (GPUS, CPUs, memory) and scheduling jobs on the cluster. In multinode training, Slurm orchestrates the execution of distributed jobs by managing the resources across multiple nodes, launching tasks, and ensuring that each process is assigned to the correct GPU. With its flexible job scheduling capabilities, Slurm allows users to queue jobs, define resource requirements, and handle complex workflows. For more information about Slurm, see Slurm workload manager.
Getting Started: Python script for fine-tuning Phi-3.5-mini-instruct using Accelerate#
This section focuses on the implementation details needed for fine-tuning the Phi-3.5-mini-instruct LLM, for the task of classification using the yelp_review_full dataset. The yelp_review_full dataset is a text classification dataset that consists of customer reviews sourced from Yelp and its primary purpose is to train models for sentiment analysis or text classification tasks. The fine-tuning process described here uses the Hugging Face Accelerate library which is designed to simplify the process of training in multiple devices. By leveraging Accelerate’s multinode training capabilities, you can scale the fine-tuning process efficiently across multiple nodes and GPUs.
This classification_finetuning_phi35.py Python script covers the essential steps such as dataset preparation, model initialization, and optimizer setup, all orchestrated through the Accelerate’s API. To use Accelerate, the Accelerator class needs to be initialized, automatically detecting the available hardware and setting up the environment accordingly. Then, the model, optimizer, and data loaders are passed to the Accelerator instance, which handles their distribution across the nodes.
import torch
from datasets import load_dataset
from transformers import AutoTokenizer
from torch.utils.data import DataLoader
from transformers import AutoModelForSequenceClassification
from torch.optim import AdamW
from transformers import get_scheduler
from tqdm.auto import tqdm

from accelerate import Accelerator

# Instantiate the Accelerator class
accelerator = Accelerator()

print("Loading the data")

# Dataset preparation stage
# For illustration purposes we are fine-tuning the model on the first 1% of data. The dataset has 5 labels
dataset = load_dataset("yelp_review_full",split={'train': 'train[:1%]', 'test': 'test[:1%]'})

print("Tokenizing the data")

llm_model = "microsoft/Phi-3.5-mini-instruct"

# Tokenize the data with map method
tokenizer = AutoTokenizer.from_pretrained(llm_model)

def tokenize_function(examples):
    return tokenizer(examples["text"], padding="max_length", truncation=True, max_length=256)

tokenized_datasets = dataset.map(tokenize_function, batched=True)
tokenized_datasets = tokenized_datasets.remove_columns(["text"])
tokenized_datasets = tokenized_datasets.rename_column("label", "labels")
tokenized_datasets.set_format("torch")

# Create train and evaluation dataloader
print("Instantiating the Dataloader")
train_dataloader = DataLoader(tokenized_datasets["train"], shuffle=True, batch_size=8)
eval_dataloader = DataLoader(tokenized_datasets["test"], batch_size=8)

# Load the model for classification
print("Loading model for classification")
model = AutoModelForSequenceClassification.from_pretrained(llm_model, num_labels=5)

# Optimizer
optimizer = AdamW(model.parameters(), lr=5e-5)

# Learning rate scheduler
num_epochs = 10
num_training_steps = num_epochs * len(train_dataloader)

lr_scheduler = get_scheduler(
    name="linear", optimizer=optimizer, num_warmup_steps=0, num_training_steps=num_training_steps
)

# The model, optimizer and data loaders are passed to the Accelerator instance
train_dataloader, eval_dataloader, model, optimizer, lr_scheduler = accelerator.prepare(train_dataloader, eval_dataloader, model, optimizer, lr_scheduler)

print("Begin Training...")

progress_bar = tqdm(range(num_training_steps))

for epoch in range(num_epochs):
    for batch in train_dataloader:
        outputs = model(**batch)
        loss = outputs.loss
        accelerator.backward(loss)

        optimizer.step()
        lr_scheduler.step()
        optimizer.zero_grad()
        progress_bar.update(1)

print("Training completed.")

print("\nSaving model weights after training")

model_save_path = "model_classification_finetuned_phi35.pth"
torch.save(model.state_dict(), model_save_path)

print(f"Model saved to: {model_save_path}")
With the Python script and Accelerate framework handling the distribution of training tasks across multiple nodes, the next step involves setting up the infrastructure for multinode training. This involves using Docker images to maintain a consistent environment across nodes, leveraging Docker Hub for easy deployment, and orchestrating the training process with Slurm for job scheduling across nodes.
Building the training infrastructure: Setting up for multinode fine-tuning#
This section covers how Docker images, Docker Hub, and Slurm are used to containerize and schedule the training task across multiple nodes, ensuring synchronized and optimized performance.
Setting up a Docker registry and creating a personal access token#
Docker Hub serves as a central repository for storing and managing Docker images, making them accessible for deployment across multiple nodes. Start by creating an account on Docker Hub. Once your account is set up, create a new repository for your Docker images. Navigate to Repositories and select Create repository, providing a repository name and an optional description. In what follows we assume that you have created a repository named multinode-finetuning. For more details on how to create a Docker repository, see Create an image repository.
Once you’ve created the multinode-finetuning repository, generate a personal access token. This token serves as an alternative to your password for authenticating with the Docker CLI, which allows you to manage Docker containers and their resources directly from the command line. Personal access tokens offer several benefits, including monitoring usage, restricting admin activities, and issuing multiple tokens for different integrations. These tokens can be revoked at any time. To create a personal access token navigate to your account settings, then security, and then personal access tokens. Generate a new token, provide a description for it, and set the desired access permissions for your multinode-finetuning repository. Once generated, copy the token and store it securely. For more information on personal access tokens, see Create and manage access tokens.
Building a Docker image#
With the Docker repository in place, you need to create a Docker file with instructions and configurations for building the Docker image. The Docker file starts with a PyTorch 2.3 base image rocm/pytorch:rocm6.2.1_ubuntu20.04_py3.9_pytorch_release_2.3.0 with ROCm 6.2.1 for AMD GPU support. It also includes all the necessary Python libraries for multinode training and fine-tuning LLMs, particularly the Accelerate library, which ensures the distributed training setup can be executed across multiple nodes.
The Docker image is build using the following ./src/Dockerfile, which includes all the necessary dependencies:
FROM rocm/pytorch:rocm6.2.1_ubuntu20.04_py3.9_pytorch_release_2.3.0

ARG DEBIAN_FRONTEND=noninteractive #Suppress interactive prompts during package installation

RUN pip install --upgrade pip
RUN pip install numpy==1.24.4
RUN pip install scipy==1.13.1
RUN pip install transformers==4.45.1
RUN pip install accelerate==0.34.2
RUN pip install datasets==3.0.1

WORKDIR /usr/src/app
The next step is to build the Docker image. You can do this on any node, assuming each node’s environment is identical, or on your local machine. Building it on a system similar to the nodes ensures compatibility.
When building a Docker image that you will push to Docker Hub, you need to provide a tag in the format your-dockerhub-username/your-repository-name:tag. In the example, the repository name is multinode-finetuning, and the tag is multinode-finetuning:rocm6.2.1_ubuntu20.04_py3.9_pytorch_release_2.3.0_accelerate_0.34.2 to identify the image’s purpose and its dependencies.
To build the image use the following command, making sure that you modify it with your respective Docker Hub username.
docker build --no-cache -t <your-dockerhub-username>/multinode-finetuning:rocm6.2.1_ubuntu20.04_py3.9_pytorch_release_2.3.0_accelerate_0.34.2 .
Push image to Docker Hub#
Once the Docker image is built, you need to push it to the Docker Hub. This process will allow all the nodes to pull the same image without the need to manually copy it into each node.
To begin with the process, and in the same directory where the Docker image was built, use the following Docker CLI command to login into Docker Hub and provide your username and password when prompted:
docker login --username <your-dockerhub username>
Next, modify the following command with your-dockerhub-username and proceed to push the image to Docker Hub with:
docker push <your-dockerhub-username>/multinode-finetuning:rocm6.2.1_ubuntu20.04_py3.9_pytorch_release_2.3.0_accelerate_0.34.2
You can verify that the image was pushed to the repository by visiting: https://hub.docker.com/repositories/
Prepare a Slurm job script#
To request and allocate the resources needed for the fine-tuning task, you need to create a Slurm job script. This is a bash script that defines the resources needed, such as the number of nodes, GPUs, CPUs, and memory. The Slurm script also includes Slurm directives that tell the scheduler what resources to allocate and how to manage the job. This script also includes the actual commands to run the training task.
The following file ./src/multinode_finetuning_phi35_job.sh is the Slurm bash script used for multinode fine-tuning. You have to modify the script with the appropriate values for your environment and system, such as your-dockerhub-username, your-personal-access-token, the number of nodes, GPUs and CPUs, partition, and the path on the login node for your local folder HOST_MOUNT.
#!/bin/bash
#SBATCH --job-name=multinode_finetuning_phi35_job # Job name
#SBATCH --nodes=2 # Number of nodes
#SBATCH --ntasks-per-node=1 # Number of tasks (processes) per node
#SBATCH --cpus-per-task=224 # Number of CPUs per task (process)
#SBATCH --mem=0 # Request all available memory on the node
#SBATCH --partition=<intended_partition> # check available partitions with "sinfo" command
#SBATCH --gres=gpu:8 # Number of GPUs per node
#SBATCH --output=%x-%j.out
#SBATCH --err=%x-%j.err
#SBATCH --exclusive
#SBATCH --time=24:00:00 # Time limit

# Docker credentials
export DOCKER_USERNAME=<your-dockerhub-username>
export DOCKER_TOKEN=<your-personal-access-token>
export DOCKER_REGISTRY=docker.io

# Docker login
echo "$DOCKER_TOKEN" | docker login -u "$DOCKER_USERNAME" --password-stdin "$DOCKER_REGISTRY"

# Get the list of nodes and the first node (master node)
master_node=$(scontrol show hostname $SLURM_NODELIST | head -n 1)

# Get the IP address of the master node
master_ip=$(srun --nodes=1 --ntasks=1 --nodelist=$master_node bash -c "ip -f inet addr show rdma0 | grep -oP '(?<=inet\s)\d+(\.\d+){3}'")

# Set environment variables for distributed training
export SLURM_MASTER_ADDR=$master_ip
export SLURM_MASTER_PORT=29501
export SLURM_TOTAL_GPUS=$(($SLURM_NNODES * $SLURM_GPUS_ON_NODE))

# Define the Docker image
export DOCKER_IMAGE="$DOCKER_USERNAME/multinode-finetuning:rocm6.2.1_ubuntu20.04_py3.9_pytorch_release_2.3.0_accelerate_0.34.2"

# Define the mount points
export HOST_MOUNT="</your/login_node/local_folder>/multinode_finetuning/"
export CONTAINER_MOUNT="/usr/src/app"

# Optional: Print out the values for debugging
echo "Custom parameter values:"
echo "MASTER ADDRESS: $SLURM_MASTER_ADDR"
echo "MASTER_PORT: $SLURM_MASTER_PORT"
echo "NUMBER OF NODES REQUESTED: $SLURM_NNODES"
echo "NUMBER OF NODES ALLOCATED: $SLURM_JOB_NUM_NODES"
echo "NUMBER OF GPUS PER NODE: $SLURM_GPUS_ON_NODE"
echo "TOTAL GPUS: $SLURM_TOTAL_GPUS"
echo "MACHINE RANK: $SLURM_NODEID"

# Run the Docker container with the script
srun bash -c 'docker run --pull always --rm \
 --env SLURM_MASTER_ADDR=$SLURM_MASTER_ADDR \
 --env SLURM_MASTER_PORT=$SLURM_MASTER_PORT \
 --env SLURM_TOTAL_GPUS=$SLURM_TOTAL_GPUS \
 --env SLURM_JOB_NUM_NODES=$SLURM_JOB_NUM_NODES \
 --env SLURM_NODEID=$SLURM_NODEID \
 --ipc=host \
 --network=host \
 --device=/dev/kfd \
 --device=/dev/dri \
 --shm-size=13G \
 --security-opt seccomp=unconfined \
 --group-add video \
 --privileged \
 -v $HOST_MOUNT:$CONTAINER_MOUNT \
 $DOCKER_IMAGE /bin/bash -c "echo $(date); cd /usr/src/app; \
 accelerate launch \
 --multi_gpu \
 --num_machines=$SLURM_JOB_NUM_NODES \
 --num_processes=$SLURM_TOTAL_GPUS \
 --machine_rank=$SLURM_NODEID \
 --main_process_ip=$SLURM_MASTER_ADDR \
 --main_process_port=$SLURM_MASTER_PORT \
 --mixed_precision=no \
 --dynamo_backend=no \
 $CONTAINER_MOUNT/classification_finetuning_phi35.py; echo $(date)"'
The Slurm bash script includes:
Slurm directives: The script usually starts with a set of directives (lines that start with #SBATCH), which specify the resources the job needs. Some of them are:
#SBATCH –job-name=<name> specifies a custom name for the job.
#SBATCH –nodes=<number> specifies the number of compute nodes required for the job.
#SBATCH –ntasks-per-node=<number> specifies the tasks or processes to be launched in each node.
#SBATCH –cpus-per-task=<number> specifies the number of CPUs allocated for each task.
#SBATCH –mem=0 specifies the amount of memory to allocate per node for the job. The number 0 implies allocating all the available memory.
#SBATCH –partition=
specifies the partition in which the job should be executed. A partition is a set of nodes, which allow administrators to allocate resources for specific workloads. #SBATCH –gres=gpu:8 specifies that the job requires eight GPUs on each allocated node.
#SBATCH –output=%x-%j.out directive that controls the filename for the standard output log.
#SBATCH –err=%x-%j.err directive that controls the filename for the standard error log.
#SBATCH –exclusive ensures that no other job can share the same node. The job will have all the node’s resources to itself.
#SBATCH –time=24:00:00 sets the maximum wall-clock time that the job is allowed to run. In this case it specifies a limit of 24 hours.
Note
For more information about Slurm directives, see the official Slurm documentation
Note
In the Slurm Bash script example,
#SBATCH --ntasks-per-node=1has been defined. This implies that only one task is launched on each node. This configuration allows Accelerate to automatically handle all the GPUs within a node.Note
To check the available partitions in a Slurm-managed system run the
sinfocommand. It will list all the available partitions in your system, the list of nodes in each partition, and their availability.Slurm environment variables: The Slurm bash script also specifies the commands needed to login into Docker Hub (with your
usernameandtoken), and defines several environment variables such as the IP address of the master node, the port used for communication, the name of the Docker image that will be pulled from the Docker Hub registry and the volume to be mounted when executing thedocker runcommand.Slurm command to launch the task: The Slurm bash script uses the
sruncommand. In this case,srunis used to launch the job allocation task by executing thedocker runcommand while passing the previous environment variables, defining several Docker arguments, and executing theaccelerate launchcommand:accelerate launch \ --multi_gpu \ --num_machines=$SLURM_JOB_NUM_NODES \ --num_processes=$SLURM_TOTAL_GPUS \ --machine_rank=$SLURM_NODEID \ --main_process_ip=$SLURM_MASTER_ADDR \ --main_process_port=$SLURM_MASTER_PORT \ --mixed_precision=no \ --dynamo_backend=no \ $CONTAINER_MOUNT/phi3_finetune.py
The
accelerate launchcommand automatically detects the available hardware resources (GPUs and CPUs) and configures the distributed training environment accordingly. Theaccelerate launchcommand accepts different types of parallelism by passing the necessary parameters (see Training Paradigm Arguments). By default, data parallelism is used. Theaccelerate launchcommand then proceeds to launch the Python scriptclassification_finetuning_phi35.pyin a distributed manner, ensuring the tasks are appropriately divided across the devices and processes. The additional arguments passed to theaccelerate launchcommand allow you to configure how the resources are distributed across different nodes and GPUs. In this example, the arguments passed are the values of the environment variables previously defined using the Slurm directives. For more information about Hugging Face Accelerate, see the Accelerate Documentation.
With the training infrastructure in place, the next step is executing and launching the multinode training job.
Running the Slurm bash script#
Follow the steps to initiate the multinode finetuning process:
Login into the login node
In a multinode environment, the first step consists of log into the head node (login node or jumpbox) of your distributed environment using the SSH protocol. The login node is the node where you can submit Slurm jobs using the
sbatchcommand. For example, to login into the node use thesshcommand:ssh your_username@login_nodeEnsure the Slurm bash script and Python script are ready
Make sure the bash script
multinode_finetuning_phi35_job.shand the python scriptclassification_finetuning_phi35.pyare located in the login node. From your local machine, you can upload them using thescpcommand or by editing them directly on the login node. Alternatively, you can usegit cloneto download the repository into the login node. For example, using thescpcommand you can upload them into the login with:scp multinode_finetuning_phi35_job.sh your_username@login_node:</your/login_node/local_folder>/multinode_finetuning/
and the Python script with:
scp classification_finetuning_phi35.py your_username@login_node:</your/login_node/local_folder>/multinode_finetuning/
where both files are uploaded to the directory
</your/login_node/local_folder>/multinode_finetuning/on the login node.Navigate to the login node directory
Back into the login node, navigate to the directory where your Slurm and Python scripts are located. For example:
cd </your/login_node/local_folder>/multinode_finetuning/
Submit the job using the sbatch command
Execute the Slurm Bash script using
sbatchcommand:sbatch multinode_finetuning_phi35_job.shCheck job status
After submitting the job, you can check the status of your job using the
squeuecommand:squeue -u your_username
Performance scaling across multiple nodes#
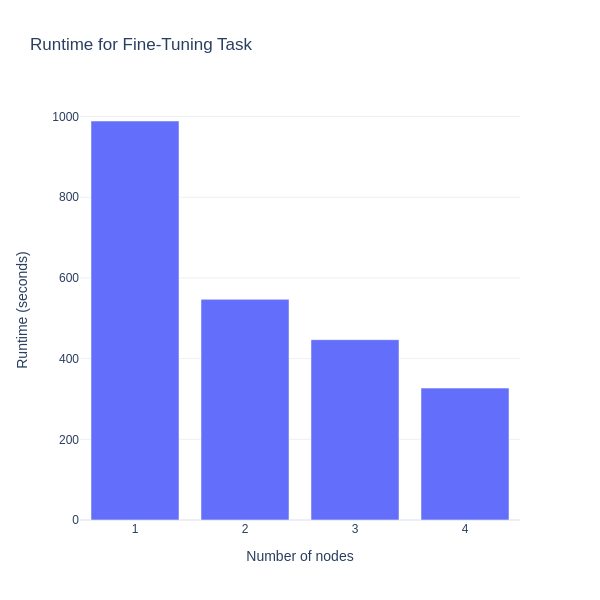
This section presents how performance improves when fine-tuning the Phi-3.5-mini-instruct LLM from Microsoft, using more nodes in distributed training. A cluster with several computational nodes, each with eight AMD Instinct™ MI300X GPUs is used. Starting with one node, then moving to two, and finally four, the time each setup takes to finish the fine-tuning task is compared. This comparison shows how scaling affects the training efficiency, highlighting that adding more nodes reduces training time, and makes large-scale fine-tuning feasible.
Adjusting the number of nodes with the Slurm directive #SBATCH --nodes, the following chart displays the time required to finish the fine-tuning tasks in relation to the number of nodes used:
Summary#
This blog has demonstrated how to effectively fine-tune the Phi-3.5-mini-instruct LLM from Microsoft, using multinode training with the Hugging Face Accelerate library and Slurm workload manager. The combination of Docker for containerization and Docker Hub for image distribution across multiple nodes showcases an efficient and scalable approach for training the LLMs. As the training scales from one to multiple nodes, a substantial reduction in training time, highlighting the benefits of parallelization in a distributed environment is observed. By leveraging a cluster equipped with AMD Instinct™ MI300X GPUs, this setup demonstrated the capability of modern hardware to handle large-scale LLM fine-tuning tasks.
Disclaimers#
Third-party content is licensed to you directly by the third party that owns the content and is not licensed to you by AMD. ALL LINKED THIRD-PARTY CONTENT IS PROVIDED “AS IS” WITHOUT A WARRANTY OF ANY KIND. USE OF SUCH THIRD-PARTY CONTENT IS DONE AT YOUR SOLE DISCRETION AND UNDER NO CIRCUMSTANCES WILL AMD BE LIABLE TO YOU FOR ANY THIRD-PARTY CONTENT. YOU ASSUME ALL RISK AND ARE SOLELY RESPONSIBLE FOR ANY DAMAGES THAT MAY ARISE FROM YOUR USE OF THIRD-PARTY CONTENT.