Retrieval Augmented Generation (RAG) with vLLM, LangChain and Chroma#
 with vLLM, LangChain and Chroma")
In this blog from the AMD Silo AI Programs, we build a simple Retrieval‑Augmented Generation (RAG) pipeline. While pretrained models are powerful, they lack access to proprietary or enterprise-specific knowledge. RAG closes that gap by retrieving relevant enterprise knowledge and injecting it into the prompt so the model can produce context‑aware answers. For enterprises, RAG systems offer an efficient way to query their knowledge bases and deliver relevant information to their users.
How a general RAG pipeline works (see Figure 1 below):
Submit - The user submits a query
Retrieve - Based on the user’s query, an integrated vector store retrieves relevant chunks of information (context)
Augment - The retrieved context is combined with the user query to form a prompt
Generate - The model uses the augmented prompt to produce a context-aware answer
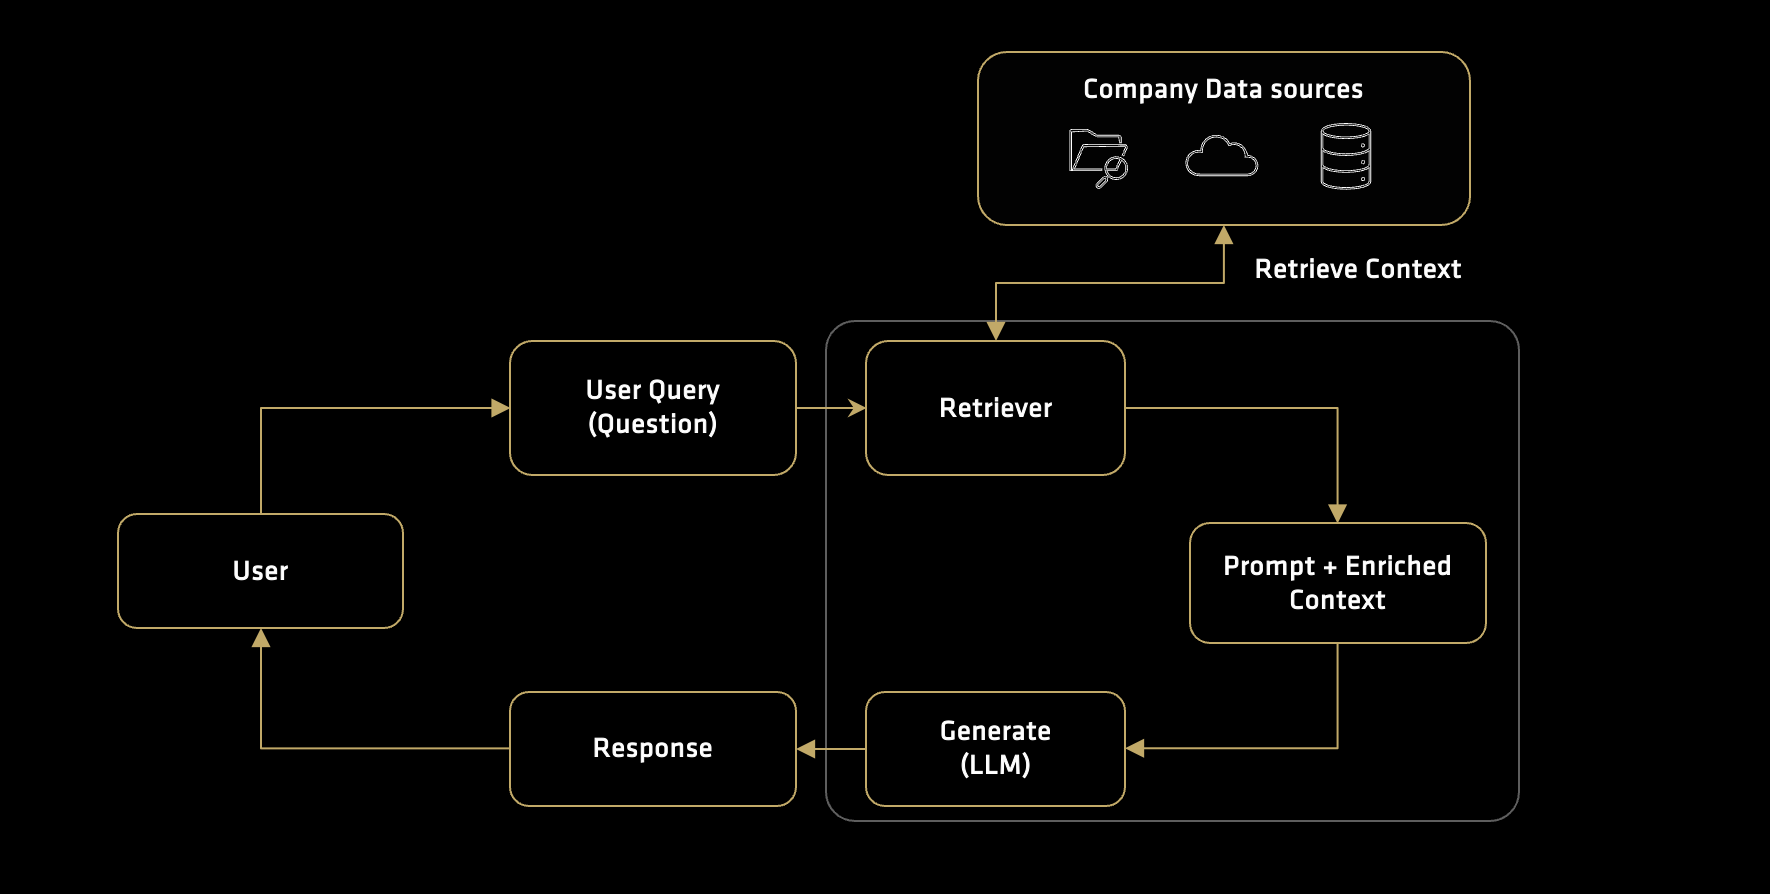
Figure 1: Overview of a RAG pipeline.
This blog provides a practical and introductory step-by-step guide to building a RAG pipeline with vLLM, LangChain, and Chroma. AMD provides tutorials on alternative frameworks listed here:
RAG with LlamaIndex: This blog uses the LlamaIndex framework and Hugging Face’s text generation
RAG with LangChain and FAISS: This guide also uses LangChain but pairs it with FAISS for vector storage, providing an alternative to the ChromaDB setup demonstrated in this post
From Ingestion to Inference: RAG Pipelines on AMD GPUs: This guide explores the ROCm RAG repository, which offers a more advanced, modular setup with multiple framework options like Haystack and LangGraph
Blog structure#
In this blog, we’ll create and run each component individually:
Prepare the environment
Serve the language model with vLLM
Create a Chroma vector store and ingest text
Retrieve relevant chunks of data and augment the model prompt
Run end‑to‑end queries and inspect responses
Prerequisites#
To get started, you’ll need a system that satisfies the following:
GPU: This tutorial was tested on an AMD Instinct MI300X GPU. Ensure that you are using an AMD Instinct GPU or another compatible GPU with ROCm support.
Host system: Meets ROCm system requirements.
ROCm 6.4: Install and verify ROCm by following the official ROCm install guide. Verify your ROCm installation by running this command in your terminal:
rocm-smi
Docker: Ensure Docker is installed and configured correctly. Follow the Docker installation guide for your operating system.
Prepare the environment#
Pull the Docker image#
Pull the vLLM Docker image required for this tutorial:
docker pull rocm/vllm:rocm6.4.1_vllm_0.10.1_20250909
vLLM is an open-source library optimized for high-throughput, low-latency large language model (LLM) inference. It introduces a novel memory management system called PagedAttention, which enables efficient handling of multiple concurrent requests while maximizing GPU utilization.
When used with AMD ROCm, vLLM takes advantage of ROCm’s optimized kernels and runtime to accelerate inference on AMD Instinct GPUs (e.g. the MI300 series). The ROCm-enabled vLLM Docker images include all necessary dependencies for running large models efficiently on AMD hardware.
The docker image and the vLLM serve command are based on the following guide.
Launch the Docker container#
Run the following command to start the container:
docker run -it --rm \
    -p 8888:8888 \
    --device=/dev/kfd \
    --device=/dev/dri \
    --group-add video \
    --shm-size 16G \
    --security-opt seccomp=unconfined \
    --security-opt apparmor=unconfined \
    -v $(pwd):/workspace \
    -w /workspace/notebooks \
    --env HUGGINGFACE_HUB_CACHE=/workspace \
    --name test \
    rocm/vllm:rocm6.4.1_vllm_0.10.1_20250909
Note
This command mounts the current directory (-v) to the /workspace directory in the container.
By default, passing –device /dev/dri grants access to all GPUs on the system. To limit a container to a specific subset of GPUs, you can instead pass in their individual device nodes. You can run the Docker container with access restricted to specific GPUs, as described in the ROCm documentation.
Install dependencies#
Install the dependencies inside the docker container using the following command:
pip install jupyter chromadb sentence_transformers langchain
Confirm the installation:
pip list | grep -E 'chromadb|jupyterlab|sentence-transformers|langchain'
Output:
chromadb                                 1.1.1
jupyterlab                               4.4.9
jupyterlab_pygments                      0.3.0
jupyterlab_server                        2.27.3
jupyterlab_widgets                       3.0.15
langchain                                0.3.27
langchain-core                           0.3.78
langchain-text-splitters                 0.3.11
sentence-transformers                    5.1.1
Start the Jupyter server:
jupyter-lab --ip=0.0.0.0 --port=8888 --no-browser --allow-root
Note
Ensure port 8888 is not already in use on your system before running the above command. If it is, you can specify a different port by replacing –port=8888 with another port number, for example, –port=8890 (ensure the docker container has the port open). If you wish to use another interpreter like iPython, that is possible. Depending on your setup, you might need to open a new terminal on your local machine and run: ssh -L 8888:localhost:8888 username@remote-hostname to access Jupyter.
Notebook and Terminal#
For the next steps, you need to open both a terminal window and a notebook window in Jupyter:
The terminal window will be used to start the vLLM server
The notebook window will be used to run the Python code and interact with the model
How to open the windows in Jupyter:
In Jupyter, click the “+” (Launcher) button or go to the File menu (New->)
Select Terminal to open a new terminal window
Select Notebook to open a new notebook
Start the vLLM server#
In this blog, we use the Qwen3-30B-A3B model. The model supports switching between thinking mode (complex reasoning) and non-thinking mode (general purpose dialogue). See the model card on Hugging Face to learn more about it. If you wish to use another model, that is possible, however note that some models require access authorization prior to use via an external license agreement.
Open the terminal and start the vLLM server using the following command:
The
vllm servecommand accepts many arguments, such as the model context length, dtype and more. For a full list, see the official vLLM documentation. The arguments used in this guide are from the ROCm documentation for this specific model.
model="Qwen/Qwen3-30B-A3B"
tp=1
dtype="auto"
kv_cache_dtype="auto"
max_num_seqs=256
max_seq_len_to_capture=32768
max_num_batched_tokens=32768
max_model_len=8192

vllm serve $model \
    -tp $tp \
    --dtype $dtype \
    --kv-cache-dtype $kv_cache_dtype \
    --max-num-seqs $max_num_seqs \
    --max-seq-len-to-capture $max_seq_len_to_capture \
    --max-num-batched-tokens $max_num_batched_tokens \
    --max-model-len $max_model_len \
    --no-enable-prefix-caching \
    --host 0.0.0.0 \
    --port 3000 \
    --swap-space 16 \
    --disable-log-requests \
    --trust-remote-code \
    --gpu-memory-utilization 0.9
Wait until the model has loaded and the server is ready to accept requests. After successfully connecting, it will display - INFO: Application startup complete.
Query the server#
With the vLLM server running, open the notebook and run the code below to send a test request through the /v1/chat/completions endpoint (verifies connectivity and configuration). The thinking mode has been disabled (enable_thinking: False) as it’s not needed for this use case.
# Import libraries
import requests
import chromadb
from chromadb.utils import embedding_functions
from langchain_text_splitters import RecursiveCharacterTextSplitter
def query_vllm(system_prompt, user_query):
    """
    Query the vLLM server using the provided user question.
    """
    # Define URL
    vllm_url = "http://localhost:3000/v1/chat/completions"

    # Prepare the payload
    payload = {
        "model": "Qwen/Qwen3-30B-A3B",
        "messages": [
            {"role": "system", "content": system_prompt},
            {"role": "user", "content": user_query},
        ],
        # Disable reasoning
        "chat_template_kwargs": {"enable_thinking": False}
    }

    # Send the request to the vLLM server
    response = requests.post(vllm_url, json=payload)

    # Parse the response
    response_data = response.json()
    return response_data["choices"][0]["message"]["content"]
Note
Remember to match the vllm serve –port 3000 and the port indicated in the vllm_url (http://localhost:3000). If the port is already used by another application, you can modify the number.
# vLLM setup
system_prompt = "You are a helpful assistant. Answer the user's question. If you don't know the answer, say you don't know."
test_query = "What is the capital of France?"

# Query
test_result = query_vllm(system_prompt=system_prompt, user_query=test_query)
print(test_result)
If the connection is successful, you should receive an answer similar to the one below. The exact phrasing may vary slightly between runs, which is expected behaviour for LLMs:
The capital of France is Paris.
The usefulness of a RAG system#
Let’s first use the language model directly without the RAG pipeline. For illustration purposes, ask the model about some fictional information that is unlikely to be present in its training data. This will help demonstrate how the model responds when queried about topics or facts it has not encountered before.
# Prepare the system and user prompts
system_prompt = "You are a helpful assistant. Answer the user's question. If you don't know the answer, say you don't know."
test_query = "What is the manufacturing ID of product ABC made by the fictional company XYZ Corp?"

# Query
test_result = query_vllm(system_prompt=system_prompt, user_query=test_query)
print(test_result)
I don't have access to specific product information or internal databases, so I don't know the manufacturing ID of product ABC made by XYZ Corp.
In this case the model can’t answer the question or it might even hallucinate one. This is expected as the model has no prior information about the XYZ Corp.
Note
When asked about topics outside its training data, a model may generate confident but incorrect content, this is referred to as “hallucination”.
We can provide additional context to the model by including relevant information in the system prompt or user message. This guides the model to generate more accurate and informed responses, especially when the information is not present in its training data.
Next, we define a helper function to check whether the model’s answer is supported by the provided context. Pay attention to how the system prompt is modified and the context is passed. The expected answer is provided outside the query so you can compare it to the generated output.
def test_rag_scenario(context, query, answer=None):
    """
    Query the vLLM server using the provided user question and prompt
    """
    print("\n--- Testing RAG Scenario ---")
    print(f"Question: {query}")
    if answer:
        print(f"Expected Answer: {answer}\n")

    system_prompt = (
        "You are a helpful AI assistant. Answer the user's question based only on the provided context. "
        "If the answer is not in the context, say you don't know."
    )
    user_message = (
        f"Here is the context:\n---\n{context}\n---\n"
        f"Based on only the context above, answer the following question: \nQuestion: {query}\nAnswer:"
    )

    print("\n--- Query (user query sent to model) ---")
    print(system_prompt)
    print(user_message)

    response = query_vllm(system_prompt=system_prompt, user_query=user_message)
    print("\n--- Generated response ---")
    print(f"{response}")
Using the function above, repeat the same question as before, but this time include a context that contains the answer.
# Example context
context = """
Product specification - XYZ Corp:
- Product ABC - ID: 12345
- Product ABC - Name: Widget
- Product ABC - Description: A useful widget
- Product ABC - Price: $19.99
"""

# Query
test_query = "What is the manufacturing ID of product ABC made by the fictional company XYZ Corp?"

# Expected answer
true_answer = "12345"

# Test the RAG scenario
test_rag_scenario(context=context, query=test_query, answer=true_answer)
Since the context is now provided, the model is able to answer the question:
Output truncated for readability.....

--- Generated response ---
Answer: 12345
Setting up Chroma#
For longer documents, it is neither efficient nor feasible to include their entire content directly in the prompt. Instead, we use vector databases to store these documents, enabling the model to retrieve relevant information:
Each document is split into chunks that are converted into vector representations using an embedding model
When a query is made, the system compares the query vector to the vectors in the database using a similarity measure, such as cosine similarity, to identify relevant information
The extracted context is then provided to the language model, allowing it to generate context-aware responses
For this purpose, we will use Chroma, an open-source vector database for storing and retrieving embeddings. In the next step, we will demonstrate how to split documents into chunks and add them to the vector database for improved semantic search and retrieval.
Configure embedding#
Chroma supports a wide range of embedding functions. We will use the default SentenceTransformers model all-MiniLM-L6-v2, a fast compact model turning text into embeddings.
# Initialize the embedding function using SentenceTransformer
embedding_model_name = "all-MiniLM-L6-v2"
sentence_transformer_ef = embedding_functions.SentenceTransformerEmbeddingFunction(
    model_name=embedding_model_name)
Create a vector database#
Create the Chroma database with the selected embedding function. Set chroma_data_path as the local storage directory. Chroma will store its files there. After running the cell below, a “chroma_db_storage” folder will appear in your workspace directory.
chroma_data_path = "chroma_db_storage" # Local path to store the ChromaDB database
collection_name = "rag_documents" # Name of the collection

# Initialize a persistent ChromaDB client
# This will save data to the chroma_data_path directory
client = chromadb.PersistentClient(path=chroma_data_path)

# Get or create the collection with the specified embedding function
# The embedding function will be used to convert text to vectors
collection = client.get_or_create_collection(
    name=collection_name,
    embedding_function=sentence_transformer_ef
)
print(f"ChromaDB client initialized. Collection '{collection_name}' loaded/created.")
print(f"Number of items in collection before adding: {collection.count()}")
Add documents#
Now, define a set of example documents as strings to add to the vector database. In a real-world scenario, these documents would typically come from your organization’s knowledge base, such as files, databases, or other sources. LangChain supports many document loaders and the right one to use depends on your use case. In this tutorial, we’ll use simple text snippets.
example_text = """
Marketing Strategy Overview - 2022:
- Objective: Increase brand awareness and customer engagement
- Target Audience: Segment A
- Key Channels: Social media, influencer partnerships, and content marketing
- Metrics for Success: Website traffic, social media engagement, and lead generation

Customer Segmentation Report - Q1 2023:
- Segment A: Loyal customers, low frequency buyers
- Segment B: Price-sensitive customers
- Segment C: Occasional buyers, with a focus on seasonal promotions
- Segment D: Loyal customers, engaged through our rewards program

Annual report XYZ - Q1 2023:
- Revenue: $200M
- EBIT: $50M
- Profit: $10M

Annual report XYZ - Q1 2022:
- Revenue: $180M
- EBIT: $30M
- Profit: $5M

Product specification - XYZ Corp:
- Product ABC - ID: 12345
- Product ABC - Name: Widget
- Product ABC - Description: A useful widget
- Product ABC - Price: $19.99
"""
The example text is short enough to fit directly into a prompt right away. However, in a real scenario you might have several hundred pages, too much for a model to process at once. To handle this you need to split your text into smaller chunks.
The RecursiveCharacterTextSplitter from LangChain breaks long documents into manageable, chunks using a hierarchy of separators (e.g. paragraphs to sentences and then to words). Each chunk can then be added to the vector database for retrieval.
# Use LangChain's RecursiveCharacterTextSplitter for chunking
text_splitter = RecursiveCharacterTextSplitter(
    chunk_size=200, # Set chunk size to 200 characters
    chunk_overlap=0 # Set chunk overlap to 0 characters
)
chunks = text_splitter.split_text(example_text)

# Prepare ids for all chunks
chunk_ids = [f"chunk_{i}" for i in range(len(chunks))]

# Add chunks to collection
collection.add(documents=chunks, ids=chunk_ids)

print(f"Added {len(chunks)} chunks. Total items in collection: {collection.count()}")
print('Chunks added successfully.')
print('\n------\n')
for i in range(len(chunks)):
    print(f"Chunk - {i} ID: \n {chunks[i]}")
The original text has been split into six chunks and added to the database. You can now retrieve each chunk by querying the database.
Query the database#
To provide relevant context to the language model, you first retrieve the most similar pieces of information (chunks) from the vector database based on your query. This step uses semantic search to find the chunks that are most closely related to your question. These chunks are then added to the prompt.
To find the manufacturing ID of product ABC, use the following parameters:
query_texts: The question you want to answer e.g., “What is the manufacturing ID of product ABC made by the fictional company XYZ Corp?”n_results: The number of most relevant chunks to retrieve from the database (e.g., 1)
results = collection.query(
    query_texts=[test_query],
    n_results=1,
    include=['documents']
    )

print(f'Query: {test_query}')
for doc in results['documents'][0]:
    print("\n--- Retrieved chunk ---")
    print(f"Document: {doc}")
You can now retrieve documents relevant to a query. To simplify retrieval, define the helper function below:
def query_chroma(query_text, n_results=2):
    """
    Queries the ChromaDB collection and returns the most relevant documents.
    """
    print(f"\n--- Querying ChromaDB ---")
    results = collection.query(query_texts=[query_text], n_results=n_results, include=['documents'])

    retrieved_docs_text = []
    if results and results.get('documents') and results['documents'][0]:
        for i, doc_text in enumerate(results['documents'][0]):
            print(f"\nRetrieved Chunk #{i+1}:")
            print(f"Text: {doc_text[:200]}...") # Print snippet
            retrieved_docs_text.append(doc_text)
    else:
        print("No relevant documents found in ChromaDB for this query.")
    return "\n\n".join(retrieved_docs_text) # Join retrieved docs into a single context string
Note
The number of chunks to retrieve (n_results) is a key hyperparameter. While a single chunk was sufficient here, complex queries might require information from multiple chunks. However, retrieving too many chunks can add noise and irrelevant context, potentially degrading the model’s performance. Finding the optimal value for n_results often requires experimentation and evaluation based on your specific use case.
Build the RAG pipeline#
Combine the code that queries the vLLM server with the retrieved context to construct the RAG pipeline.
# User Query
user_query = "What is the manufacturing ID of product ABC made by the fictional company XYZ Corp?"
true_answer = "12345"

# Retrieve context from Chroma
retrieved_context_for_llm = query_chroma(query_text=user_query, n_results=2)

# Test the RAG scenario
test_rag_scenario(context=retrieved_context_for_llm, query=user_query, answer=true_answer)
The answer is now accurate (i.e. the manufacturing ID is 12345), as the model has received the domain specific information it was not trained on:
Output truncated for readability.....

--- Generated response ---
The manufacturing ID of product ABC made by the fictional company XYZ Corp is 12345.
Here is another example:
# User Query
user_query = "What was the target audience based on the marketing strategy from 2022?"
true_answer = "Segment A"

# Retrieve context from ChromaDB
retrieved_context_for_llm = query_chroma(user_query, n_results=2)

# Test the RAG scenario
test_rag_scenario(context=retrieved_context_for_llm, query=user_query, answer=true_answer)
Output truncated for readability.....

--- Generated response ---
Answer: The target audience was Segment A.
You’ve now built a foundational RAG pipeline, but this is just the beginning! We encourage you to take the next step and experiment. Try creating more elaborate prompts, adding your own custom documents, or even swapping in a different embedding model to see how the performance changes.
Summary#
In this blog, we’ve demonstrated how to:
Set up and configure a vLLM server for model inference
Create a vector database using Chroma for document storage and retrieval
Implement semantic search to find relevant context for queries
Build a simple RAG pipeline that enhances LLM responses with domain-specific knowledge
The key benefits for readers include:
Practical, hands-on experience with RAG implementation
Understanding of core RAG components and how they work together
Experience with industry-standard tools like vLLM, LangChain, and Chroma
For those interested in exploring different RAG implementations, AMD provides several complementary guides (see the beginning of this blog). For more information about the individual libraries, refer to the documentation (vLLM, Chroma, LangChain).
Disclaimers#
Third-party content is licensed to you directly by the third party that owns the content and is not licensed to you by AMD. ALL LINKED THIRD-PARTY CONTENT IS PROVIDED “AS IS” WITHOUT A WARRANTY OF ANY KIND. USE OF SUCH THIRD-PARTY CONTENT IS DONE AT YOUR SOLE DISCRETION AND UNDER NO CIRCUMSTANCES WILL AMD BE LIABLE TO YOU FOR ANY THIRD-PARTY CONTENT. YOU ASSUME ALL RISK AND ARE SOLELY RESPONSIBLE FOR ANY DAMAGES THAT MAY ARISE FROM YOUR USE OF THIRD-PARTY CONTENT.