Building a GPU-Resident YOLO26 Object Detection Pipeline on the AMD Radeon™ AI PRO R9700 GPU#

Modern AMD GPUs include a dedicated hardware block for video processing called the Video Core Next (VCN) engine. By chaining VCN directly into machine learning frameworks, you can build an object detection pipeline where a video frame stays in VRAM from decode to the final bounding boxes. The host sees only the surviving detections.
In this guide, we build that pipeline on AMD ROCm™ software 7.2, using Ultralytics YOLO26 as the detector. The complete source code for this tutorial lives in the companion GitHub repository.
We integrate three core components:
rocDecode and its Python bindings rocPyDecode: A ROCm library that decodes compressed video directly on AMD GPUs using the on-chip VCN engines.
DLPack: A standard tensor memory layout that allows frameworks to exchange GPU buffers without making redundant memory copies.
MIGraphX: The AMD graph inference engine that compiles and runs optimized deep learning models natively on AMD GPUs.
Pipeline Architecture: rocDecode to DLPack to MIGraphX#
There are two common approaches for video pipelines: decoding on the CPU with inference on the GPU, or both on the GPU. This guide takes the second approach. Decoding runs on the VCN block, separate from the compute cores that run PyTorch and MIGraphX. Neither the CPU nor the GPU compute cores are involved in the decoding process itself.
As shown in the architecture diagram, the pipeline consists of four GPU-resident stages. A video packet is decoded into a device buffer, exposed as a DLPack tensor, preprocessed in PyTorch, and handed to MIGraphX. YOLO26’s end-to-end head emits final detections directly, so PyTorch only undoes the letterbox before returning survivors to the host.
This approach frees the host CPU for the work that runs after detection: trackers, downstream models, application logic. GPU decoding also reduces PCIe traffic, because only the compressed bitstream crosses the bus instead of every raw frame.
The DtoH copy shown at the end of the diagram is a demo-only artifact: the output video has to be drawn on the host.
Prerequisites and Setup#
Hardware: A ROCm-supported AMD GPU with a VCN-capable video engine, such as AMD Radeon™ AI PRO R9700 or AMD Instinct™ MI300X / MI325X / MI350X / MI355X GPUs. For the codec-by-architecture support matrix, see the rocDecode formats and architectures reference.
Host software: A working ROCm installation and Docker Engine.
Container: ROCm 7.2.2 with PyTorch 2.10.0 and Python 3.10 on Ubuntu 22.04 (exact tag below).
Launch the container. Use the rocm/pytorch Docker image with GPU-access flags. HIP_VISIBLE_DEVICES=0 pins the container to the first AMD GPU. On a host with multiple DRM render nodes (integrated plus discrete, or several discretes), set the index of the GPU you want to target.
docker run -it --rm \
  --device=/dev/kfd \
  --device=/dev/dri \
  --network host \
  --ipc host \
  --group-add video \
  --cap-add=SYS_PTRACE \
  --security-opt seccomp=unconfined \
  -e HIP_VISIBLE_DEVICES=0 \
  -v $(pwd):/workspace -w /workspace \
  rocm/pytorch:rocm7.2.2_ubuntu22.04_py3.10_pytorch_release_2.10.0
Install and verify rocDecode. The rocDecode packages come from the rocm repository, already configured in the base image. Their libva backend comes from the AMD graphics repository, which we add below:
echo "deb [arch=amd64 signed-by=/etc/apt/keyrings/rocm.gpg] \
  https://repo.radeon.com/graphics/latest/ubuntu jammy main" \
  > /etc/apt/sources.list.d/amdgpu-graphics.list

apt-get update -y
apt-get install -y \
  rocdecode rocdecode-dev rocdecode-host \
  rocpydecode rocjpeg rocjpeg-dev libdlpack-dev
pip install onnx rich opencv-python-headless

export LD_LIBRARY_PATH=/opt/rocm/lib:$LD_LIBRARY_PATH
export PYTHONPATH=/opt/rocm/lib:$PYTHONPATH

python3 -c 'import pyRocVideoDecode.decoder, migraphx; print("Libraries loaded successfully!")'
Compile the model#
MIGraphX runs the detector from an ONNX graph. Every variant of the Ultralytics YOLO26 family shares the same end-to-end head, so the pipeline works with any of them. That head emits a [1, 300, 6] tensor ([x1, y1, x2, y2, conf, class_id] per row) and skips NMS.
Ultralytics provides the tooling to export the model to ONNX format; see their export documentation for details. MIGraphX then compiles that ONNX into a GPU-tuned .mxr binary:
import migraphx

model = migraphx.parse_onnx("yolo26s.onnx")

# FP16 quantization speeds up model inference without accuracy drop
migraphx.quantize_fp16(model)

# offload_copy=False exposes the output as a named parameter so we can bind
# a pre-allocated PyTorch tensor to it at inference time (see Step 3).
model.compile(migraphx.get_target("gpu"), offload_copy=False)

migraphx.save(model, "model.mxr")
Step 1: GPU-native decoding with rocDecode#
The input is an MP4 or MKV file with H.264 or H.265 video. This guide uses peloton_sample_ai_gen.mp4, a 15-second 1920×1080 H.264 cycling clip shipped alongside the source code in the companion GitHub repository. This sample clip is fully AI-generated and provided for demonstration purposes only; it is upscaled with FFmpeg’s lanczos filter from a 1280×704 source on an AMD Instinct™ MI350X GPU with ROCm 7.2.
Sample media generated using Qwen-Image-2512 and Wan 2.2 I2V-A14B (Apache 2.0 licensed models).
Two rocPyDecode components turn the file into GPU-resident frames:
The demuxer splits the container into elementary video packets and reports the codec id, which we pass to the decoder.
The decoder runs on the VCN engine and produces a decoded frame in VRAM for each packet. rocPyDecode can deliver the frame either as a raw NV12 surface or already converted to RGB on the GPU. We use the second path (
GetFrameRgb) so PyTorch sees a ready-to-consume[H, W, 3]tensor. We also pick the device-copied output mode: the decoder owns each surface, keeps it in DLPack-wrappable memory, and recycles it on the next call. The lower-overhead device-internal mode saves one intra-VRAM copy but requires the caller to manage the surface lifetime; see the rocDecode documentation for details.
Set up the demuxer and decoder#
Build the demuxer/decoder pair and pin them to the first HIP device:
from pyRocVideoDecode.decoder import decoder, GetRocDecCodecID
from pyRocVideoDecode.demuxer import demuxer
from pyRocVideoDecode.types import OUT_SURFACE_MEM_DEV_COPIED

input_path = "peloton_sample_ai_gen.mp4"  # H.264 / H.265 in MP4 or MKV

demux = demuxer(input_path)
codec_id = GetRocDecCodecID(demux.GetCodecId())

viddec = decoder(
    codec_id,
    device_id=0,                          # first HIP device
    mem_type=OUT_SURFACE_MEM_DEV_COPIED,  # own VRAM surface, DLPack-safe
    b_force_zero_latency=False,           # emit frames in display order
    crop_rect=None,                       # full frame
    max_width=0,                          # 0 = use demuxer's width
    max_height=0,                         # 0 = use demuxer's height
    clk_rate=1000,                        # timestamp resolution (ms)
)
We keep display order because the demo writes the detections back to a video file. For detection-only loops where frame order does not matter, set b_force_zero_latency=True instead to emit each frame as soon as it is decoded.
Decode and wrap as a PyTorch tensor#
GetFrameRgb(packet, rgb_format) decodes the next packet and converts the result from NV12 to interleaved 8-bit RGB on the GPU in a single step. We use rgb_format=3 for RGB; rgb_format=1 would deliver BGR instead. The converted surface is exposed through packet.ext_buf[0] and we wrap it with from_dlpack as a [H, W, 3] PyTorch view without copying. The view is valid only until ReleaseFrame, so anything that must outlive the iteration has to be cloned.
Note (rocPyDecode 0.8.0 / rocm/pytorch:rocm7.2.2): The DLPack capsule for the RGB surface advertises strides=(W*3, 1, 0) for an [H, W, 3] shape. The helper restores the correct strides (W*3, 3, 1) with torch.Tensor.as_strided and clamps the height to H - 1 to stay within declared storage. The missing bottom row has no measurable effect on detection: the preprocessing step letterbox-pads the frame to 640×640 anyway.
Define the helper once, before the decode loop calls it:
import torch

def decoded_rgb_view(packet) -> torch.Tensor:
    raw = torch.from_dlpack(packet.ext_buf[0])
    H, W = raw.shape[:2]
    return raw.as_strided((H - 1, W, 3), (W * 3, 3, 1))
With the helper in scope, the decode loop is a straight call sequence:
packet = demux.DemuxFrame()
n_frames = viddec.DecodeFrame(packet)

for _ in range(n_frames):
    pts = viddec.GetFrameRgb(packet, rgb_format=3)
    if pts == -1:
        viddec.ReleaseFrame(packet)
        continue

    rgb = decoded_rgb_view(packet)  # [H, W, 3] uint8, cuda

    # ... preprocess / inference / draw ...

    viddec.ReleaseFrame(packet)  # return the surface to the decoder pool
Step 2: GPU-native preprocessing with PyTorch#
With rgb resident on the GPU, we run YOLO preprocessing natively in PyTorch using torch.nn.functional. Reshape, normalization, resize, and letterbox pad each allocate a new device tensor on the active PyTorch stream, the same stream MIGraphX uses in Step 3. None of these steps touch host memory.
import torch.nn.functional as F

def preprocess_color_layout(rgb_tensor: torch.Tensor) -> torch.Tensor:
    tensor = rgb_tensor.permute(2, 0, 1).unsqueeze(0)  # HWC -> BCHW
    return tensor / 255.0                              # [0, 255] -> [0.0, 1.0]
Next, resize and letterbox-pad to the 640×640 model input with a uniform scale. The geometry helper is split out so postprocess can reuse it to undo the letterbox:
def letterbox_geometry(h: int, w: int, target: int = 640) -> tuple:
    scale = min(target / w, target / h)
    # floor division matches YOLO's training-time letterbox convention
    pad_x = (target - int(w * scale)) // 2
    pad_y = (target - int(h * scale)) // 2
    return scale, pad_x, pad_y

def preprocess_spatial(tensor: torch.Tensor, target: int = 640) -> torch.Tensor:
    h, w = tensor.shape[2], tensor.shape[3]
    scale, pad_x, pad_y = letterbox_geometry(h, w, target)
    new_h, new_w = int(h * scale), int(w * scale)
    tensor = F.interpolate(tensor, size=(new_h, new_w), mode="bilinear", align_corners=False)
    padding = (pad_x, target - new_w - pad_x, pad_y, target - new_h - pad_y)
    tensor = F.pad(tensor, padding, value=114.0 / 255.0)  # YOLO letterbox gray
    return tensor.contiguous()
Step 3: GPU-native inference with MIGraphX#
MIGraphX executes the compiled .mxr model asynchronously on the active PyTorch stream. Pointing it at PyTorch tensor addresses eliminates framework-level copies, so both input and output stay on the GPU.
Load the model and discover parameter names#
By default a MIGraphX program owns its output buffer and copies the result to host after each run. Compiling with offload_copy=False instead exposes the output as a named parameter we can bind to a pre-allocated PyTorch tensor and keep on the GPU:
import migraphx
import torch

model = migraphx.load("model.mxr")

param_shapes = model.get_parameter_shapes()
input_name = "images"
output_name = next(name for name in param_shapes if name != input_name)

input_shape = param_shapes[input_name]
output_shape = param_shapes[output_name]
Pre-allocate the output tensor#
Allocate the output on the GPU once and wrap its device pointer as a MIGraphX argument. Reusing the argument across frames keeps per-frame work to a single pointer bind plus one kernel dispatch:
output_tensor = torch.empty_strided(
    output_shape.lens(), output_shape.strides(),
    dtype=torch.float32, device="cuda",
)
mgx_output_arg = migraphx.argument_from_pointer(output_shape, output_tensor.data_ptr())
Run inference per frame#
The per-frame call binds the preprocessed input and submits the graph on the active PyTorch stream. MIGraphX takes the stream handle as ihipStream_t, so its kernels stay ordered with the surrounding PyTorch work.
def run_inference(input_tensor: torch.Tensor) -> torch.Tensor:
    curr_stream = torch.cuda.current_stream()
    mgx_buffers = {
        input_name: migraphx.argument_from_pointer(input_shape, input_tensor.data_ptr()),
        output_name: mgx_output_arg,
    }
    model.run_async(mgx_buffers, curr_stream.cuda_stream, "ihipStream_t")
    return output_tensor
Step 4: GPU-native postprocessing with PyTorch#
MIGraphX returns the 1×300×6 detection tensor in letterboxed coordinates: four box corners, confidence, and class id per row. YOLO26’s end-to-end head does the selection itself, so postprocess collapses to a confidence filter, a coordinate rescale, and a single batched copy to the host.
The unused slots in this tensor are padded with zero-confidence rows, so a single threshold removes them along with any real low-confidence detections. We use 0.25, the Ultralytics default. We apply the threshold mask to the full tensor at once: filtering each column separately would force three device-to-host syncs to size each output, instead of one for the combined tensor:
def filter_predictions(raw: torch.Tensor, conf_thresh: float) -> torch.Tensor:
    preds = raw[0]                           # [300, 6]
    mask  = preds[:, 4] > conf_thresh
    return preds[mask].clone()               # [N, 6] survivors
The boxes still live in 640×640 letterboxed space, so undo the uniform scale and the letterbox padding in two batched ops, in place on the survivors tensor:
def transform_coordinates(survivors: torch.Tensor, scale: float, pad_x: int, pad_y: int) -> torch.Tensor:
    survivors[:, [0, 2]] = (survivors[:, [0, 2]] - pad_x) / scale
    survivors[:, [1, 3]] = (survivors[:, [1, 3]] - pad_y) / scale
    return survivors
A single survivors.cpu().numpy() transfers the result to the host. If the next consumer is another GPU stage (tracker, serializer, downstream model), that final copy is unnecessary too.
The four steps now compose into a minimal per-frame loop:
while True:
    # Step 1: Decoding: VCN demuxes and decodes the compressed bitstream on-chip
    packet = demux.DemuxFrame()
    for _ in range(viddec.DecodeFrame(packet)):  # one packet may yield 0-N frames
        if viddec.GetFrameRgb(packet, rgb_format=3) == -1:  # frame not ready
            viddec.ReleaseFrame(packet)
            continue

        # Step 2: Preprocessing (all on GPU, no host copies)
        # Fix DLPack strides, reorder HWC -> CHW, normalize to [0, 1],
        # record letterbox scale/padding, resize to 640x640.
        rgb                 = decoded_rgb_view(packet)
        chw                 = preprocess_color_layout(rgb)
        scale, pad_x, pad_y = letterbox_geometry(chw.shape[2], chw.shape[3])
        model_input         = preprocess_spatial(chw)

        # Step 3: Inference
        # MIGraphX runs the pre-compiled .mxr graph on the GPU,
        # returns a [1, 300, 6] tensor (x1, y1, x2, y2, conf, class_id).
        raw                 = run_inference(model_input)

        # Step 4: Postprocessing
        # Drop low-confidence boxes, map coords back to original frame resolution.
        # Only surviving detections are copied to the host.
        survivors           = filter_predictions(raw, conf_thresh=0.25)
        survivors           = transform_coordinates(survivors, scale, pad_x, pad_y)
        detections          = survivors.cpu().numpy()  # single batched DtoH
        viddec.ReleaseFrame(packet)

    if packet.bitstream_size <= 0:  # end-of-stream
        break
The full runnable sample is in the companion GitHub repository; its main.py adds command-line parsing and an OpenCV CPU decoding baseline on top of the snippets in this section.
Adapting to YOLO models that need NMS#
Older detectors such as the YOLO11 family use one-to-many label assignment and need NMS to deduplicate predictions. Two GPU-native primitives keep that step on-device: torchvision.ops.batched_nms or ultralytics.utils.ops.non_max_suppression. Either replaces the filter_predictions step; the rest of the loop is unchanged.
Running and Verifying on the GPU#
Use --decoder rocdecode to route decoding through VCN; --decoder opencv is a CPU baseline for the verification step below.
python3 main.py \
  --model model.mxr \
  --input peloton_sample_ai_gen.mp4 \
  --decoder rocdecode \
  --output output.mp4
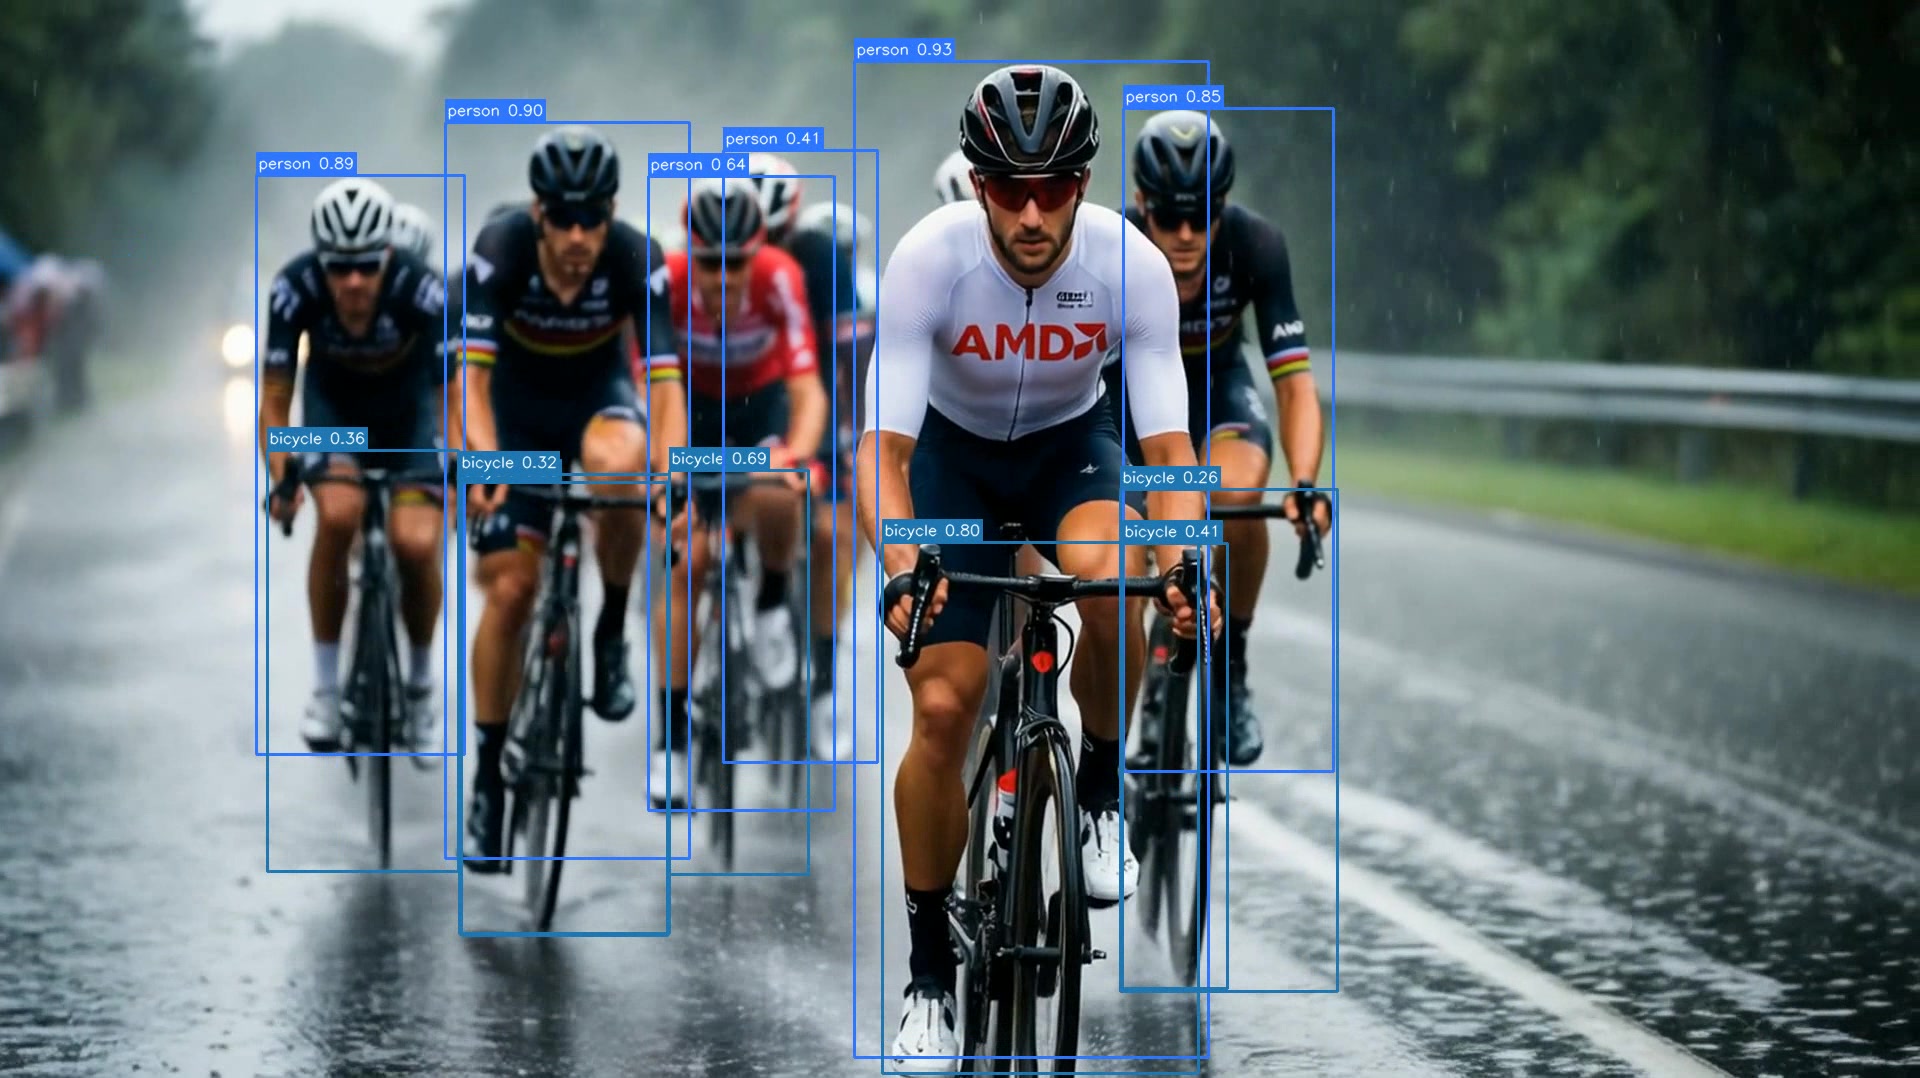
After processing, the output video contains the drawn detections:
The pipeline keeps tensors on the GPU until the final survivor copy; a stray .cpu() or host-side staging would break that silently. PyTorch asserts below fail fast if decode, preprocess, or inference drifts to the CPU.
assert rgb.is_cuda,         "decoder returned a CPU tensor"
assert model_input.is_cuda, "preprocess produced a CPU tensor"
assert raw.is_cuda,         "MIGraphX output is not on the GPU"
For a hardware-level view, sample per-engine activity with amd-smi:
# Print GPU 0 engine usage every second
amd-smi metric --usage -g 0 --watch 1 --watch_time 30
Each GPU exposes up to 4 VCN instances, so VCN_ACTIVITY is an array; entries beyond the physical engine count read N/A. The R9700 used in this guide reports one active engine and three N/A slots; datacenter Instinct™ SKUs expose more (see the rocDecode codec-and-architecture matrix). A representative output sample:
GPU: 0
    USAGE:
        GFX_ACTIVITY: 40 %
        UMC_ACTIVITY:  3 %
        MM_ACTIVITY:   9 %
        VCN_ACTIVITY: [9 %, N/A, N/A, N/A]
        ...
To see how this maps to the hardware over a longer run, we can plot the engine activity side-by-side. The figure below places the two runs panel by panel, tracing each engine’s utilization across the full clip.
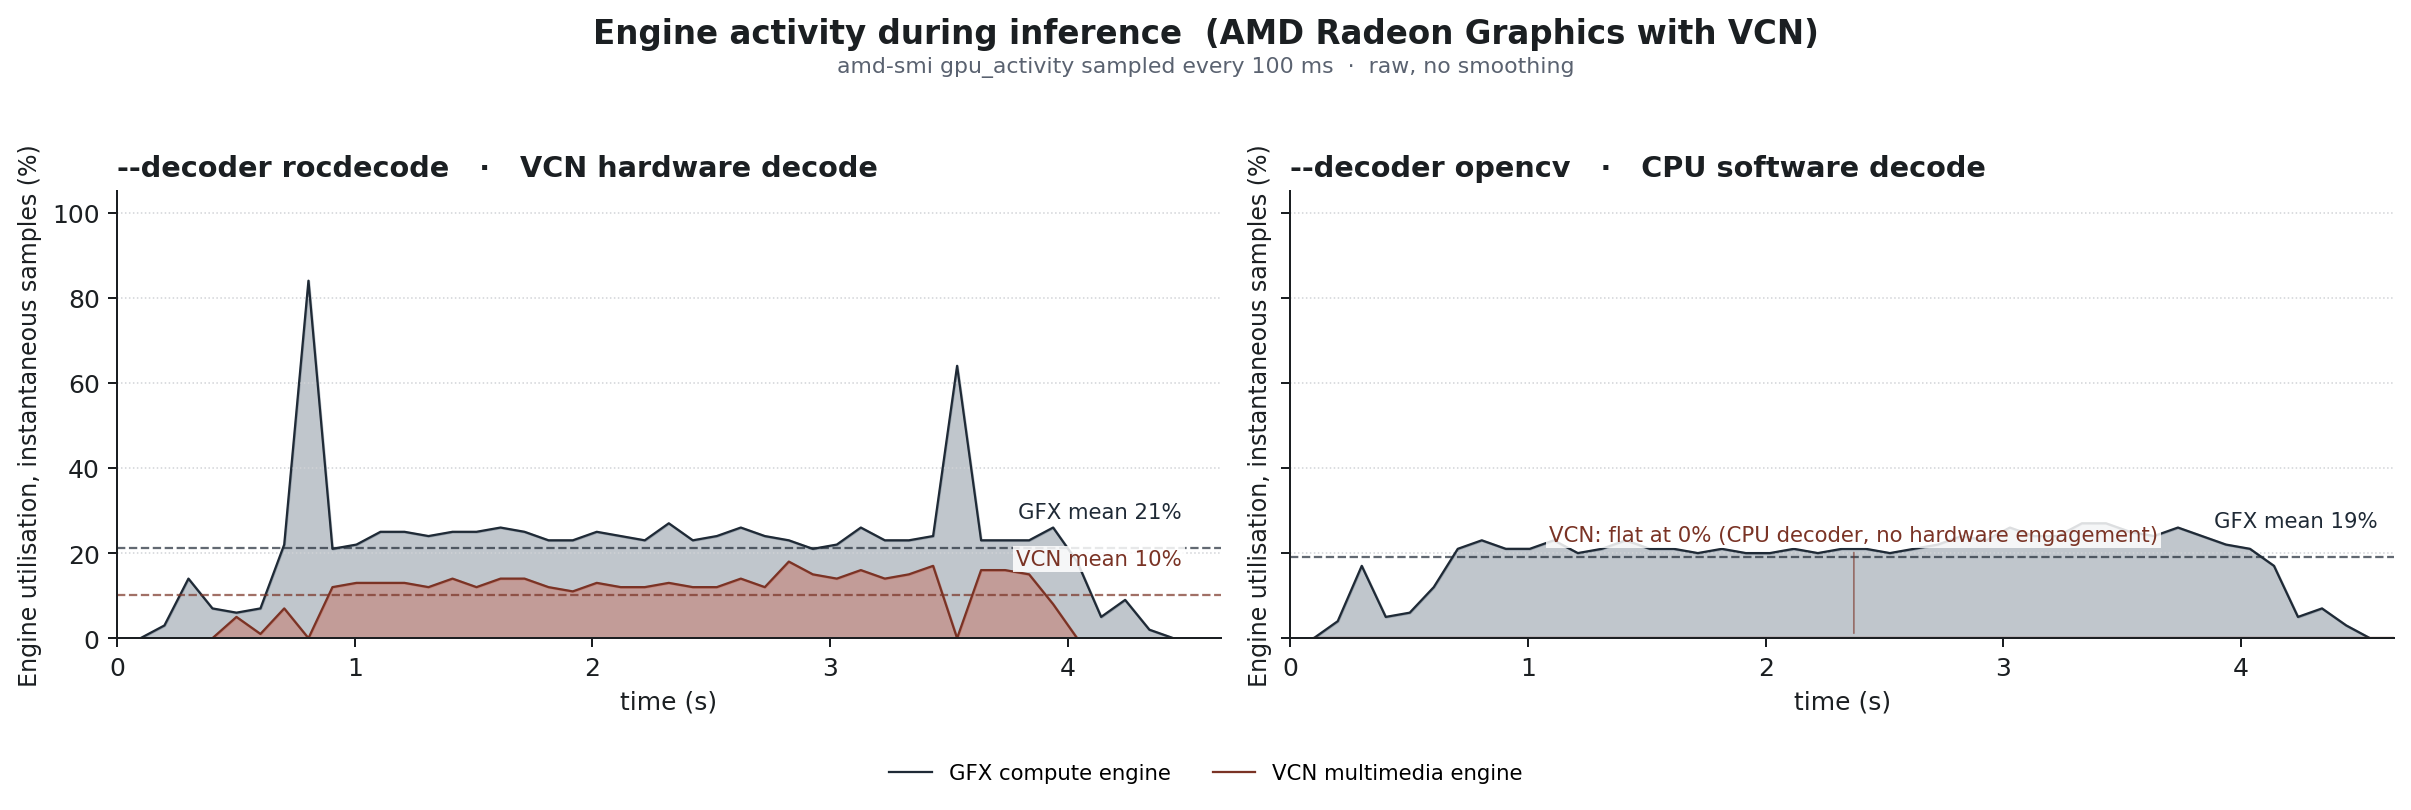
When using the rocDecode path, the VCN multimedia engine and the GFX compute engine run concurrently. VCN handles the compressed bitstream at a low, steady utilization (mean 10%1), visible as a continuous low fill in the chart; it is a fixed-function hardware block that decodes H.264/H.265 far faster than real-time for a single stream, so it spends most of its time waiting for the next frame. The GFX compute engine maintains a steady ~21%1 load executing the PyTorch preprocessing, MIGraphX inference, and the GetFrameRgb color conversion kernel.
Falling back to the OpenCV baseline disables the hardware decode path entirely. The VCN engine flatlines at 0% because the host CPU now decompresses the video. The GFX compute engine still runs the neural network pipeline, but its average load falls slightly (to ~19%1) because OpenCV delivers pre-converted RGB frames, sparing the GPU from the color conversion step.
For a timeline-level view, rocprofv3 shows per-engine VCN activity side by side with HIP kernel launches.
Summary#
Across this guide, we assembled a GPU-resident object detection pipeline in which rocDecode, DLPack, and MIGraphX exchange data through device pointers on ROCm 7.2. A frame is decoded on the VCN engine and stays in VRAM through preprocessing, inference, and postprocessing on a single PyTorch stream, so the host receives only the surviving detections. We verified the result with amd-smi: the VCN decode block and the GFX compute engine share the workload and run concurrently.
The same template adapts to other ROCm-supported AMD GPUs, from Radeon™ AI PRO workstations to Instinct™ accelerators.
The reference implementation has two intentional constraints:
Single-stream and serial by design. The tutorial uses a
batch=1model and a single Python thread that dispatches decode and inference serially. To scale up, you would decouple the engines: run decoder threads pushing DLPack tensors to a shared queue, and dedicate a PyTorch stream to pull from the queue, batch the frames, and run inference. You can compile the model with a fixed batch size (e.g.,batch=4) matching your camera count; dynamic shapes are only required if the number of active streams fluctuates at runtime.Codec coverage is bound to rocDecode. Only codecs listed in the rocDecode codec-and-architecture matrix route through VCN: H.264 and H.265 on most hardware, plus AV1 and VP9 on newer generations. For unsupported formats, remux the video into an MP4 or MKV container first.
Additional Resources#
rocJPEG Documentation, the still-image counterpart to rocDecode for single-image pipelines, which plugs into the same DLPack → MIGraphX path. See also rocJPEG decoding performance on AMD Instinct GPUs.
Endnote#
[1] Measured on AMD Radeon™ AI PRO R9700, ROCm 7.2.2, rocm/pytorch:rocm7.2.2_ubuntu22.04_py3.10_pytorch_release_2.10.0, yolo26s FP16, 1920×1080 H.264 input at 16 fps, batch=1, 15.2 s source clip (AI-generated, upscaled from 1280×704 to 1920×1080 with FFmpeg scale=1920:1080:flags=lanczos). Method: amdsmi.amdsmi_get_gpu_activity sampled every 100 ms; results are configuration-specific and may vary.
Disclaimers#
Third-party content is licensed to you directly by the third party that owns the content and is not licensed to you by AMD. ALL LINKED THIRD-PARTY CONTENT IS PROVIDED “AS IS” WITHOUT A WARRANTY OF ANY KIND. USE OF SUCH THIRD-PARTY CONTENT IS DONE AT YOUR SOLE DISCRETION AND UNDER NO CIRCUMSTANCES WILL AMD BE LIABLE TO YOU FOR ANY THIRD-PARTY CONTENT. YOU ASSUME ALL RISK AND ARE SOLELY RESPONSIBLE FOR ANY DAMAGES THAT MAY ARISE FROM YOUR USE OF THIRD-PARTY CONTENT.
Use of certain video codecs (including but not limited to H.264 / AVC, H.265 / HEVC, VP9, and AV1) may require licenses from third parties (such as MPEG LA, Via LA, the Alliance for Open Media, or other patent licensing pools or rights holders). It is the user’s responsibility to obtain any such licenses required for the user’s use of any such codecs. AMD provides no patent rights or licenses for the use of any such codecs through AMD products or technologies.