Elevate Your LLM Inference: Autoscaling with Ray, ROCm 7.0.0, and SkyPilot#

This blog explores autoscaling of inference workloads in Ray Serve with a vLLM backend on AMD Instinct™ GPUs for large language models (LLMs). Furthermore, you will learn how to scale beyond a single cluster using SkyPilot, which enables multicloud scaling for Ray Serve. Combined with the AMD ROCm™ software platform, this creates a unified, cloud-agnostic platform that scales distributed LLM inference from single-GPU to multi-cluster deployments.
AI inference workloads today demand significant computational power and are required to support large variations in user request traffic volume. This presents a challenge for model providers who aim to offer a good user experience while keeping infrastructure costs down. To address this, Anyscale™ developed Ray, a unified solution for scaling Python and AI applications from a laptop to a cluster without additional infrastructure. Ray’s general-purpose design allows it to efficiently run a wide variety of workloads, maintaining the same code seamlessly across different scales. Ray is open source, and AMD’s ROCm 7.0.0 software has provided integrated support for Ray since 2024, with vLLM backend support added more recently. In this blog, you will learn how to autoscale your ML inference infrastructure with ROCm 7.0.0 and Ray. You will also learn how to perform multi-node and multi-cluster scaling on SkyPilot, an open-source AI infrastructure orchestration framework that enables deployment across multiple clouds and Kubernetes clusters.
Ray Serve#
Ray provides a feature-rich library for scalable and programmable serving of LLMs known as Ray Serve LLM. The library offers Ray Serve primitives for distributed LLM serving workloads, with enterprise-grade features and an OpenAI-compatible API that aligns with vLLM server.
Ray Serve Autoscaling manages the scaling (up and down) of Ray model replicas based on the incoming request load. The Ray Serve Autoscaler operates as an application-level autoscaler layered on top of the Ray Autoscaler. Specifically, it directs Ray to initiate a certain number of replicas according to the number of requests. If the Ray Autoscaler identifies insufficient available resources like CPUs or GPUs to accommodate the traffic volume, it requests additional Ray nodes from the underlying cloud provider. Conversely, when Ray Serve reduces scale by terminating replicas, it aims to maximize idle nodes, enabling the Ray Autoscaler to efficiently remove them. In summary, the Ray Serve Autoscaler monitors metrics such as request rate, queue length, and processing time, and uses these signals to automatically adjust the number of model replicas based on traffic and resource usage.
The autoscaler makes these decisions continuously and reacts quickly to load changes. It helps applications handle unpredictable traffic without manual intervention. By scaling replicas up and down efficiently, Ray Serve keeps performance stable while controlling infrastructure costs.
Ray Serve autoscaling with vLLM has many use cases for LLM-based applications such as:
Inference serving under variable load enabling cost efficiencies.
Multi-model serving with independent autoscaling for each model.
Real-time applications with bursty traffic.
Refer to the Ray Serve LLM documentation for details on these vLLM-compatible use cases.
To follow along with the rest of the blog, you need:
A node with ROCm 7.0.0-supported AMD GPUs
A supported Linux distribution
A ROCm 7.0.0 installation
Autoscaling with Ray Serve on multi-GPUs#
This section walks through a demo that illustrates the efficacy of autoscaling with Ray Serve on a single node with 8 MI300X GPUs. The next section will showcase autoscaling across two nodes using SkyPilot.
For vLLM inference serving with Ray on ROCm 7.0.0, prebuilt, vLLM‑optimized Docker images from Docker Hub under the rocm/vllm repository are recommended.
Start the Docker container
rocm/vllm:rocm7.0.0_vllm_0.11.2_20251210.
docker run -it --privileged --network=host --device=/dev/kfd --device=/dev/dri --group-add video --cap-add=SYS_PTRACE --security-opt seccomp=unconfined --ipc=host --shm-size 16G -v ~/:/workspace --workdir /workspace --name rocm7-ray-vllm rocm/vllm:rocm7.0.0_vllm_0.11.2_20251210 /bin/bash
To ensure version compatibility across components, uninstall any existing version of vLLM and build vLLM 0.10.2 from source. Refer to this official guide for more details.
pip uninstall -y vllm
git clone https://www.github.com/vllm-project/vllm.git -b v0.10.2
cd vllm

# Build and install AMD System Management Interface (AMD SMI)
pip install /opt/rocm/share/amd_smi

# Install dependencies
pip install --upgrade numba \
    scipy \
    huggingface-hub[cli,hf_transfer] \
    setuptools_scm

pip install -r requirements/rocm.txt

# To build for a single architecture (e.g., MI300) for faster installation (recommended):
export PYTORCH_ROCM_ARCH="gfx942"

# To build vLLM for multiple architectures (MI210, MI250, and MI300), use this instead
# export PYTORCH_ROCM_ARCH="gfx90a;gfx942"

python3 setup.py develop
cd /workspace
After installing vLLM from source, install Ray Serve.
pip install ray[serve]==2.52.1
Clone this blog repository in the docker container to run the example code.
git clone https://github.com/ROCm/rocm-blogs.git
cd rocm-blogs/blogs/ecosystems-and-partners/ray-rocm7
Observe the following Python code provided in ray_serve_app.py, which is meant to be run inside the Docker container. This script uses Ray Serve with vLLM to load an LLM, sets the deployment configuration including the autoscaling policy, and serves the model for inference.
Set the
model_sourceandmodel_idin themodel_loading_configfield to a model of your choice. In the sample script below, the model used isQwen/Qwen2.5-0.5B-Instruct.Modify the
accelerator_typeto your specific hardware choice. This demo was run on a MI300X GPU, and it is set toAMD-Instinct-MI300X-OAM.Key parameters used here for autoscaling policy are
max_ongoing_requests=1andtarget_ongoing_requests=1. These numbers are chosen to illustrate how the autoscaling mechanism is triggered with varying traffic load, and should not be taken as guidance for production settings. Look up the details of these parameters in this Autoscaling Guide.
from ray import serve
from ray.serve.llm import LLMConfig, build_openai_app

llm_config = LLMConfig(
    model_loading_config={
        "model_id": "Qwen/Qwen2.5-0.5B-Instruct",
        "model_source": "Qwen/Qwen2.5-0.5B-Instruct",
    },
    deployment_config={
        "max_ongoing_requests": 1,
        "autoscaling_config": {
            "target_ongoing_requests": 1,
            "min_replicas": 1,
            "max_replicas": 8,
            "upscale_delay_s": 15
         }
    },
    # Pass the desired accelerator type
    accelerator_type="AMD-Instinct-MI300X-OAM",
    # You can customize the engine arguments (e.g. vLLM engine kwargs)
    engine_kwargs={
        "tensor_parallel_size": 1,
    },
    runtime_env={"env_vars": {"VLLM_USE_V1": "1"}},
)

app = build_openai_app({"llm_configs": [llm_config]})
serve.run(app, blocking=True)
Note
The values used in this configuration are chosen for demonstrating the effects of autoscaling on the response times (latency) of the application. In a real-world scenario, these parameters are highly dependent on the specifications of your overall system and the application.
Launch the above application inside the Docker container using this command to begin serving the model:
python3 src/ray_serve_app.py
On the client-side, use Locust to run a load test script that sends multiple requests (repeatedly) to the above service endpoint. In a separate terminal attached to the Docker container, install
locustusing this command:
pip install locust --ignore-installed blinker
Run the Locust client-side load testing script inside the Docker container using the command below:
This script is designed to send multiple requests continuously to the Ray Serve instance’s endpoint to trigger autoscaling.
Thus, this command intentionally sets the number of users sending requests a little higher than available GPUs or resources with a spawn rate of one user every ten seconds (0.1 user/second).
locust -f src/locust_client.py --host http://127.0.0.1:8000 --users 12 --spawn-rate 0.1 --run-time 200s
Note
The values used in this command are for demonstration purposes only to accentuate the effects of autoscaling on the response times (latency) of the application. In a real-world application, these parameters are highly dependent on the specifications of your overall system and the application.
There are multiple ways to observe and verify whether autoscaling is working from both the client and server side.
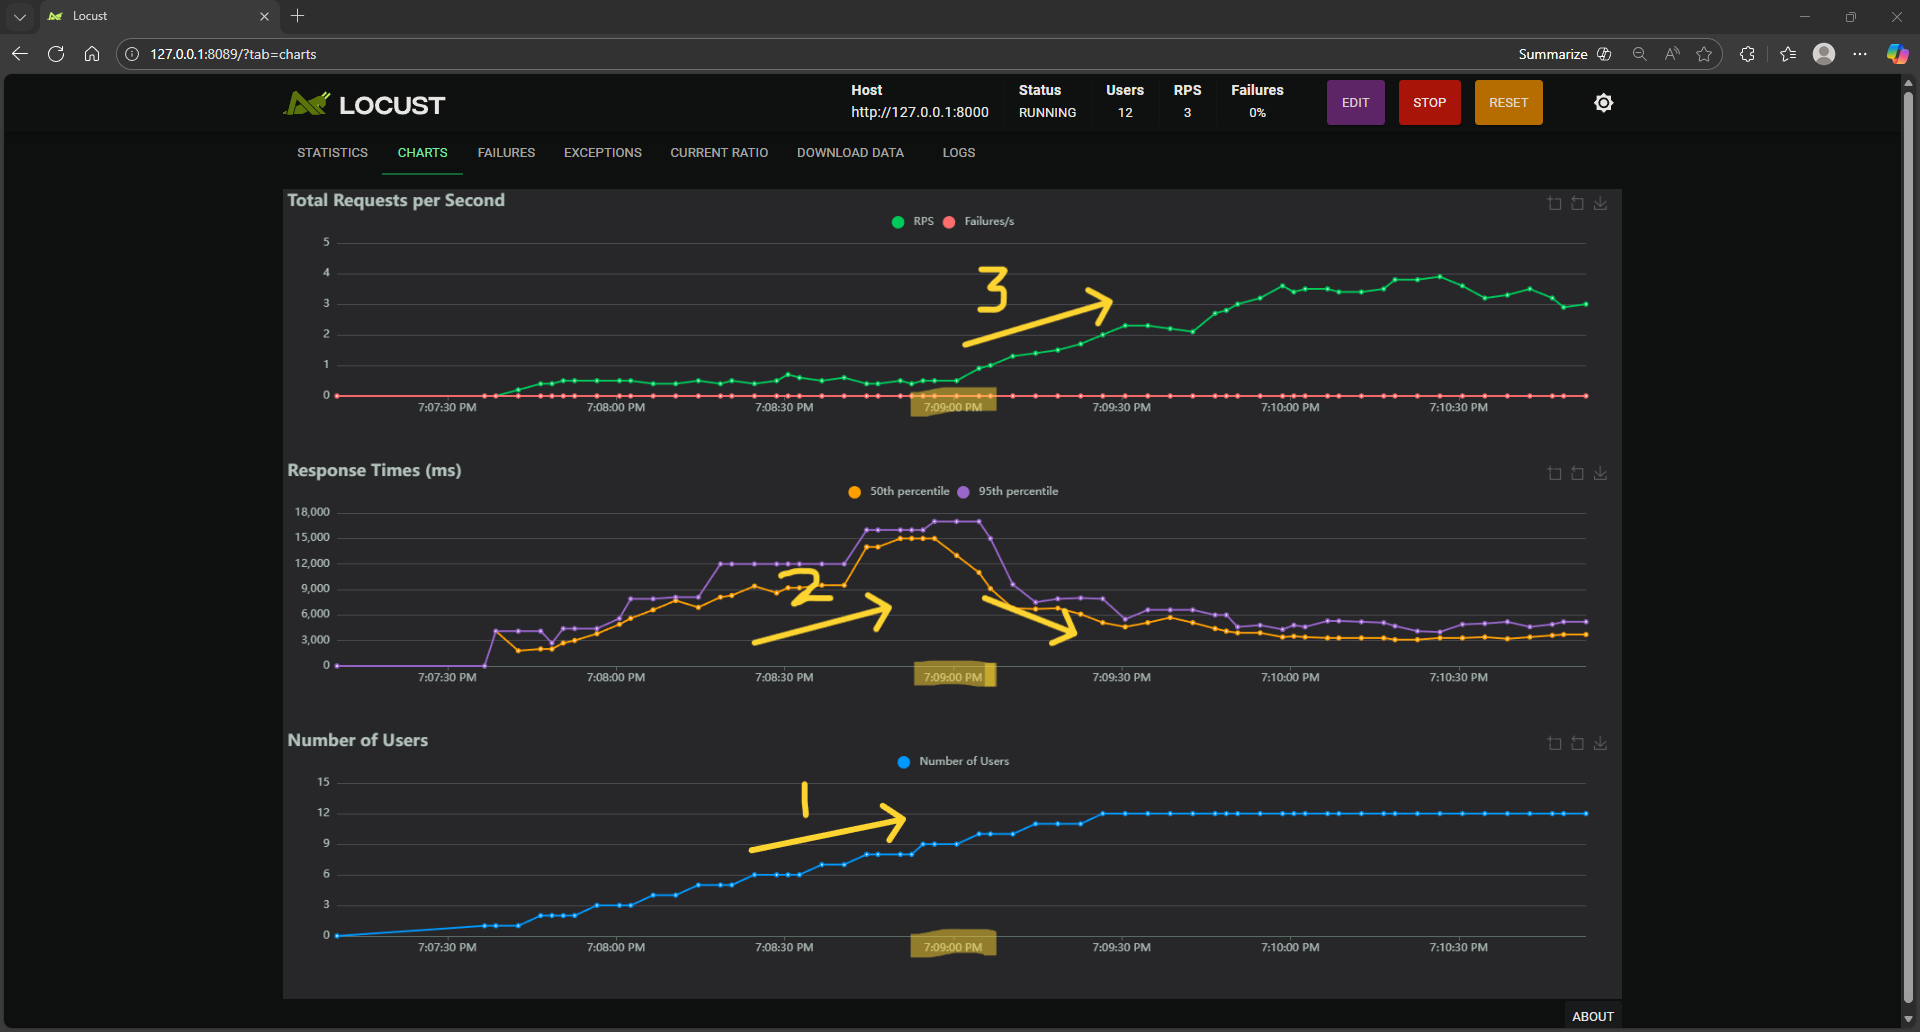
Figure 1: Locust Dashboard showing throughput, latency and concurrency charts.#
Client Side:
Open the Locust Dashboard in a browser on the client machine (default link is http://127.0.0.1:8089/?tab=charts) and observe the charts as illustrated in Figure 1.
In the third chart in Figure 1, the number of users is ramping up from 1 to 12 maximum (One new user every ten seconds) as indicated by the yellow arrow labelled as 1.
As a result of the rising user requests, the server response time for each request also rises (as indicated by the yellow arrow labelled as 2). This is because new requests are queuing up faster than they are being serviced. But, as soon as autoscaling kicks in at around the 07:09:00 timestamp (highlighted in the chart in the middle), the latency for the new incoming requests starts going down. This is because more server resources (GPUs) have now been provisioned to handle these requests.
After this moment in time, the throughput (total completed requests per second) starts going up (as indicated by the yellow arrow labelled as 3 in the chart at the top) while the latency goes down. These are the expected effects of autoscaling.
Server side:
You can look for log messages like
Adding replicaorUpscaling Deploymentin the Ray Serve application logs in/tmp/ray/session_latest/logs/serve/*.logto confirm the autoscaling is working as expected.View the Cluster tab on the Ray Dashboard (default link is http://127.0.0.1:8265#cluster) and observe the different GPUs scaling up automatically to handle the increasing load of requests as illustrated in Figure 2 and Figure 3.

Figure 2: Ray Dashboard before autoscaling.#
Figure 2 shows the occupancy of the GPUs before autoscaling (see red circled area). There is only one application replica running on a single MI300X GPU.
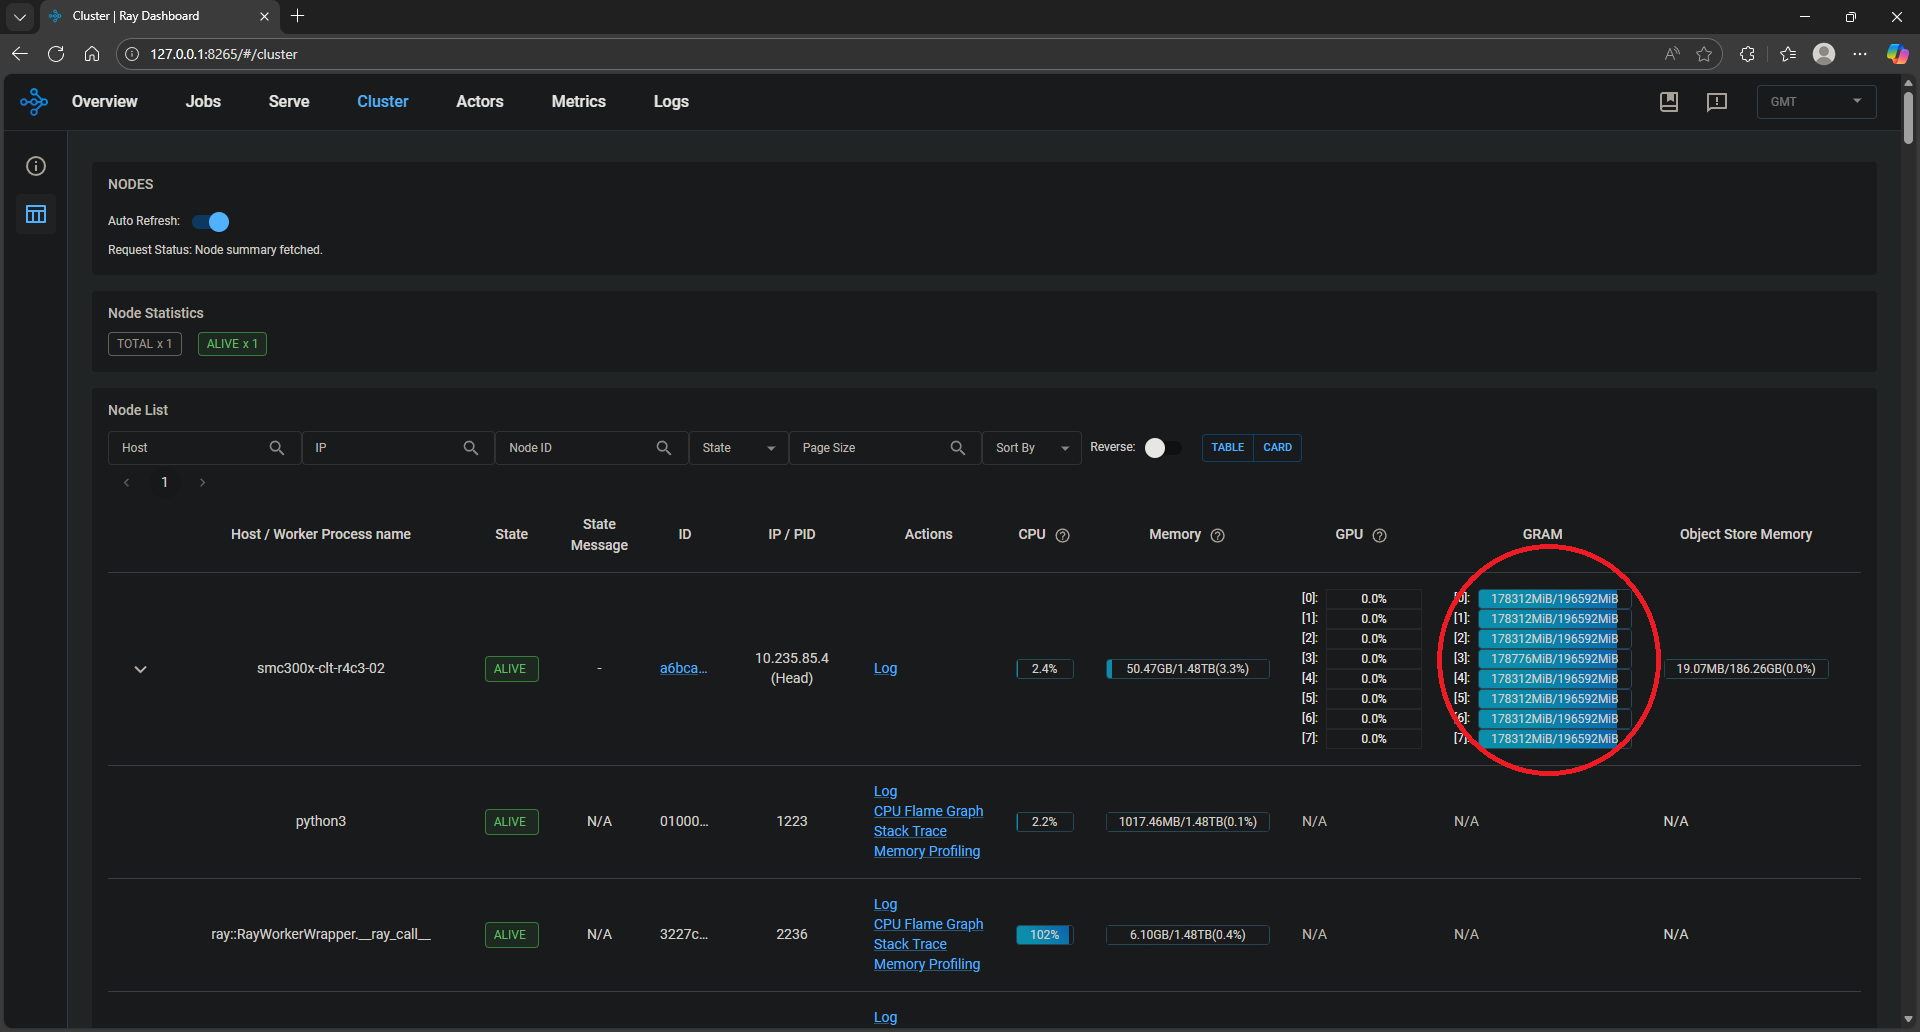
Figure 3: Ray Dashboard after autoscaling.#
Figure 3 shows the occupancy of the GPUs after autoscaling (see red circled area). After autoscaling starts, there are eight replicas of the server application, each occupying an MI300X GPU.
Multi-node and multi-cluster autoscaling using SkyPilot#
SkyPilot enables similar autoscaling capabilities but on a larger scale, across multiple clouds and clusters. Refer to this earlier blog to set up SkyPilot with AMD ROCm 7.0.0 across clouds.
Run Ray Serve application on SkyPilot#
In this example, a simple setup of two Kubernetes (K8s) clusters, each having a single node with a single AMD Instinct MI300X GPU, was used. Due to SkyPilot’s ability to provide a unified view across compute resources in different clouds, the two nodes do not need to be in the same cluster, or even in the same cloud. After the setup is complete, verify it with the command
sky show-gpus --infra k8s. The output should look like the following:
sky show-gpus --infra k8s

Kubernetes GPUs
GPU    UTILIZATION
MI300  2 of 2 free
Context: amd-autoscale-1
GPU    REQUESTABLE_QTY_PER_NODE  UTILIZATION
MI300  1                         1 of 1 free
Context: amd-autoscale-2
GPU    REQUESTABLE_QTY_PER_NODE  UTILIZATION
MI300  1                         1 of 1 free
Kubernetes per-node GPU availability
CONTEXT          NODE                  GPU    UTILIZATION
amd-autoscale-1  amd-rocm-autoscale-1  MI300  1 of 1 free
amd-autoscale-2  amd-rocm-autoscale-2  MI300  1 of 1 free
An example SkyPilot configuration, skypilot_ray_vllm10.yaml, is provided which can be used to launch a Ray Serve deployment on the SkyPilot cluster using the command below.
sky serve up src/skypilot_ray_vllm10.yaml --secret HF_TOKEN=<YOUR_HF_TOKEN_ID>
SkyPilot brings up a controller with the above command and takes around 5 to 10 minutes to provision a single replica of the Ray Serve application on one node.
Check the status of the SkyPilot service after 10 minutes. The
REPLICAScolumn in theServicessection should show1/1, and theSTATUScolumn in theService Replicassection should showREADY. If the status showsSTARTING, wait until it becomesREADY.
sky serve status -v

Services
NAME              VERSION  UPTIME  STATUS  REPLICAS  ENDPOINT

sky-service-530f  1        5m 59s  READY   1/1       http://165.245.142.8:30001

Service Replicas
SERVICE NAME      ID  VERSION  ...  STATUS
sky-service-530f  1   1        ...  READY
The controller then provides a single endpoint which can be used to send requests from a client. Use the following command to retrieve the endpoint:
sky serve status --endpoint
Copy the endpoint returned and insert it in the Locust client command below (also mentioned in the previous section of this blog) to direct requests to the SkyPilot service:
locust -f src/locust_client.py --host <YOUR ENDPOINT> --users 200 --spawn-rate 200 --run-time 600s --headless
The client script overloads the server with requests forcing SkyPilot to initiate autoscaling. The autoscaling is handled based on the policy parameters in the config skypilot_ray_vllm10.yaml file. Here is a snippet of the autoscaling replica policy used in this example:
service:
  # Specifying the path to the endpoint to check the readiness of the service.
  readiness_probe:
    path: /v1/models
    initial_delay_seconds: 1200
    timeout_seconds: 1200
  ports: 8000
  replica_policy:
    min_replicas: 1
    max_replicas: 2
    target_qps_per_replica: 0.05
    upscale_delay_seconds: 2
Note
Key parameters target_qps_per_replica: 0.05 and upscale_delay_seconds: 2 are kept low intentionally to invoke quick autoscaling for demonstration purposes. In a real-world application, these parameters are highly dependent on the specifications of your overall system and the application.
Run
watch sky serve status -vto see the status of any additional replicas of your application being deployed in real time.
watch sky serve status -v

Services
NAME              VERSION  UPTIME  STATUS  REPLICAS  ENDPOINT

sky-service-530f  1        5m 59s  READY   1/2       http://165.245.142.8:30001

Service Replicas
SERVICE NAME      ID  VERSION  ...  STATUS
sky-service-530f  1   1        ...  READY
sky-service-530f  2   1        ...  STARTING
Note the REPLICAS column in the services section now shows 1/2, which indicates that another replica has been initiated. You can see that its status is STARTING and will eventually turn READY.
You can also see the behavior of the SkyPilot controller in real-time and how it responds to the incoming requests live by running the following command:
sky serve logs --controller <YOUR SERVICE NAME>
For additional confirmation, look for log messages that indicate additional replicas being deployed due to autoscaling.
Replicas to probe: replica_1(url=http://165.245.142.8:8000), replica_2(url=http://165.245.143.25:8000)
I 01-31 00:52:18.440 PID=383306 replica_managers.py:624] Probing replica 1 with url http://165.245.142.8:8000 with http://165.245.142.8:8000/v1/models.
I 01-31 00:52:18.450 PID=383306 replica_managers.py:624] Probing replica 2 with url http://165.245.143.25:8000 with http://165.245.143.25:8000/v1/models.
I 01-31 00:52:18.451 PID=383306 replica_managers.py:645] GET request to replica 1 with url http://165.245.142.8:8000 returned status code 200.
I 01-31 00:52:18.458 PID=383306 replica_managers.py:645] GET request to replica 2 with url http://165.245.143.25:8000 returned status code 200.
I 01-31 00:52:21.621 PID=383306 controller.py:82] All replica info for autoscaler: [ReplicaInfo(replica_id=1, cluster_name=sky-service-530f-1, version=1, replica_port=8000, is_spot=False, location=None, status=ReplicaStatus.READY, launched_at=1769818524), ReplicaInfo(replica_id=2, cluster_name=sky-service-530f-2, version=1, replica_port=8000, is_spot=False, location=None, status=ReplicaStatus.READY, launched_at=1769818938)]
After the incoming requests from the client stop and sufficient time has passed, SkyPilot will automatically scale down extra replicas to save compute costs.
Summary#
In this blog, you learned how Ray Serve, in conjunction with ROCm 7.0.0 is an effective platform for automatically scaling LLM applications on AMD GPUs. The integration of Ray and SkyPilot facilitates distributed computing across multi-node, multi-cluster, and multi-cloud configurations while ROCm 7.0.0 enhances performance. AMD is committed to enabling deeper integration with Ray and SkyPilot to facilitate orchestration of large-scale workloads in the broader ML ecosystem. Stay tuned for more advanced use cases in scalable AI applications with Ray in future blog posts.
Additional Reading#
Disclaimers#
Third-party content is licensed to you directly by the third party that owns the content and is not licensed to you by AMD. ALL LINKED THIRD-PARTY CONTENT IS PROVIDED “AS IS” WITHOUT A WARRANTY OF ANY KIND. USE OF SUCH THIRD-PARTY CONTENT IS DONE AT YOUR SOLE DISCRETION AND UNDER NO CIRCUMSTANCES WILL AMD BE LIABLE TO YOU FOR ANY THIRD-PARTY CONTENT. YOU ASSUME ALL RISK AND ARE SOLELY RESPONSIBLE FOR ANY DAMAGES THAT MAY ARISE FROM YOUR USE OF THIRD-PARTY CONTENT.