AUP Learning Cloud: Streamlining AI Education on AMD#
AI education is becoming increasingly hands-on. Students are now expected to train models, build AI agents, experiment with large language models (LLMs), and develop applications accelerated by graphics processing units (GPUs), so courses depend as much on practical computing infrastructure as on learning materials. Yet standing up that infrastructure is usually the real bottleneck, and educators often spend more effort building it than teaching.
AUP Learning Cloud was built to remove that bottleneck and bridge the last mile of AI education on AMD ROCm. Delivered as a tailored JupyterHub deployment built on Kubernetes and accelerated by AMD ROCm, it folds the hard, repeatable setup work into a single platform that runs on widely available AMD hardware, from Ryzen AI processors to Radeon GPUs. In practice, it takes on the challenges educators face every term:
Deploying and managing GPU resources
Setting up ROCm environments consistently
Providing notebook and development environments
Managing shared classroom resources
Tracking experiments and usage
In this blog, you will explore how AUP Learning Cloud is designed and deployed, how learners work through GPU-ready notebooks and open-source teaching labs, how Code Server extends the platform to full projects, how admins manage shared GPUs with group-based access and quotas, and how the same stack scales from a single AI PC to a campus cluster. By the end, you will know how to bring hands-on, ROCm-accelerated AI education to your own AMD hardware.
AUP Learning Cloud at a Glance#
AUP Learning Cloud serves both individual learners and whole groups from one architecture. The same stack runs on a single machine for one person or scales out to a cluster for a classroom or lab, which gives the platform its two defining strengths: it is easy to deploy and flexible to scale. The figure below shows an overview of the AUP Learning Cloud architecture:
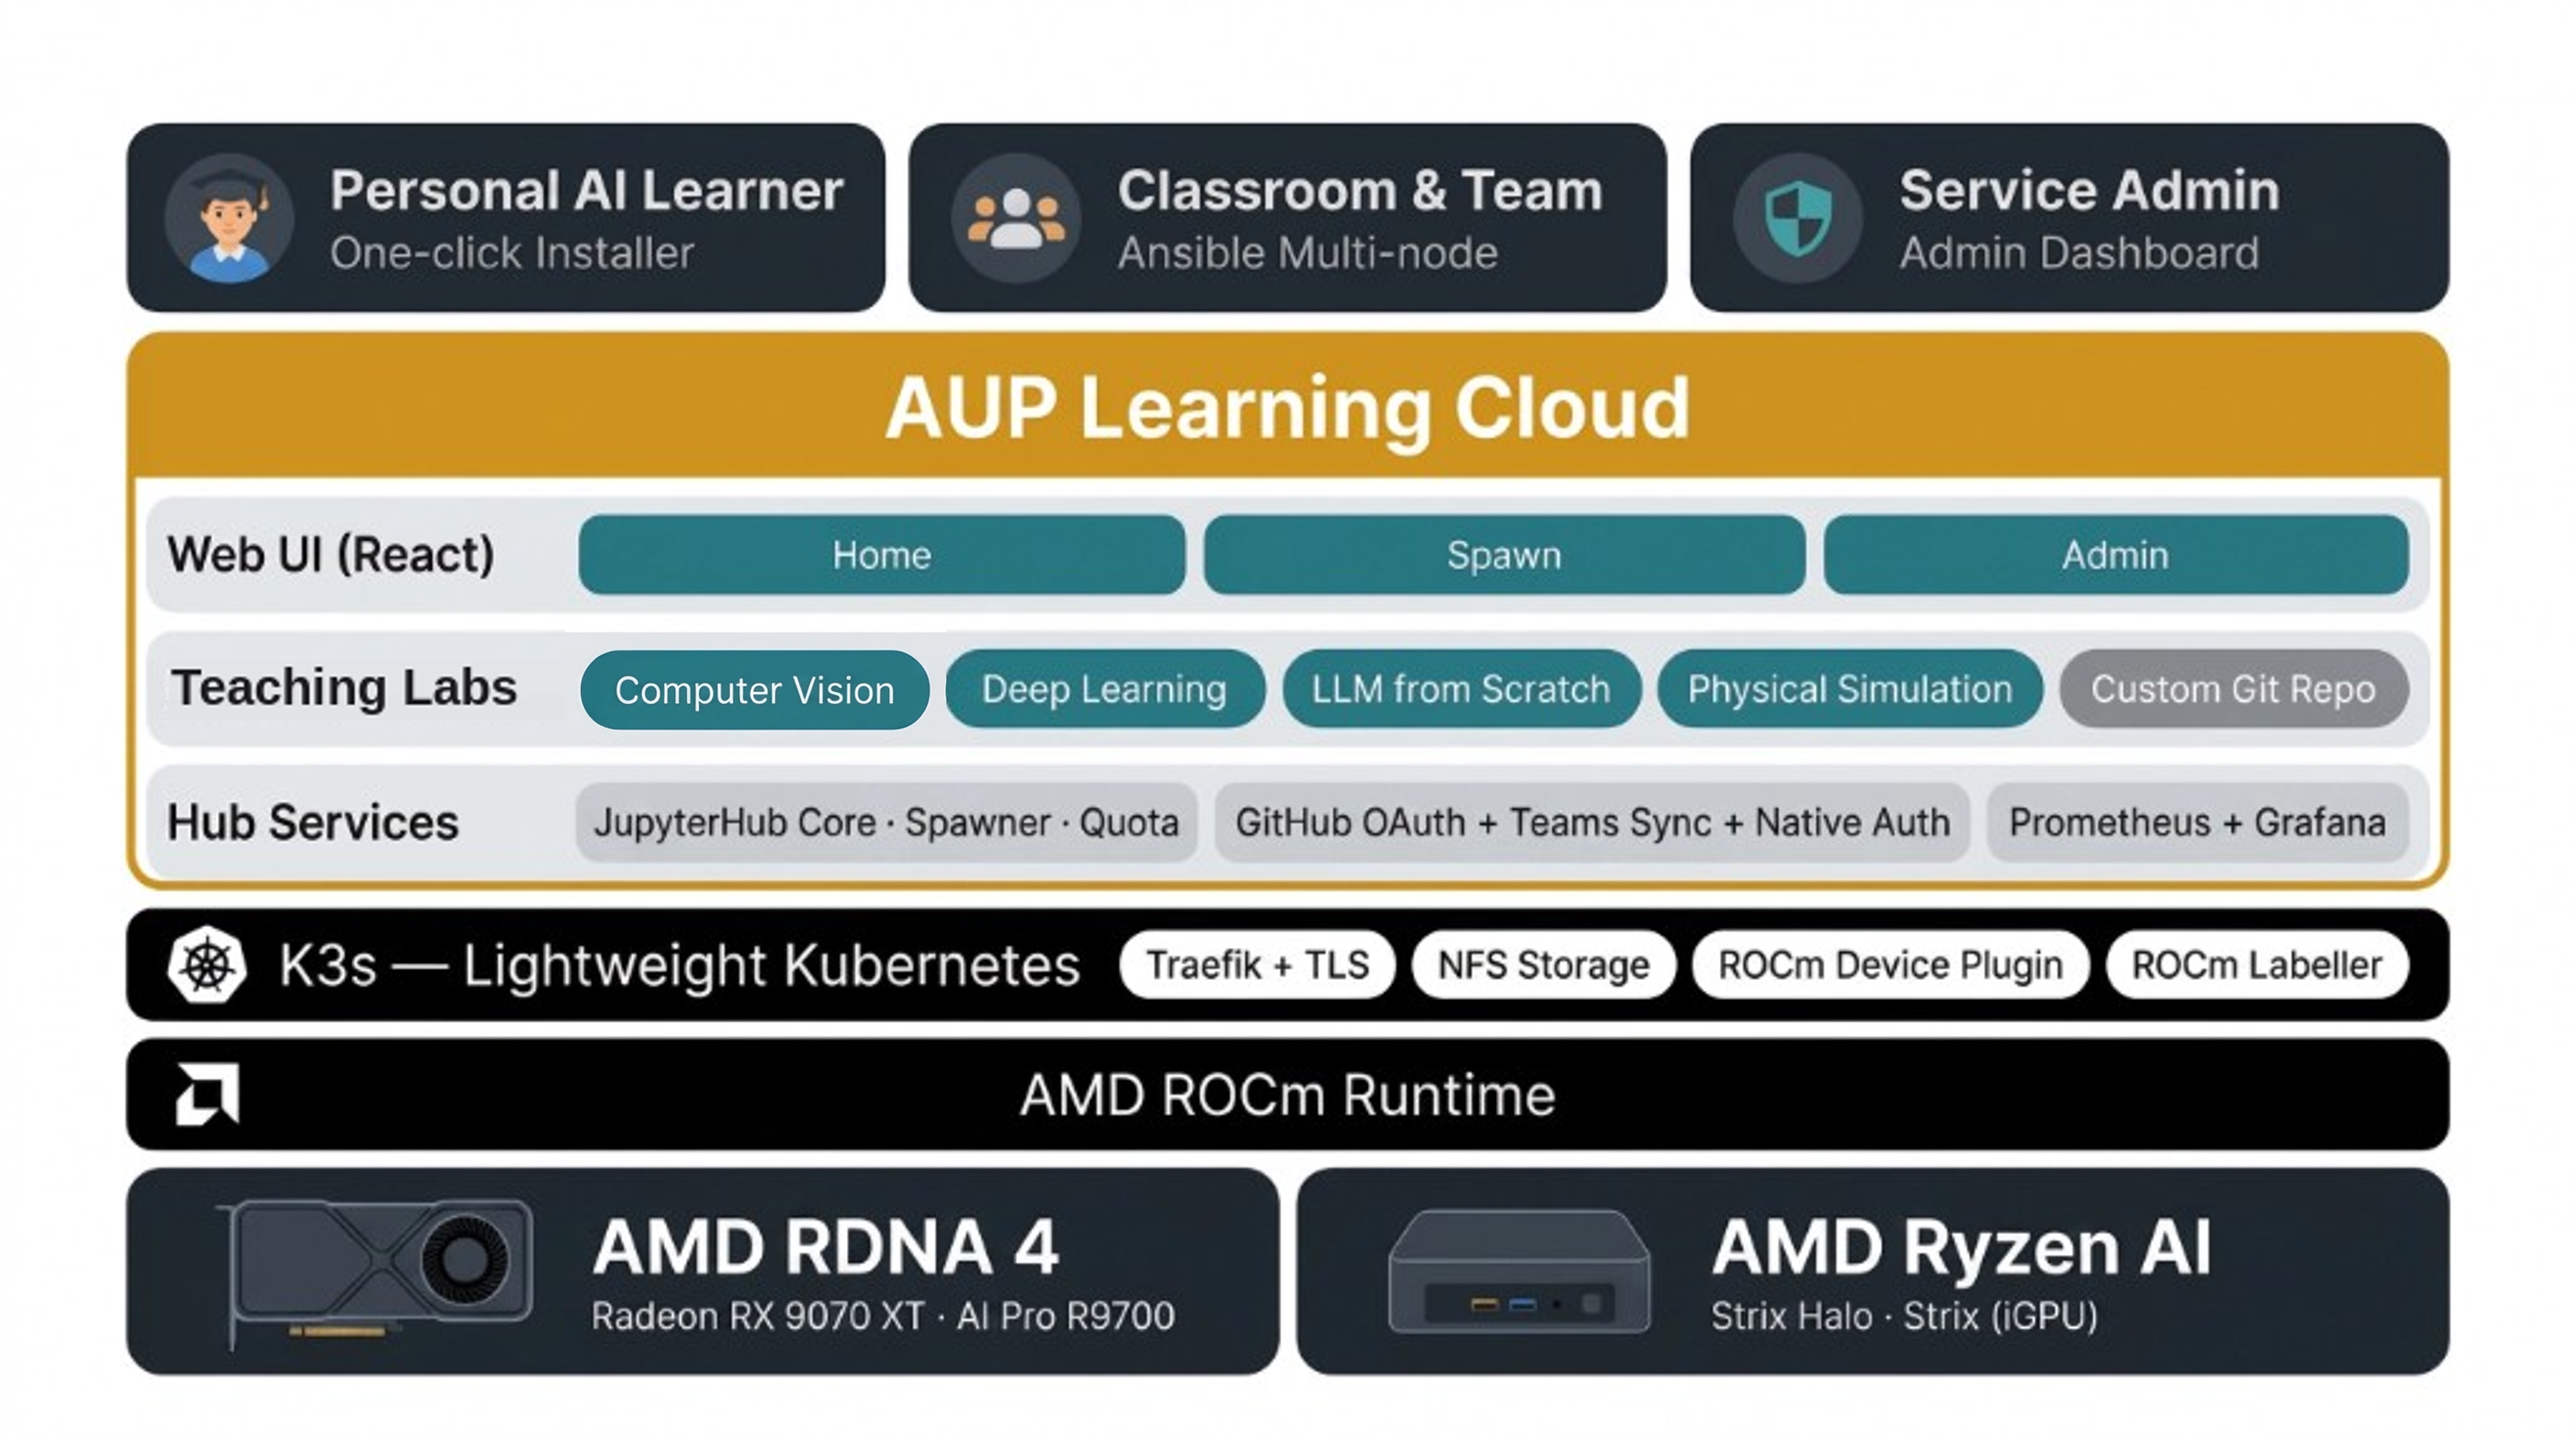
Figure 1. Overview of the AUP Learning Cloud architecture, from AMD GPU hardware up to the JupyterLab interface.#
This is a layered stack. At the base sits the AMD GPU, whether that is an RDNA (Radeon DNA) 4 GPU such as the Radeon AI PRO R9700, or a Ryzen AI accelerated processing unit (APU) such as Strix Halo. On top of it, AUP Learning Cloud configures a matching AMD ROCm runtime, so the right driver and library versions for that GPU are set up for you. K3s, a lightweight Kubernetes distribution, manages the whole system above the runtime, bringing along Traefik with TLS (Transport Layer Security), NFS (Network File System) storage, and the ROCm device plugin and labeller that expose the GPU to the cluster. Each teaching lab then ships as a custom container image that bundles its own tested ROCm and framework stack. Finally, all of this is delivered through a convenient JupyterLab notebook interface, with Home, Spawn, and Admin pages, so learners can focus on the content instead of the setup.
Learning Through Interactive Notebooks#
The primary learning experience in AUP Learning Cloud is centered around JupyterLab. Students can launch GPU-enabled notebook environments directly from their browser and immediately begin experimenting. As shown in Figure 2 below, learners start from a spawn page and pick a pre-configured course environment in a single click. This notebook-first workflow allows learners to move seamlessly from theory to practice.
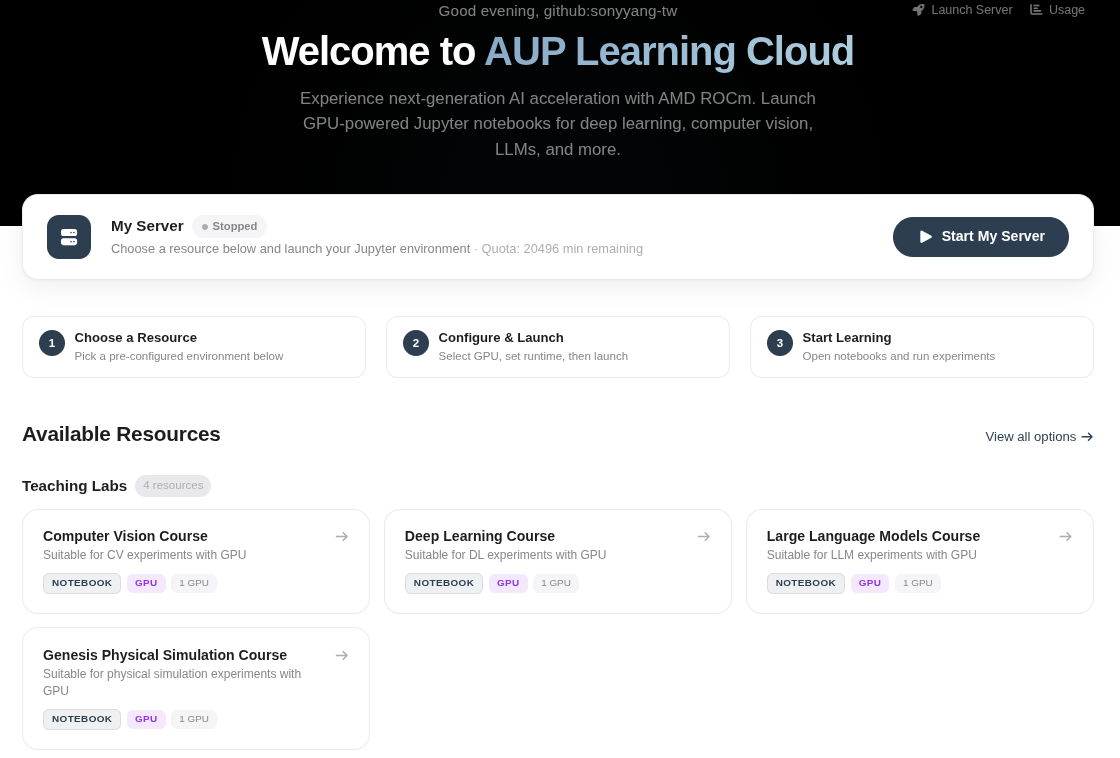
Figure 2. The spawn page, where learners pick a pre-configured course environment in one click.#
Multiple teaching solutions are what make AUP Learning Cloud a learning platform, not just an infrastructure recipe. Each teaching solution provides a series of teaching labs, all open source and version-tested against their PyTorch stack, so they work out of the box on AMD GPUs with no dependency wrangling. The content is built with university professors and draws from the most popular AI courses taught on campus. Within each solution, the labs progress from the basics to advanced topics step by step. Pick the one that matches your interest and start building. The four teaching solutions and a sample of what each one covers are shown below.
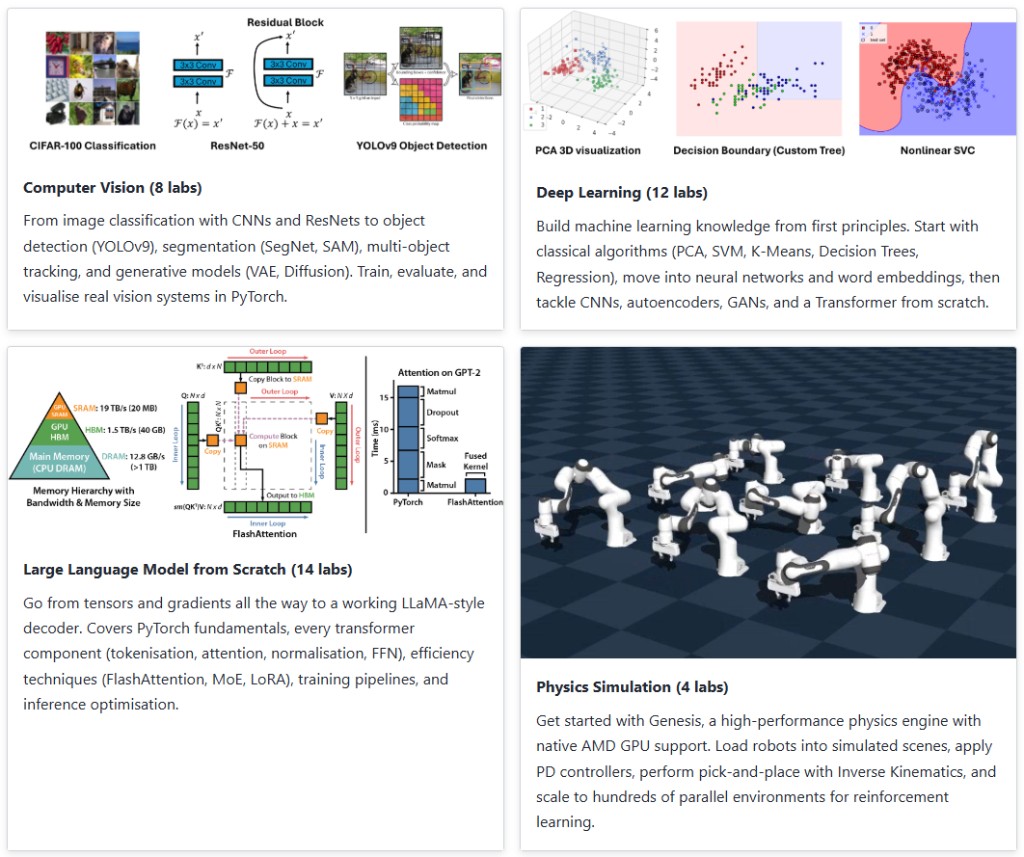
Figure 3. The four teaching solution labs and a sample of what each one covers.#
Computer Vision (8 labs)
Work through real vision systems in PyTorch, from image classification with convolutional neural networks (CNNs) and ResNets to object detection with YOLOv9 (You Only Look Once), segmentation with SegNet and the Segment Anything Model (SAM), multi-object tracking, and generative models such as the variational autoencoder (VAE) and Diffusion.Deep Learning (12 labs)
Build machine learning knowledge from first principles. Start with classical algorithms like Principal Component Analysis (PCA), Support Vector Machine (SVM), K-Means, Decision Trees, and Regression, move into neural networks and word embeddings, then tackle CNNs, autoencoders, generative adversarial networks (GANs), and a Transformer from scratch.Large Language Models from Scratch (14 labs)
Go from tensors and gradients all the way to a working LLaMA-style decoder. The labs cover PyTorch fundamentals, every transformer component (tokenization, attention, normalization, feed-forward network (FFN)), efficiency techniques such as FlashAttention, Mixture of Experts (MoE), and Low-Rank Adaptation (LoRA), plus training pipelines and inference optimization.Physics Simulation (4 labs)
Get hands-on with Genesis, a high-performance physics engine with native AMD GPU support. Load robots into simulated scenes, apply proportional-derivative (PD) controllers, perform pick-and-place with inverse kinematics, and scale to multiple parallel environments.
Because every teaching lab ships as a ready-to-run image, the path from logging in to running one on an AMD GPU is measured in minutes. The figure below shows one of the labs from the Large Language Models from Scratch series.
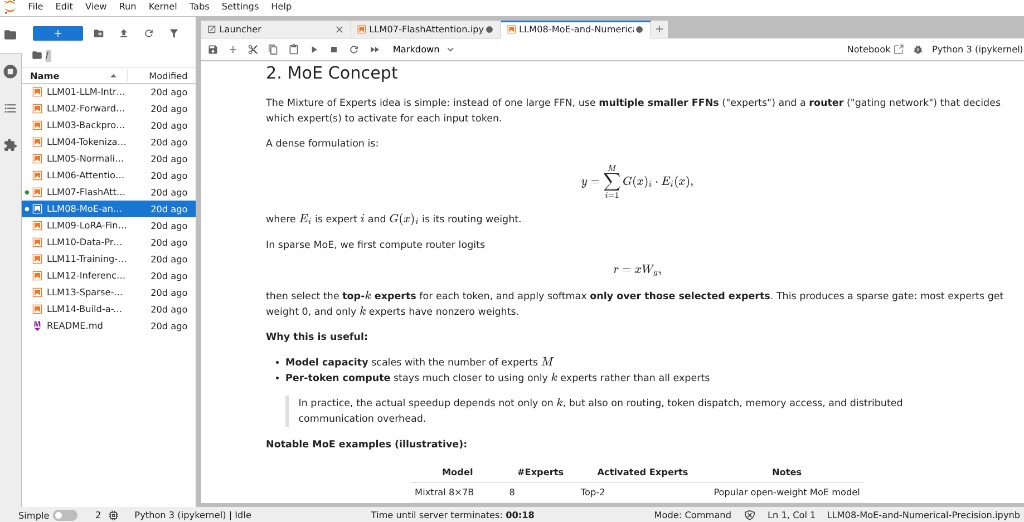
Figure 4. Each lab pairs conceptual explanations and equations with runnable code, so learners study theory and practice together.#
The notebooks are built for more than just running code. In this example, the lab interleaves the underlying theory, concepts, equations, and worked explanations, directly with executable cells. It walks through the MoE concept, complete with the routing math, right next to the code that implements it. Learners read the explanation, run the cell, and inspect the result in one place, building intuition and implementation skills at the same time instead of treating theory and practice as separate steps.
Coding in the Browser with Code Server#
Not every workflow fits in a notebook. For multi-file projects, training scripts, step-through debugging, or running a development server, AUP Learning Cloud also offers Code Server, a full browser-based VS Code experience that runs on the same GPU-ready environments. Learners pick a Code Server CPU (central processing unit) or GPU environment at spawn time and land in a familiar editor, complete with the file explorer, integrated terminals, source control, a debugger, and the VS Code extension marketplace, with nothing to install locally.
Because it runs inside the same platform, Code Server inherits everything that makes the notebook experience easy: the AMD ROCm runtime is already configured, the GPU is exposed to the environment (a quick rocm-smi in the terminal confirms it), and anything saved under /home/jovyan persists across sessions. On top of that it adds the conveniences of a desktop integrated development environment (IDE), integrated terminals for scripts and training jobs, breakpoint debugging, Git integration, and port forwarding that surfaces a web app or dev server running inside the environment straight to the browser. Figure 5 below shows the Code Server editor running on a GPU-ready environment.
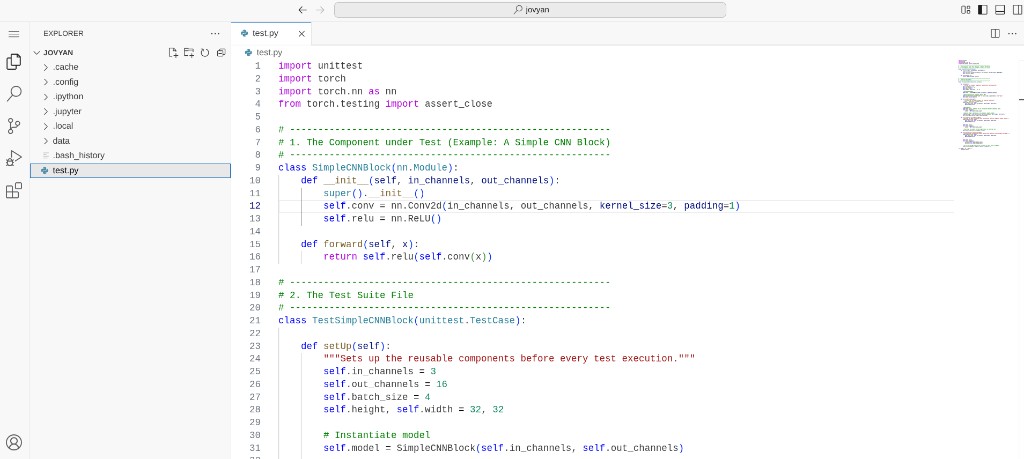
Figure 5. Code Server brings a full browser-based VS Code editor, with terminals, debugging, and extensions, to the same GPU-ready AMD environments.#
For a complete walkthrough, covering environment selection, terminals, saving files, port forwarding, and extensions, see the Code Server Guide.
Resource Management for Admins#
For whoever runs the platform, AUP Learning Cloud gives admins full control over how shared GPUs are used. Each learner picks a resource at spawn time rather than landing in one fixed image, choosing a course environment, a generic CPU or GPU option, or an accelerator-specific one, and optionally cloning a Git repository on startup. What each user can see is governed by their JupyterHub group membership, so admins manage access by group instead of per user. The spawn page in Figure 2 shows the catalog of pre-configured environments a learner chooses from.
Admins start with a clear view of who is on the platform. As shown in Figure 6 below, the admin Users view lists every user alongside their remaining quota and server status, and lets admins start, stop, or adjust quota for individual users or the whole class in one place.
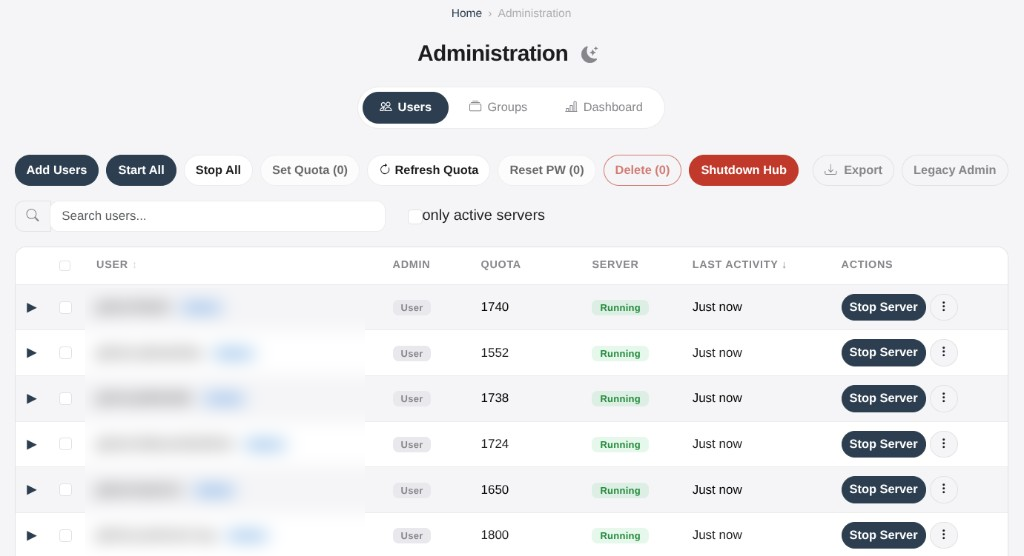
Figure 6. The admin Users view for managing per-user quota and server status across the class.#
Zooming out from individual users, the admin dashboard turns raw activity into something an instructor can act on. As shown below, it opens with an at-a-glance summary of total users, active sessions, total usage hours, and weekly activity, plus a live Active Now table of who is running what on which AMD GPU. Alongside it, the same data is broken into trends: usage minutes charted against active users over time, sessions clustered by hour of day, and a ranking of usage by course that shows which labs consume the most GPU time.
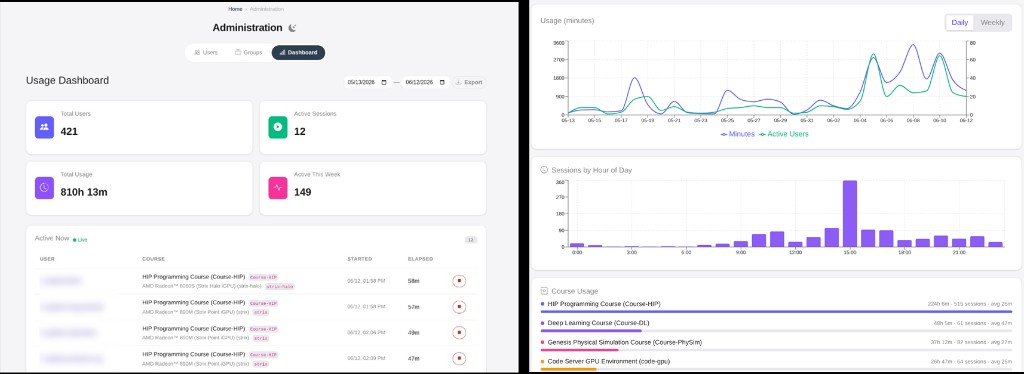
Figure 7. The admin usage dashboard: summary metrics and a live Active Now table (left) with usage trends by time and course (right).#
This visibility pairs with a concrete quota system. When quota is enabled, the Hub estimates a session’s cost from the selected accelerator’s rate and runtime, checks the user’s balance before a server is allowed to spawn, records the session while it runs, and deducts quota when it ends. Scheduled refresh rules, implemented as Kubernetes CronJobs, can top up balances automatically. Together these tools let instructors manage GPU cost and share limited hardware fairly across a class.
Deployment: From Single AI PC to Campus Mini Clusters#
AUP Learning Cloud can run as a single-machine deployment or a cluster deployment. Because both options run the same software stack, choosing between them mainly comes down to scale, budget, and power. The three cluster builds introduced below are only reference starting points, you can freely adjust the cluster size to fit your needs, or simply deploy a single machine to run the whole system. As Figure 8 below shows, you can start from a compact micro cluster for a small group and scale up through a mini cluster to a full standard rack with workstation for a whole school.
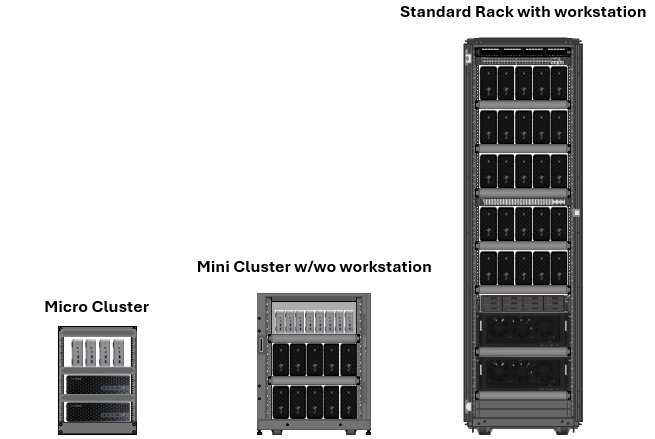
Figure 8. Three reference builds for the same platform. Left: a micro cluster (~600 W, ~$10K) for small-group learning and development. Middle: a mini cluster with or without a workstation (~2000 W, ~$40–60K) for classroom or department teaching and experimentation. Right: a standard rack with workstation (~5000 W, ~$100–150K) for school-level teaching, experimentation, and development.#
The same platform deploys in two ways, single-node deployment or cluster deployment, depending on whether you are running on one machine or several.
Single-Node Deployment#
Single-node is the fastest way to a working deployment, and it fits a developer workstation, a single AI PC, or a classroom machine. The whole flow is driven by the auplc-installer, which handles the steps you would otherwise do by hand:
detects supported AMD GPU families and SKUs (stock keeping units)
installs K3s and the supporting tools
deploys the ROCm GPU device plugin and node labeller
pulls (or builds) the required course images
deploys the JupyterHub runtime
The defaults are deliberately kept simple so the first run just works. The repository ships with auto-login authentication, local-path storage, and a NodePort on 30890, which gives you a plain HTTP deployment you can open immediately. NFS, ingress, and TLS are all available, but they are opt-in rather than required.
Before you start, the host needs Ubuntu 24.04, sudo access, a supported Ryzen AI 300-series (or newer) APU or Radeon 9000-series PCIe GPU, and Docker for the default install path.
Quick Start#
A full single-node deployment takes three commands once the prerequisites are in place. Clone the repository and launch the interactive installer:
git clone https://github.com/AMDResearch/aup-learning-cloud.git
cd aup-learning-cloud
./auplc-installer
For a first install, choose Install and accept the defaults at each prompt. The installer shows a configuration summary before it does anything:
Configuration summary
  GPU              : auto-detect
  K3s runtime      : Docker
  Image source     : pull
  Image registry   : ghcr.io/amdresearch
  Image tag        : latest
  Courses          : cpu, gpu, Course-CV, Course-DL, Course-LLM, Course-PhySim
The same defaults are available without the wizard if you prefer a scripted run:
# Non-interactive install with default settings
./auplc-installer install

# Preview the plan without making any changes
./auplc-installer install --dry-run
When the installer finishes, the Hub is live in your browser:
http://localhost:30890
From there you pick a course environment on the spawn page and land in a GPU-ready notebook, with no manual ROCm or framework setup along the way.
3 Node Mini-Cluster Example#
Because AUP Learning Cloud builds its whole stack on K3s, the single-node setup naturally extends into a cluster. The example below uses three nodes for concreteness, but the same approach scales to as many nodes as you need. A cluster is the right choice once you want multiple workers, shared storage, and a layout closer to a long-running lab.
The cluster is built with an Ansible plus Helm workflow, and the 3 Node Mini-Cluster Example is a concrete, end-to-end reference for it. Its trick is netbooting diskless workers over PXE (Preboot Execution Environment), so adding a machine takes almost no per-machine effort. The diagram below shows the topology of this example.
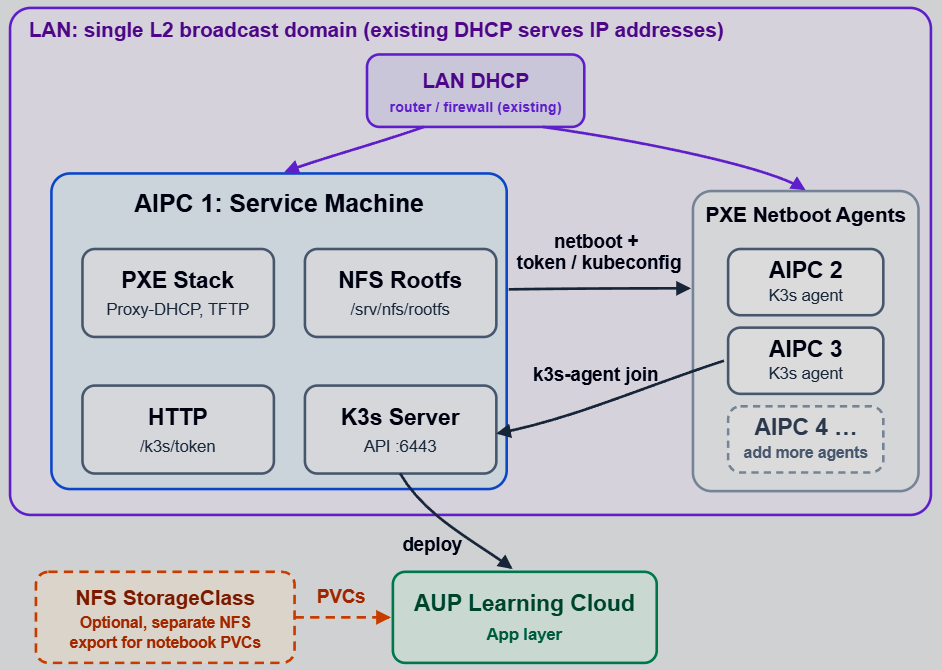
Figure 9. Topology of the 3-node mini-cluster: one service machine PXE-netboots two diskless K3s agents.#
Only one machine in this topology runs an operating system (OS) you install and manage. That service machine, AIPC 1, hosts the PXE controller and the single-node K3s server. The other machines are diskless agents that network-boot from AIPC 1 and join the cluster on their own.
Role |
Machine |
Notes |
|---|---|---|
Service machine |
AIPC 1 |
Runs the PXE controller and the K3s server. The only Ansible-managed node, with a local disk and a static IP. |
Agents |
AIPC 2, AIPC 3 |
Diskless workers that netboot. No OS install, not managed by Ansible. |
The service machine does the work that would normally be manual cluster setup. AIPC 1 runs dnsmasq in Proxy-DHCP (Dynamic Host Configuration Protocol) and TFTP (Trivial File Transfer Protocol) mode, builds an NFS root filesystem, and serves the K3s join credentials over HTTP (HyperText Transfer Protocol). Your existing LAN (local area network) DHCP keeps handing out IP (Internet Protocol) addresses as usual, and the PXE controller only adds boot information on top of it.
Bringing up an agent is just powering it on. The boot path is fully automatic:
The agent firmware asks for an IP, and
dnsmasqon AIPC 1 replies with PXE boot metadata.The agent downloads the boot loader and loads the kernel and initrd from TFTP.
The kernel mounts the read-only NFS rootfs, with a writable tmpfs overlay on top.
The agent sets its hostname and runs
k3s-auto-join, fetching the token and joining the K3s server.
The payoff is a small GPU cluster where adding a worker means netbooting another machine, with no OS install and no manual K3s configuration. Once the cluster is up, the JupyterHub chart goes on with Helm, and a learner can log in and spawn a GPU notebook that lands on one of the netbooted nodes. The path from one AI PC to a shared cluster stays smooth, because both use the same images and the same Hub configuration.
Summary#
The future of AI education depends not only on what students learn, but also on whether they can practice, experiment, and innovate on real AI systems.
In this blog, you learned how AUP Learning Cloud brings that practice within reach on AMD hardware. You saw how it configures a matching ROCm runtime and serves GPU-ready notebooks straight from the browser, how learners work through the open-source teaching labs and switch to Code Server for larger projects, how admins manage shared GPUs with group-based access and quotas, and how the same stack scales from a single AI PC to a campus cluster with the same images and Hub configuration.
By combining ROCm-ready environments, interactive notebooks, open teaching labs, built-in profiling, educator-focused resource management, and scalable deployment from AI PCs to clusters, AUP Learning Cloud helps bridge the last mile between AI curriculum and hands-on practice on AMD platforms.
If you are an instructor preparing a course, a researcher standing up a shared lab, or a developer who wants to explore ROCm without the setup overhead, AUP Learning Cloud gives you a fast, consistent, and observable way to learn and experiment on AMD GPUs.
Try It Online#
You don’t need any AMD hardware to get started. We host a live AUP Learning Cloud cluster that anyone can try for free. Just sign in with your GitHub account and spawn a GPU notebook in your browser.
Live cluster: AUP Learning Cloud — Click the website and register online to try the AUP Learning Cloud for free.
When you are ready to run it yourself, the full documentation walks through everything from quick start to single-node and multi-node deployment, JupyterHub configuration, and each teaching lab.
Full documentation: https://amdresearch.github.io/aup-learning-cloud/introduction/overview.html
References#
AUP Learning Cloud Documentation: https://amdresearch.github.io/aup-learning-cloud/
AUP Learning Cloud Repository: https://github.com/AMDResearch/aup-learning-cloud
AMD SMI (System Management Interface): https://rocm.docs.amd.com/projects/amdsmi/en/latest/
Genesis Simulation Engine: https://github.com/Genesis-Embodied-AI/Genesis
Acknowledgements#
Thanks to the AMD University Program interns Shifeng Zhang and Wei Syuan Liao, along with Ruiz Noguera Mario, Wen Chen, Purushotham Naveen, and Hugo Andrade, for their contributions, and to the university partners whose joint efforts made these teaching labs possible: National Taiwan University (Prof. Chun-Yi Lee, ELSA Lab) for the Deep Learning and Computer Vision teaching labs, and Nanjing University (Prof. Jingwei Xu, NJUDeepEngine) for the Large Language Model teaching lab.
Disclaimers#
The information presented in this document is for informational purposes only and may contain technical inaccuracies, omissions, and typographical errors. The information contained herein is subject to change and may be rendered inaccurate for many reasons, including but not limited to product and roadmap changes, component and motherboard version changes, new model and/or product releases, product differences between differing manufacturers, software changes, BIOS flashes, firmware upgrades, or the like. Any computer system has risks of security vulnerabilities that cannot be completely prevented or mitigated. AMD assumes no obligation to update or otherwise correct or revise this information. However, AMD reserves the right to revise this information and to make changes from time to time to the content hereof without obligation of AMD to notify any person of such revisions or changes. THIS INFORMATION IS PROVIDED ‘AS IS.” AMD MAKES NO REPRESENTATIONS OR WARRANTIES WITH RESPECT TO THE CONTENTS HEREOF AND ASSUMES NO RESPONSIBILITY FOR ANY INACCURACIES, ERRORS, OR OMISSIONS THAT MAY APPEAR IN THIS INFORMATION. AMD SPECIFICALLY DISCLAIMS ANY IMPLIED WARRANTIES OF NON-INFRINGEMENT, MERCHANTABILITY, OR FITNESS FOR ANY PARTICULAR PURPOSE. IN NO EVENT WILL AMD BE LIABLE TO ANY PERSON FOR ANY RELIANCE, DIRECT, INDIRECT, SPECIAL, OR OTHER CONSEQUENTIAL DAMAGES ARISING FROM THE USE OF ANY INFORMATION CONTAINED HEREIN, EVEN IF AMD IS EXPRESSLY ADVISED OF THE POSSIBILITY OF SUCH DAMAGES. AMD, the AMD Arrow logo, ROCm, and combinations thereof are trademarks of Advanced Micro Devices, Inc. Other product names used in this publication are for identification purposes only and may be trademarks of their respective companies. © 2026 Advanced Micro Devices, Inc. All rights reserved