ROCm Revisited: Getting Started with HIP#

This blog is part of our ROCm Revisited series[1]. The purpose of this series is to share the story of ROCm and our journey through the changes and successes we’ve achieved over the past few years.
This blog will provide an introductory guide to GPU programming using AMD’s HIP C++ language and runtime. It explains the architectural differences between CPUs and GPUs, highlighting how GPUs excel at parallel processing for tasks like machine learning and simulations. The post introduces core parallel programming concepts such as threads, blocks, grids, and memory types (local, shared, and global), along with SISD and SIMT processing models. It then walks through installing ROCm and HIP on Ubuntu 24.04 and demonstrates how to write and compile simple HIP programs, including a “Hello World” example and a matrix addition kernel. It is also important to note that while the ROCm toolkit supports many paradigms such as Fortran and OpenCL, its most prominent focus is on HIP.
Introduction to GPU vs. CPU Architecture#
Before we can cover the key architectural differences between CPUs and GPUs there are a couple definitions we need to cover in the context of HIP and ROCm. To start, the host is the system’s main processor (typically a CPU) that manages program execution, memory allocation, and coordination of work. The device refers to the accelerator targeted by HIP, the GPU, where compute-intensive kernels are executed. HIPs current focus is on enabling high-performance GPU programming. The host is responsible for preparing data, launching kernels, and handling results, while the device excels at executing parallel workloads efficiently.
The HIP programming model has two execution contexts: the main application starts on the CPU (host processor), while compute kernels are launched on the device, such as Instinct accelerators or AMD GPUs. Host execution is defined by the C++ abstract machine, whereas device execution follows the SIMT (Single Instruction, Multiple Threads) model of HIP.
In HIP, the CPU (host) manages the coordination between the CPU and GPU (device) by handling data transfers, kernel launches, and task synchronization as illustrasted in Figure 1. The process begins with initializing the HIP runtime and selecting a target GPU, followed by preparing and transferring data from host to device memory. The host then configures and launches GPU kernels. Finally, the host retrieves results, validates output, and cleans up resources. This structured workflow enables efficient use of GPU acceleration while keeping the CPU free for managing overall application logic.

Figure 1: Interaction Flow between the Host and Device in a GPU Program#
Here are some key architectural differences between the CPU and the GPU, as summarized in Table 1 below:
Feature |
CPU |
GPU |
|---|---|---|
Processing Type |
Optimized for sequential processing with few high-performance cores (4-64). |
Built for parallel processing with many simpler cores (hundreds to thousands). |
Clock Speed |
Operates at high clock speeds (3-5 GHz). |
Operates at lower clock speeds (1-2 GHz). |
Thread Register Files |
Each thread has its own register file; hyperthreading allows up to 2 register files per core. |
Register files are shared among threads; the number of threads that can run in parallel depends on the registers required per thread. |
CU (Compute Unit) aka SM (Streaming Multiprocessor) |
A single CU or SM executes each thread. |
Multiple CUs or SMs process a group of threads performing the same operation (wavefront aka warp). |
Instruction Execution |
Designed to quickly execute instructions within a single thread. |
Uses Single Instruction, Multiple Thread (SIMT) execution. |
Branch Prediction |
Utilizes sophisticated branch prediction for handling conditional operations. |
For thread divergence, CUs or SMs process the entire wavefront, masking results for divergent threads. |
Cache |
Large L1/L2 caches per core, shared among fewer threads (typically 2 with hyperthreading). |
Equipped with small caches and a larger number of registers compared to CPUs. |
Context Switching |
Context switching is time-intensive (CU or SM pipeline must be flushed, register files written to memory). |
Context switching is efficient, as threads’ registers are stored on the compute unit, avoiding the need to move them to global memory. |
Figure 2 below visually depicts these architectural differences:
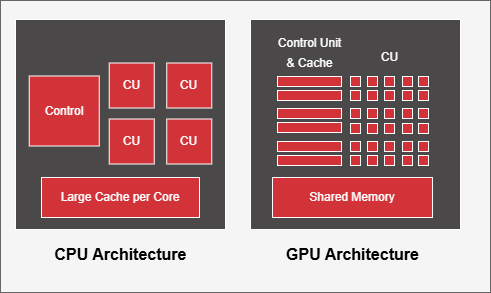
Figure 2: Architectural Differences between a CPU and a GPU#
The CPU is ideal for tasks requiring sequential processing, complex branching, and fast decision-making. It is optimized for low-latency operations with fewer cores but higher individual core performance. Examples include handling I/O operations, logic-heavy algorithms, and managing tasks that require decision-making.
The GPU shines in scenarios requiring massive parallelism and throughput optimization. GPUs are designed for performing repetitive computations across large datasets simultaneously, making them perfect for tasks like image processing, machine learning, and scientific simulations.
Another key difference is memory bandwidth. GPUs typically offer much higher memory bandwidth compared to CPUs, allowing them to move large amounts of data quickly between memory and CUs or SMs. This high bandwidth is essential for workloads that process large datasets in parallel, further enhancing the GPU’s advantage in data-intensive applications.
Introduction to Parallelism#
Parallelism in computing involves breaking down a task into smaller sub-tasks that can be executed simultaneously, utilizing multiple processing units. Parallelism can be achieved either by multi-core (multi-threaded) CPUs or, more importantly, by massive parallelism in GPUs.
Serial vs. Parallel Processing#
Traditional computing involves serial processing, where a single processor executes one instruction at a time on a single piece of data. This approach, known as SISD (Single Instruction Single Data), is typical of work done on traditional single-core CPUs. While effective for tasks with sequential logic, serial processing quickly becomes a bottleneck for workloads that can be divided into many independent operations.
Modern GPUs, by contrast, are designed for parallel processing. They follow the SIMT (Single Instruction, Multiple Threads) model, where a single instruction is executed across many threads, each working on different data elements. Unlike SIMD (Single Instruction, Multiple Data), which processes multiple data points with a single instruction in lockstep, SIMT allows each thread to follow its own control flow, enabling more flexible parallel execution. This makes GPUs highly efficient for workloads that can be parallelized, such as vector addition or matrix operations. Figure 3 below illustrates how SIMT enables efficient parallel execution, making GPUs ideal for high-performance computing workloads.

Figure 3: Instruction flow of a sample SIMT program#
Threads, Wavefronts, Blocks, Grids#
In GPU programming, parallel computation is divided into a hierarchy (see Figure 4 below):
Thread: The smallest unit of execution. Each thread runs an instance of the kernel (GPU function) and performs calculations on a subset of data.
Block: A group of threads, often organized, can cooperate by sharing data in shared memory. Each block operates independently of others.
Grid: A collection of blocks that together execute a kernel on the GPU. The entire grid may consist of thousands of blocks, and it’s the highest-level unit of work in GPU programming.
Wavefront aka Warp: A group of threads that are processed simultaneously within a single SIMD unit in a GPU.
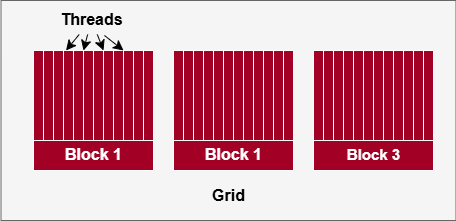
Figure 4: Visual Depiction of Threads, Blocks and Grids.#
What is HIP#
HIP C++ programming language and the HIP runtime API provide a similar programming experience with the CUDA C++ and runtime API, allowing developers to repurpose GPU code written for NVIDIA GPUs to support AMD GPUs, or vice versa. HIP provides an interface for managing memory, launching kernels, and synchronizing between the host (CPU) and the device (GPU). It supports data-parallel execution, where the same operation is applied across many data elements in parallel, making it ideal for GPU-accelerated computations.
Installing HIP#
To start programming with HIP, you will first need to install it. If you prefer a custom installation or more detailed instructions you can consult the installation documentation[2]. In this blog we will cover the quick start installation of ROCm using Ubuntu 24.04.
You can install ROCm using the following terminal commands:
wget https://repo.radeon.com/amdgpu-install/6.4.1/ubuntu/noble/amdgpu-install_6.4.60401-1_all.deb
sudo apt install ./amdgpu-install_6.4.60401-1_all.deb
sudo apt update
sudo apt install python3-setuptools python3-wheel
sudo usermod -a -G render,video $LOGNAME # Add the current user to the render and video groups
sudo apt install rocm
To apply all settings, reboot your system. You can then check that HIP has installed successfully with the following terminal command:
/opt/rocm/bin/hipconfig --full
Now that HIP is successfully installed, we can start programming!
Write Your First Program Using HIP#
After you have verified that the installation was successful, you can start your first HIP program. Let’s cover some of the basic API calls and syntax.
First, we need to include the HIP runtime header file:
#include <hip/hip_runtime.h>
After this, we need to create our kernel. The basic kernel syntax is a function that returns void prefaced by the keyword __global__ so that the kernel can be called by the host:
__global__ void kernel(args) {}
Now we need to know how to get the global thread ID in our grid. As explained earlier, the grid is made up of blocks, each containing a specific number of threads. This means that any thread ID will be the grid size multiplied by the block ID plus the local thread ID:
int gid = blockIdx.x * blockDim.x + threadIdx.x;
When performing work on a thread, it is also important to make sure that threads don’t repeat the same work and that the size of the problem is not exceeded by the threads. We can ensure this with a conditional check where N is the size of the problem:
if (gid < N)
{
    //Perform work on thread
}
Note
This example is fitted for a one-dimensional problem, for 2D or 3D problems thread IDs and conditional checks will have to account for all dimensions.
Now that the kernel is set up, we need to launch it from the host in main. We can do so with the following line:
kernel<<<dim3(gridSize), dim3(blockSize)>>>(args);
The syntax starts with the kernel name followed by a triple chevron. This contains the initialization parameters for the kernel in terms of how many blocks it will run (i.e., the grid size) and how many threads per block (i.e., the block size). Finally, the input arguments are given.
Now that we know the basic syntax, let’s go over a couple of examples.
For the first example, let’s print hello world from the GPU:
#include <hip/hip_runtime.h>

__global__ void gpuHelloWorld(int N)
{
    int gid = blockIdx.x * blockDim.x + threadIdx.x;
    if (gid < N)
    {
        printf("Hello world from block %d and thread %d \n", blockIdx.x, gid);
    }
}

int main()
{
    int gridSize = 4; //Four blocks
    int blockSize = 4; //Threads per block
    int N = gridSize * blockSize; //Size of problem

    gpuHelloWorld<<<gridSize, blockSize>>>(N); //Launch kernel

    return 0;
}
You can then compile the code in the terminal with the line:
hipcc <file name> -o <build file name>
You should get an output similar to the following:
Hello world from block 3 and thread 12
Hello world from block 3 and thread 13
Hello world from block 3 and thread 14
Hello world from block 3 and thread 15
Hello world from block 0 and thread 0
Hello world from block 0 and thread 1
Hello world from block 0 and thread 2
Hello world from block 0 and thread 3
Hello world from block 2 and thread 8
Hello world from block 2 and thread 9
Hello world from block 2 and thread 10
Hello world from block 2 and thread 11
Hello world from block 1 and thread 4
Hello world from block 1 and thread 5
Hello world from block 1 and thread 6
Hello world from block 1 and thread 7
Note
Your terminal output may not be the same as the one shown above. Since each block is run in parallel one may finish before the other, this means the order is not guaranteed.
Let’s look at one more example that’s a bit more involved and perform a simple matrix addition on the GPU.
#include <hip/hip_runtime.h>
#include <iostream>
#include <vector>

// Matrix addition kernel
__global__ void matrixAddition(float* A, const float* B, const int Nx, const int Ny)
{
    const int x = blockIdx.x * blockDim.x + threadIdx.x;
    const int y = blockIdx.y * blockDim.y + threadIdx.y;

    if (x < Nx && y < Ny)
    {
        //In HIP the indicies are column major
        const int idx = y * Nx + x;
        A[idx] += B[idx];
    }
}

// Helper functions for filling matrices
void fillMatrix(std::vector<float>& mat, const int m, const int n)
{
    assert(mat.size() == n * m);
    for(int i = 0; i < n; ++i)
    {
        for(int j = 0; j < m; ++j)
        {
            const int idx = i * m + j;
            mat[idx]      = i + j;
        }
    }
}

// Computes ceil(numerator/divisor) for integer types.
// This helps us determine how many threads to use based on the problem size and the grid size
template <typename intT1,
          class = typename std::enable_if<std::is_integral<intT1>::value>::type,
          typename intT2,
          class = typename std::enable_if<std::is_integral<intT2>::value>::type>
intT1 ceildiv(const intT1 numerator, const intT2 divisor)
{
    return (numerator + divisor - 1) / divisor;
}

int main()
{
    const int Nx = 5; //rows
    const int Ny = 4; //columns

    // Host input data
    std::vector<float> matrixA(Nx * Ny);
    fillMatrix(matrixA, Nx, Ny);
    std::vector<float> matrixB(Nx * Ny);
    fillMatrix(matrixB, Nx, Ny);

    // Host output data
    std::vector<float> finalMatrix(matrixA.size());

    //Memory to allocate to device data in bytes
    const size_t matrixMem = matrixA.size() * sizeof(decltype(matrixA)::value_type);

    //Device data to be sent to the kernel
    float* dA = nullptr;
    float* dB = nullptr;

    //Allocate device memory on GPU
    assert(hipMalloc(&dA, matrixMem) == hipSuccess);
    assert(hipMalloc(&dB, matrixMem) == hipSuccess);

    //Copy data from the host to the device
    assert(hipMemcpy(dA, matrixA.data(), matrixMem, hipMemcpyHostToDevice) == hipSuccess);
    assert(hipMemcpy(dB, matrixB.data(), matrixMem, hipMemcpyHostToDevice) == hipSuccess);

    //Launch the kernel
    matrixAddition<<<dim3(32, 32), dim3(ceildiv(Ny, 32), ceildiv(Nx, 32))>>>(dA, dB, Nx, Ny);

    //Copy the output data from the device back to the output host data
    assert(hipMemcpy(finalMatrix.data(), dA, matrixMem, hipMemcpyDeviceToHost) == hipSuccess);

    //Free allocated GPU memory
    assert(hipFree(dA) == hipSuccess);
    assert(hipFree(dB) == hipSuccess);

    //Check error of computation
    float maxerr = 0.0;
    for(int i = 0; i < finalMatrix.size(); ++i) {
        float diff = std::abs(matrixA[i] + matrixB[i] - finalMatrix[i]);
        if(diff > maxerr)
            maxerr = diff;
    }
    std::cout << "max error: " << maxerr << "\n";

}
The output should be an error of zero, showing that the GPU successfully added the two matrices.
Now that you’ve seen the basics as well as a couple of examples, you’re ready to start making your own programs using the full power of your computer!
If you’re interested in looking at what else HIP has to offer, you can look at the full HIP documentation[3]. Additionally, you can look at more practice examples showcasing the basics of HIP[4] to learn more features and uses HIP has to offer. AMD also has a public rocm-examples[5] repository to provide valuable code examples on different topics covering the ROCm stack and its applications.
Summary#
GPU computing is no longer just about graphics; it has become a fundamental technology for accelerating complex algorithms in AI, simulations, and data analytics. AMD’s HIP API offers a programming interface on the ROCm platform, giving developers control over threads, blocks, and memory while ensuring code portability and high performance.
In this blog, we explored the fundamentals of GPU programming with AMD’s HIP API on the ROCm platform, covering how GPUs differ from CPUs, why they excel at parallel workloads, and how HIP enables you to harness that power for your own applications. We walked through installing ROCm and HIP, then built and ran simple HIP programs—including a matrix addition example—to demonstrate key concepts like threads, blocks, and basic memory management. With this foundation you’re now equipped to start developing your own GPU-accelerated programs using HIP.
Disclaimers#
Third-party content is licensed to you directly by the third party that owns the content and is not licensed to you by AMD. ALL LINKED THIRD-PARTY CONTENT IS PROVIDED “AS IS” WITHOUT A WARRANTY OF ANY KIND. USE OF SUCH THIRD-PARTY CONTENT IS DONE AT YOUR SOLE DISCRETION AND UNDER NO CIRCUMSTANCES WILL AMD BE LIABLE TO YOU FOR ANY THIRD-PARTY CONTENT. YOU ASSUME ALL RISK AND ARE SOLELY RESPONSIBLE FOR ANY DAMAGES THAT MAY ARISE FROM YOUR USE OF THIRD-PARTY CONTENT.