Styled Text Image Generation with Eruku on AMD#

Producing text images where text is both readable and controllable while faithfully matching a target visual style is a challenging problem. It has broad applications ranging from synthetic handwritten text generation to graphic design. In these settings, you need more than plausible images; you need precise control over both text content and visual fidelity. This is where Eruku[1] stands out.
Eruku addresses this challenge with a new approach to styled text image generation. It reframes the task as a multimodal, prompt-conditioned autoregressive problem and replaces heuristic stopping rules with an explicit end-of-generation token, improving reliability and content adherence. This post explains the method at a high level, describes how it was developed and trained on the LUMI supercomputer powered by AMD Instinct™ MI250X GPUs, and provides steps to run it on ROCm™.
What is Styled Text Image Generation?#
Styled Text Image Generation is the task of generating an image containing user-provided text in a specified style. For example, given any arbitrary text and an image of someone’s handwriting, we can generate an image of that text in the provided handwriting style. While generic image generation models are getting better at generating text images, tackling the generation of handwriting and typewriting is still particularly challenging. Models like Eruku, which specifically tackle these problems, have been developed within the field of Handwritten Text Generation (HTG). Eruku is nonetheless very capable of generating text in a variety of styles, not just handwriting.
What is Eruku?#
Eruku is a Styled Text Image Generation model based on an autoregressive encoder-decoder Transformer architecture, presented at WACV 2026. A full description is available on its project page. An interactive demo of Eruku is available here.
How does Eruku work?#
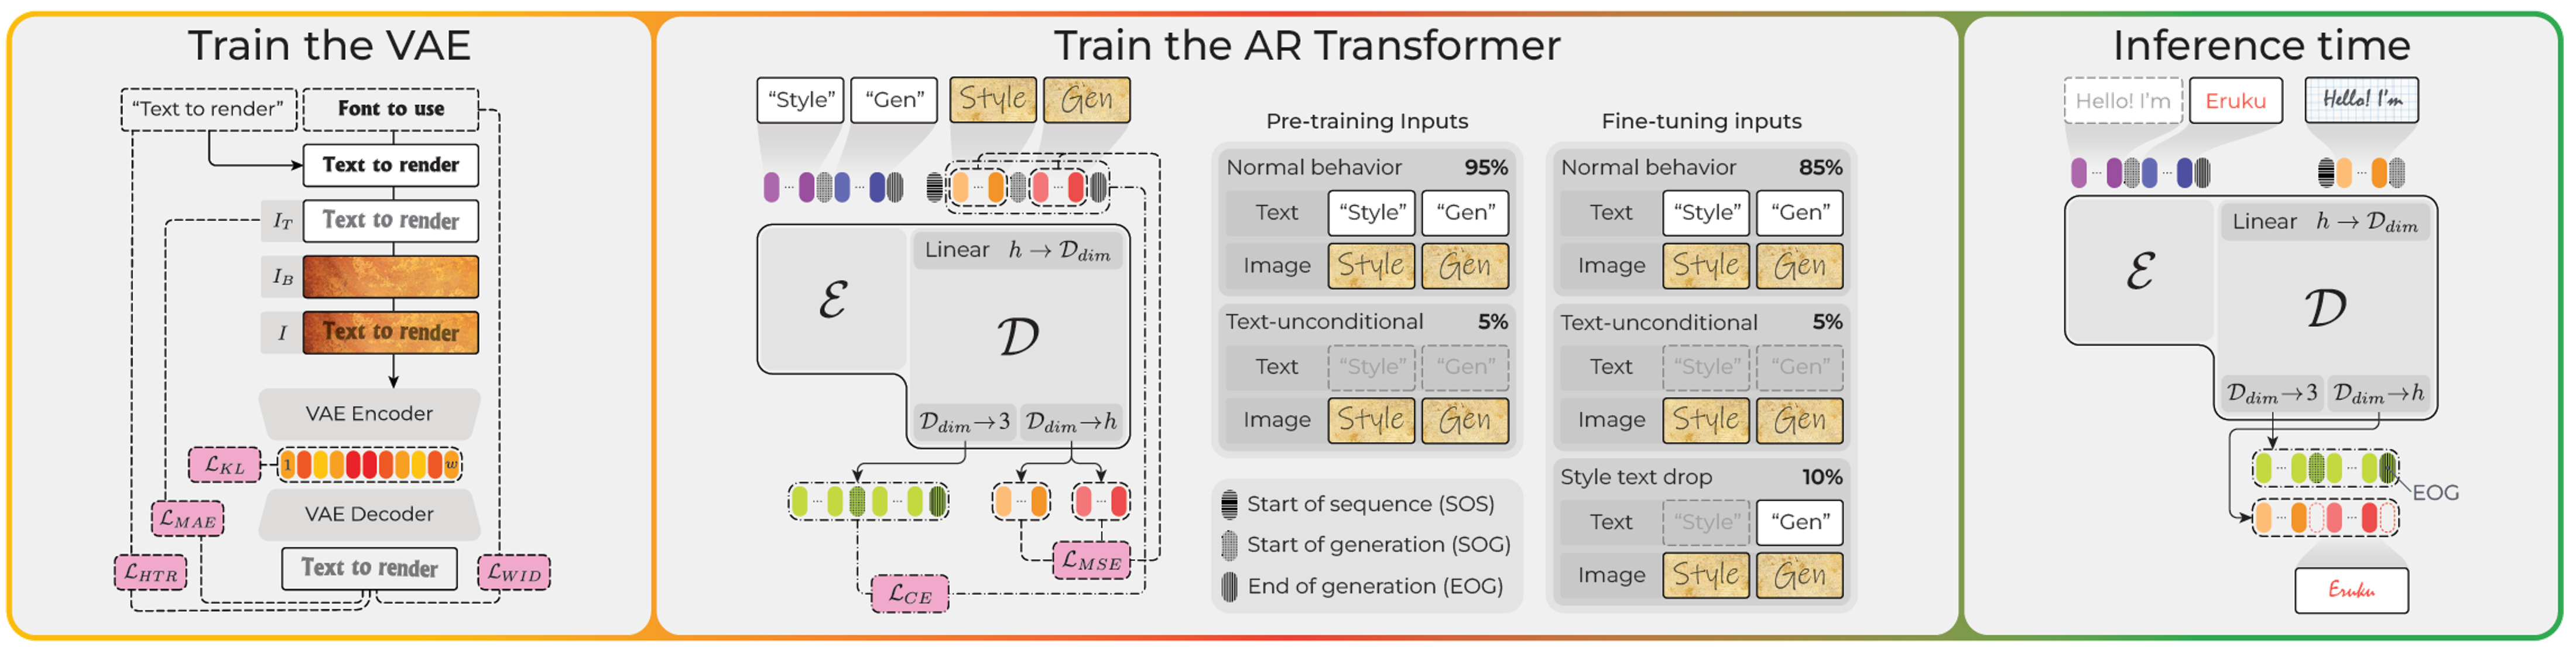
Figure 1. Eruku components, from left to right: VAE training, autoregressive Transformer training, and inference-time behavior.#
As shown in the middle panel of Figure 1, Eruku is based on an autoregressive encoder-decoder Transformer architecture, in contrast to many other modern image generation models, which are based on diffusion models. HTG models based on diffusion models[2] exist, but they are not as effective as Eruku.
One of the main reasons for this is an architectural limitation on diffusion models: they generate images on a fixed-size canvas, which requires knowing in advance the size of the image that will be generated. This is not always easy to estimate for text images, especially when generating handwriting, where the size of the image can be very variable and not easily predictable.
Eruku, on the other hand, is based on next-token prediction, which does not have this limitation: it can generate tokens corresponding to successive slices of the image, and decide when to stop by itself.
The user inputs are processed in this way: the text is first tokenized using ByT5’s byte-level tokenizer[3], whereas the style image is processed by Emuru’s text-specific VAE encoder[4] (see the left panel of Figure 1), which outputs a sequence of latent vectors. The tokenized text is fed into the encoder of the Eruku encoder-decoder Transformer, and the latent vectors are fed into the decoder. The decoder then generates the image token by token, in a somewhat similar way to how Large Language Models (LLMs) generate text.
An architectural difference between Eruku and LLMs is that Eruku’s decoder operates on continuous vectors rather than discrete tokens. Specifically, the VAE latents are linearly projected into Eruku’s embedding space. During decoding, the model’s outputs are linearly projected into two representations: one corresponding to the VAE decoder’s latent space for image reconstruction, and another three-dimensional space used for generation control. The latter three-dimensional output determines whether the generated token is the start-of-generation token, the end-of-generation token, or an image token. When an end-of-generation token is generated, the generation process stops. At this point, all the collected image tokens are decoded by the VAE decoder into an image.
Eruku was trained on a massive dataset of 20 million synthetically generated samples, and then finetuned on a smaller dataset of longer samples, which were also synthetically generated. You can download both datasets and use them as you like. The training and fine-tuning datasets are publicly available on Hugging Face and are released under the Creative Commons Attribution 4.0 International (CC BY 4.0) license:
Eruku demonstrates promising ability to transfer the knowledge acquired from synthetic datasets to real-world handwriting datasets. As shown in Figure 2, Eruku achieves competitive performance compared to its autoregressive predecessor Emuru[4], the strongest GAN-based competitor VATr++[5], and the leading diffusion-based method DiffusionPen[2] on both the word‑level and line‑level datasets, as well as on the handwritten and typewritten datasets.
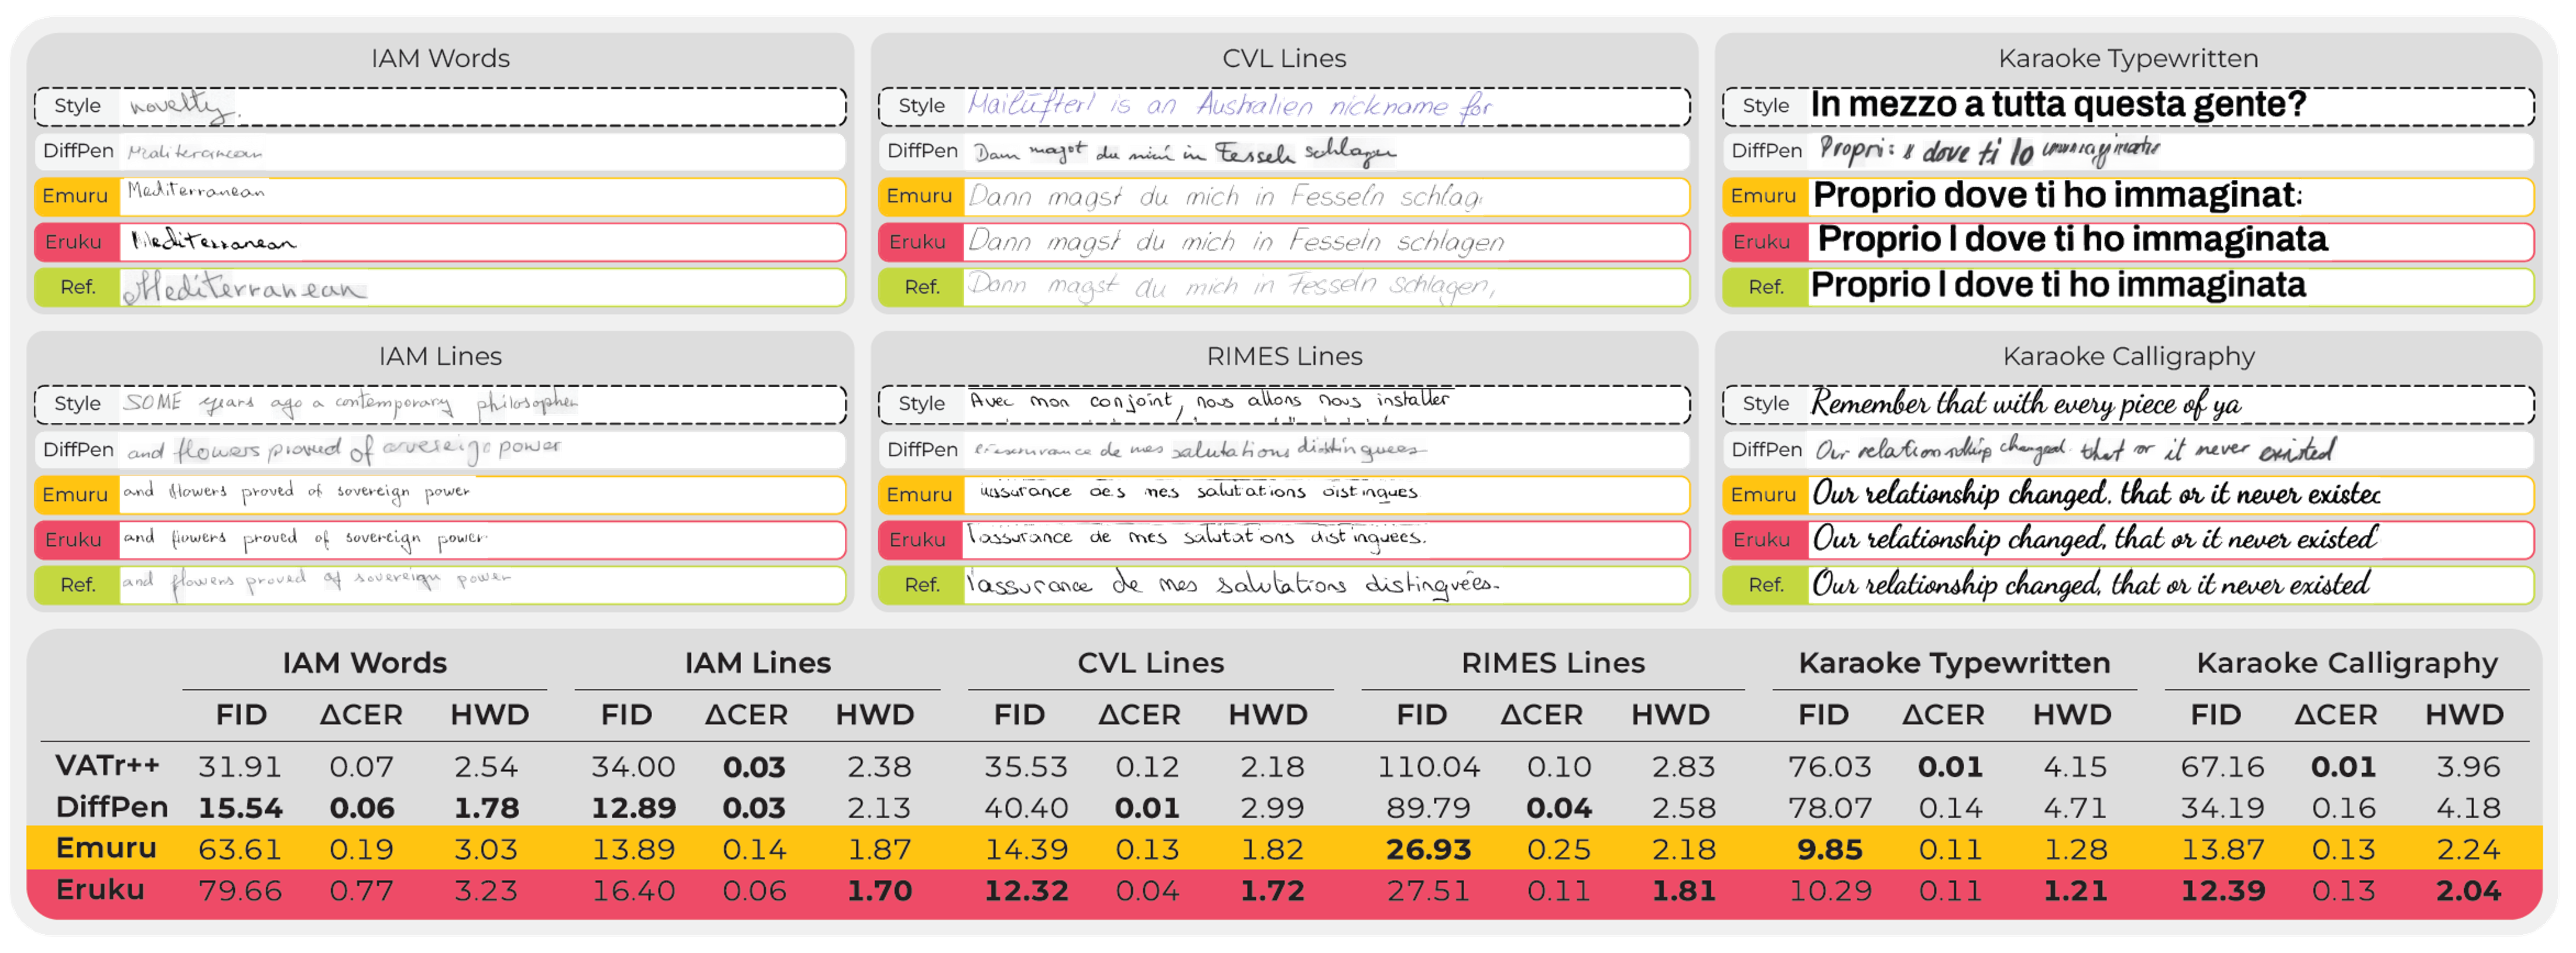
Figure 2. Qualitative and quantitative results of Eruku and competing methods across various datasets. Source: Eruku paper. The standard image-quality metric Fréchet Inception Distance (FID) evaluates visual realism. The Absolute Character Error Rate Difference (ΔCER) quantifies readability relative to the reference style. The task-specific Handwriting Distance (HWD) measures style fidelity. For all the metrics, lower is better. Further qualitative and quantitative results can be found in the paper.#
If you are just interested in running Eruku, you can skip ahead to Running Eruku on AMD. If you’re interested in how we trained Eruku on LUMI, you can continue with the next section.
Developing Eruku on LUMI supercomputer#
Eruku itself was trained using AMD GPUs on the LUMI supercomputer, while its predecessor Emuru, whose code served as the starting point for Eruku, was developed on NVIDIA hardware. Using PyTorch with seamless ROCm™ support allowed the same Python code to run on both CUDA‑based NVIDIA GPUs and ROCm‑based AMD GPUs. This made it possible to go back and forth between NVIDIA and AMD hardware during development, which was very useful for debugging, since the in-house systems the authors used for debugging had NVIDIA GPUs. In fact, the publicly released Eruku code is compatible with both CUDA and ROCm™.
LUMI provides containers with pre-installed ROCm™ and PyTorch, along with documentation on running deep learning workloads on the system. Here is a useful guide to get started. In the next section, we explain how we set up the environment for training Eruku on LUMI.
Setting up the environment on LUMI#
In order to use the LUMI Singularity containers for Deep Learning, start by loading the appropriate modules:
module use /appl/local/containers/ai-modules
module load singularity-AI-bindings
Then, pick a base Singularity container. You can get an up-to-date list of available container images with ls /appl/local/containers/sif-images/. We used the lumi-pytorch-rocm-6.2.4-python-3.12-pytorch-v2.6.0.sif container for our experiments, which has ROCm 6.2.4, Python 3.12, and PyTorch 2.6.0. Set the SIF variable to the path of the container image:
export SIF=/appl/local/containers/sif-images/lumi-pytorch-rocm-6.2.4-python-3.12-pytorch-v2.6.0.sif
You can then get a shell within the container with:
singularity shell $SIF
Then, within the container, you can initialize Conda with:
$WITH_CONDA
Then create a virtual environment and activate it:
python -m venv emuru-env --system-site-packages
source emuru-env/bin/activate
Clone the Eruku repository:
git clone https://github.com/Blowing-Up-Groundhogs/Eruku.git
cd Eruku
Then, within the virtual environment, you can install the required packages:
pip install -r requirements.txt
At this point, you should have a working environment for training Eruku on LUMI.
Multi-GPU Training on LUMI#
To run distributed training on a full node on LUMI-G, we use the following SLURM script:
#!/bin/bash
#SBATCH --job-name=eruku_cont
#SBATCH --account=project_XXXXXXXXX
#SBATCH --partition=small-g
#SBATCH --nodes=1
#SBATCH --ntasks-per-node=1
#SBATCH --gpus-per-node=8
#SBATCH --cpus-per-task=56
#SBATCH --mem=400GB
#SBATCH --time=04-00:00:00

module use /appl/local/containers/ai-modules
module load singularity-AI-bindings

export SIF=/appl/local/containers/sif-images/lumi-pytorch-rocm-6.2.4-python-3.12-pytorch-v2.6.0.sif

srun singularity exec $SIF bash -c '$WITH_CONDA && source ~/emuru-env/bin/activate && /users/$USERNAME/emuru-env/bin/accelerate launch  --num_machines=1 --machine_rank=0 --main_process_port=0 cnt_multigpu_hf.py'
Looking at LUMI-G’s architecture documentation, we can see the following:
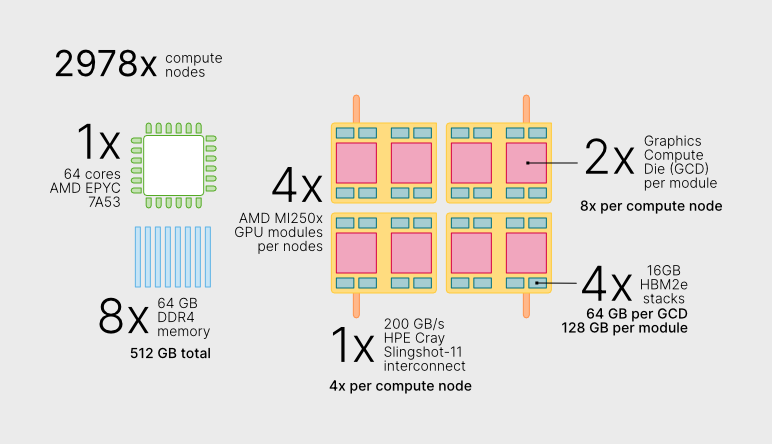
Figure 3. LUMI-G overview. Figure source: LUMI supercomputer website, reused under the CC BY 4.0 license. No modifications applied.#
As shown in Figure 3, each LUMI-G node has a 64-core AMD EPYC™ CPU and 4 AMD Instinct MI250X GPU modules. In the SLURM script, we are requesting 1 node, 1 task, 8 GPUs, 56 CPUs and 400GB of memory. Each MI250X GPU module has 2 GPU dies (Graphic Compute Dies, or GCDs), so to use all 4 modules we need to request 8 GPUs, each will have access to 64GB of HBM memory.
We request 56 out of the 64 available CPU cores, because LUMI-G runs in low-noise mode, which means that 8 cores are reserved for the system.
To ensure the training process is robust and efficient in such a large-scale parallel setting, we implemented several features using Hugging Face Accelerate in our training script:
DDP-Compatible Model Wrapper: We use a
DDPCompatibleEmuruwrapper (defined in eruku_continuous_inf.py) with a unifiedforwardmethod. This ensures that all model operations—training, inference, and visualization—interact correctly with PyTorch’s Distributed Data Parallel (DDP) logic.Dynamic Gradient Accumulation: To maintain a consistent effective batch size (we used 256 samples) regardless of the number of GPUs, the script automatically calculates the required gradient accumulation steps based on the available hardware.
Fixed-Length Padding for Stability: To prevent distributed deadlocks (hangs), we pad all images and text tensors to a fixed maximum length (
MAX_IMG_LEN). This ensures that every GPU in the DDP group receives identical tensor shapes, which is critical when working with variable-length handwriting samples.Reliability and Debugging: We configured PyTorch distributed (NCCL/RCCL) environment variables such as
TORCH_NCCL_BLOCKING_WAITto enforce synchronous error reporting. This helps prevent failures from being deferred by asynchronous execution and makes debugging large‑scale ROCm™ runs more predictable.Distributed Evaluation and Logging: Evaluation is performed across all GPUs, with results gathered on the main process for synchronized logging to Weights & Biases.
Running Eruku on AMD#
We provide a Gradio‑based web interface for Eruku that can be run on AMD hardware. In this blog post, we deploy and run the interface on a LUMI compute node using ROCm™, while accessing it locally through a web browser via port forwarding. The demo code is hosted on Hugging Face Spaces.
Running Eruku on LUMI supercomputer#
Request an interactive session on a compute node with GPU access for an hour:
salloc --account=project_XXXXXX --partition=dev-g --nodes=1 --gpus-per-node=1 --cpus-per-gpu=8 --mem=16G --time=01:00:00

module use /appl/local/containers/ai-modules && module load singularity-AI-bindings
Once you’re on the compute node, enter the Singularity container and activate your environment:
export SIF=/appl/local/containers/sif-images/lumi-pytorch-rocm-6.2.4-python-3.12-pytorch-v2.6.0.sif
srun --interactive --pty singularity shell $SIF
$WITH_CONDA
python -m venv eruku-env --system-site-packages
source eruku-env/bin/activate
Then, download the demo code from Hugging Face:
git clone https://huggingface.co/spaces/carminezacc/eruku
cd eruku
Install the required dependencies:
pip install -r requirements.txt
The demo will automatically download the pretrained Eruku model weights from Hugging Face Hub on the first run. To launch the Gradio interface:
python app.py
This will start a local web server on the compute node. You should see output similar to:
Running on local URL: http://127.0.0.1:7860
Since LUMI compute nodes are not directly accessible from your local machine, you need to set up SSH port forwarding. In a new terminal on your local machine:
ssh -L 7860:<node_name>:7860 <your_username>@lumi.csc.fi
Then, from within that SSH session, connect to the compute node where your app is running:
ssh -L 7860:localhost:7860 <node_name>
Replace <node_name> with the actual compute node identifier (you can find this by running squeue --me on a terminal connected to a LUMI login node and checking which node the job is running on in the NODELIST column). Now you can open http://localhost:7860 in your local web browser to interact with the demo.
The interface allows you to:
Upload a style image containing example text in your desired style (e.g., a photo of handwriting) and, if you want, also the text contained in the image (the model will work better if you provide it).
Enter the text you want to generate in that style.
Generate and download the resulting styled text image.
The demo runs on a LUMI compute node within an interactive session using ROCm™, while the Gradio interface is accessed locally through port forwarding to your browser. All processing takes place inside the container environment configured on LUMI.
Summary#
In this blog post, we have shown how advanced generative AI research—specifically styled text image generation with Eruku—can be effectively trained and deployed on AMD Instinct™ MI250X GPUs and ROCm™ at scale. We walked through the key ideas behind the model, highlighted how the training setup was realized on the LUMI supercomputer, and provided reproducible steps to run the interactive demo.
If you are working on styled text generation, handwriting synthesis, or document understanding tasks, including synthetic document creation for OCR training or robustness testing of document parsing pipelines, we encourage you to try Eruku on AMD platforms. To dive deeper into the method itself, check out the Eruku paper, the GitHub repository, and the Hugging Face model card. Additional resources on document analysis and generative models are available on the authors’ Hugging Face organization page.
Keep an eye out for upcoming posts on generative AI workloads, reproducible training pipelines, and deployment on ROCm™ in the future.
Disclaimers#
Third-party content is licensed to you directly by the third party that owns the content and is not licensed to you by AMD. ALL LINKED THIRD-PARTY CONTENT IS PROVIDED “AS IS” WITHOUT A WARRANTY OF ANY KIND. USE OF SUCH THIRD-PARTY CONTENT IS DONE AT YOUR SOLE DISCRETION AND UNDER NO CIRCUMSTANCES WILL AMD BE LIABLE TO YOU FOR ANY THIRD-PARTY CONTENT. YOU ASSUME ALL RISK AND ARE SOLELY RESPONSIBLE FOR ANY DAMAGES THAT MAY ARISE FROM YOUR USE OF THIRD-PARTY CONTENT.