Deploy an Imaging AMD Solution Blueprint on AMD Radeon™ GPUs#
AMD introduces support for AMD Radeon™ AI PRO R9700 and AMD Radeon™ PRO W7900 GPUs in technical preview for the AMD enterprise AI reference stack, and the AMD GPU Operator:
With these components running on AMD Radeon hardware, you can, for example:
Serve your own LLMs using AMD Inference Microservices (AIMs). AIMs provide standardized, portable inference microservices for serving AI models on AMD hardware. Distributed as Docker images, AIMs abstract away the complexities involved in model serving through an intelligent orchestration layer that automatically configures runtime environments, detects available accelerators, selects a performance profile, and exposes an OpenAI-compatible API.
Deploy reference applications from the AMD Solution Blueprints Catalog. AMD Solution Blueprints offer an easy way to explore AIMs in the context of a complete microservice solution, such as document summarization, RAG chatbots, AI coding assistants, and agentic workflows.
Simplify deployment & management of GPUs within kubernetes clusters, using the AMD GPU Operator. It automates driver installation, device plugin deployment, and node labeling for AMD Instinct™ and Radeon GPUs, so accelerators come up as schedulable cluster resources without manual per-node setup. Use AMD GPU Operator to configure and scale out GPU-accelerated workloads, including machine learning and generative AI, with support for tracking GPU utilization and other metrics with HTTP-based tools like Prometheus and Grafana.
These capabilities are made possible by a layered stack that runs from the hardware up to the applications you deploy. Each layer builds on the one below it (see Figure 1).
At the base, AMD Radeon hardware is made programmable by ROCm, orchestrated by Kubernetes, and exposed to the cluster by the AMD GPU Operator. AIMs, AMD AI Workbench, and AMD Resource Manager manage models, workflows, and resources. Open standards, frameworks and popular LLMs, run on top of them. Finally, your applications, agents, and Solution Blueprints build on that foundation at the top.
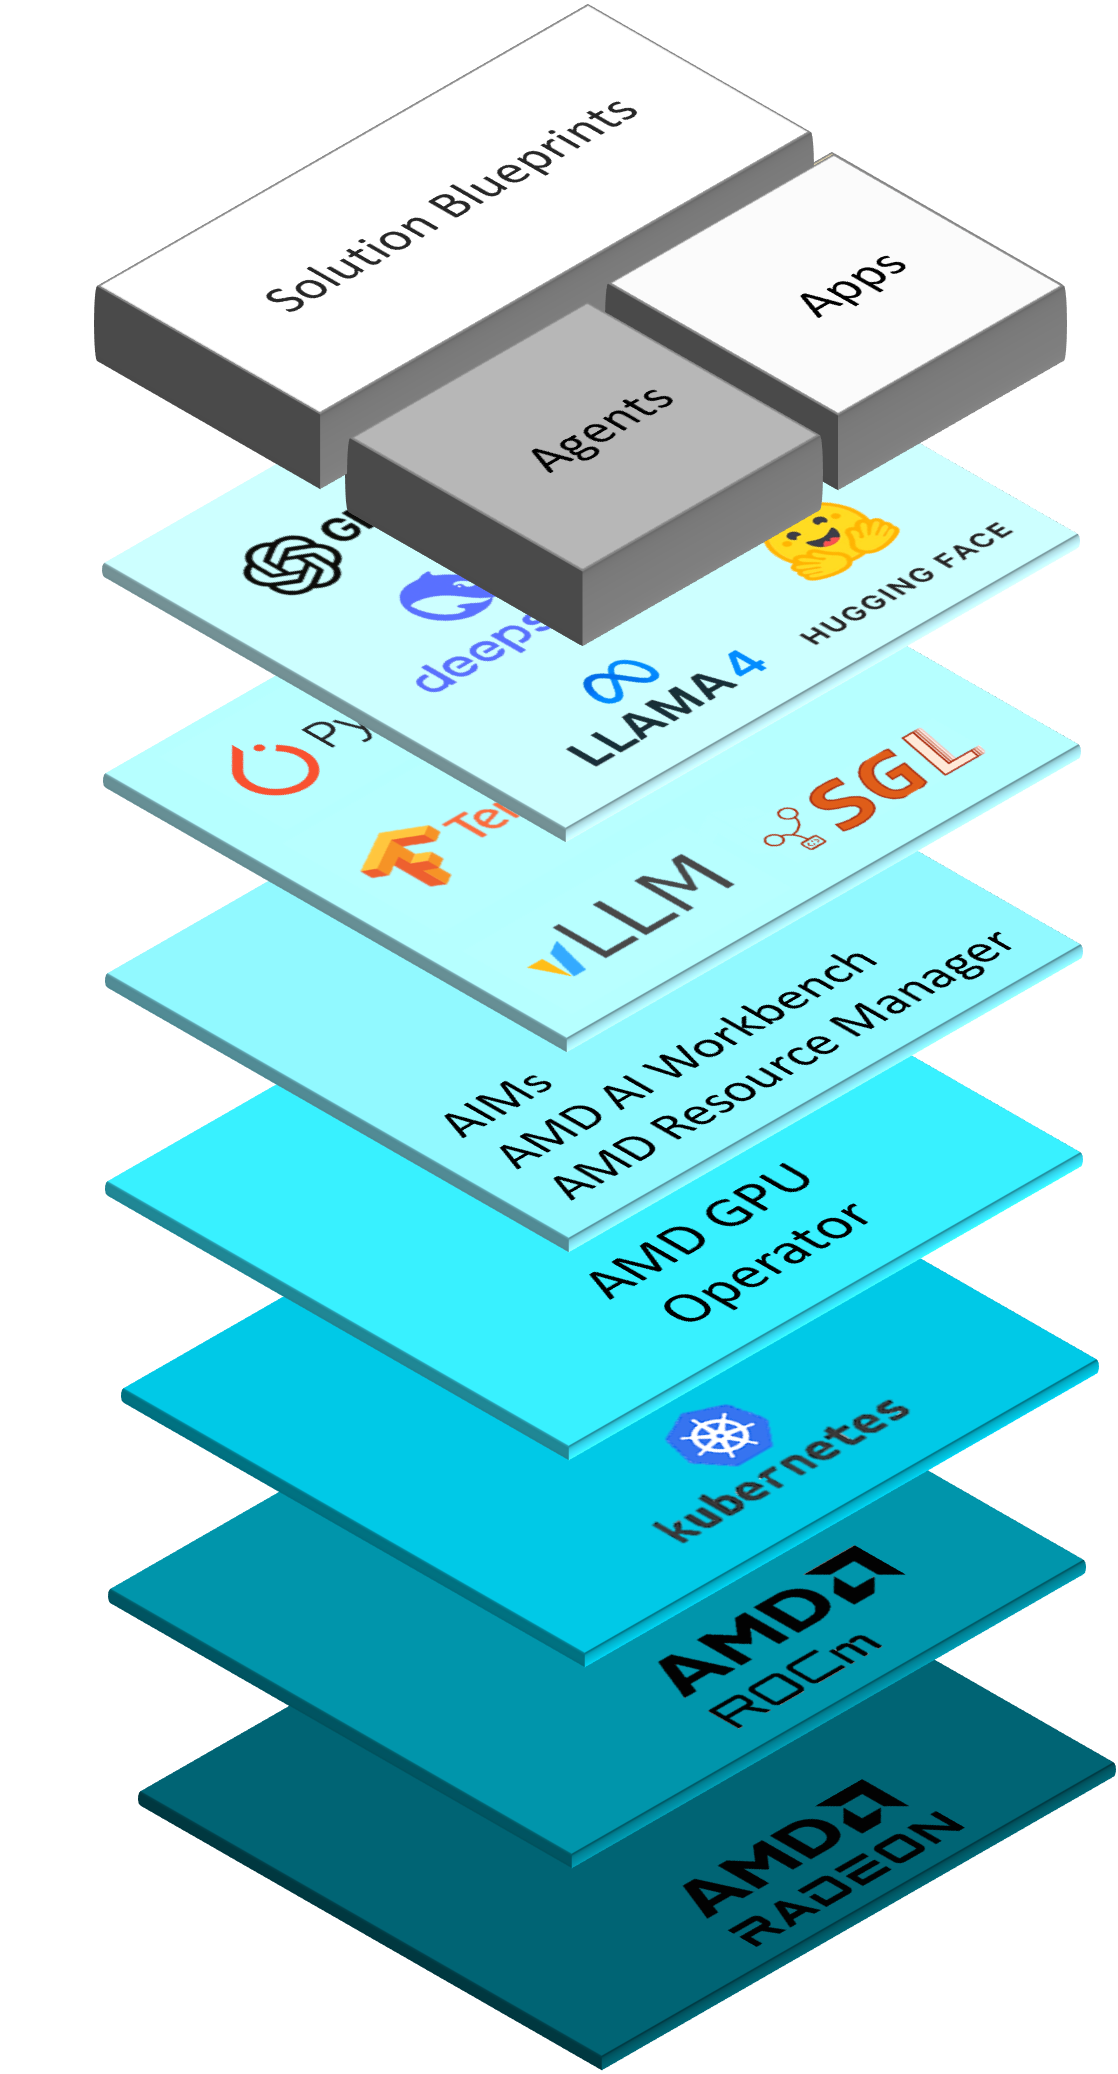
Figure 1: Overview of the stack, from hardware to the applications.
In this blog, we put this into practice with one concrete example. We will walk you through how to deploy the MRI Analysis Tool Solution Blueprint, an MRI imaging application on AMD Radeon AI PRO R9700S GPU, in a Kubernetes cluster. The MRI Analysis Tool is one of AMD’s several Solution Blueprints available in the AMD Solution Blueprints Catalog.
Specifically, we will:
Deploy the AMD Solution Blueprint directly from the terminal
Connect to the Gradio web interface
Run an analysis on a sample MRI scan
Read and interrogate the LLM-assisted report through follow-up Q&A
Clean up the deployed resources when you are done
Note
The MRI Analysis Tool is intended for research and educational use only. It is not a medical device and must not be used for clinical diagnosis or treatment decisions.
Prerequisites#
This blog post was validated on a cluster powered by AMD Radeon AI PRO R9700S GPUs and with AMD AI Workbench v2.0.0 and AMD Resource Manager v2.0.0 installed. For installation guides, see e.g.,On-premises Installation.
Before you begin, ensure the following prerequisites are met:
Kubernetes cluster: Access to a cluster (e.g., via
kubectl). You should be able to create resources in at least one namespace (we’re using AMD Resource Manager for managing projects or namespaces)Namespace: Access to at least one namespace. For this blog we’ve used AMD Resource Manager to get access to a project. We use a project called
mri-analysis-blog
kubectl and k9s: Installed and configured to communicate with your cluster
Helm: Installed on your machine
Basic technical proficiency: Familiarity with command-line tools, kubectl, and cluster monitoring tools such as k9s
Note
If using a gated model, providing a Hugging Face token will be necessary. See the Customization section at the end for further details.
Deploying the MRI Analysis Solution Blueprint#
The MRI Analysis Tool is an AI-powered reference application that combines computer vision, deep learning, and an AIM to provide an AI generated report based on an MRI scan. It takes an image through a full pipeline of loading, preprocessing, tissue segmentation, anomaly detection, and quantitative measurements, then passes the computed results to an AIM-served LLM that drafts an AI generated report. Everything is then exposed through a web interface, you interact with the entire workflow from your browser.
The analysis pipeline provides the following capabilities:
Multi-format input: DICOM (
.dcm), NIfTI (.nii,.nii.gz), and standard images (.png,.jpg,.jpeg).Preprocessing: CLAHE contrast enhancement and Gaussian noise reduction to improve image quality before analysis.
Tissue segmentation: K-means clustering that groups pixels into tissue regions with per-cluster statistics.
Anomaly detection: Statistical thresholding combined with connected-component counting to flag and visually overlay candidate regions of interest.
Quantitative measurements: Image dimensions, intensity statistics, signal-to-noise ratio.
LLM-assisted reporting: An AI generated report based on the computed findings, plus an interactive Q&A chat for follow-up questions.
The application runs as a single container alongside the AIM, Qwen3 VL 8B Instruct, that serves the LLM, as shown in Figure 2.
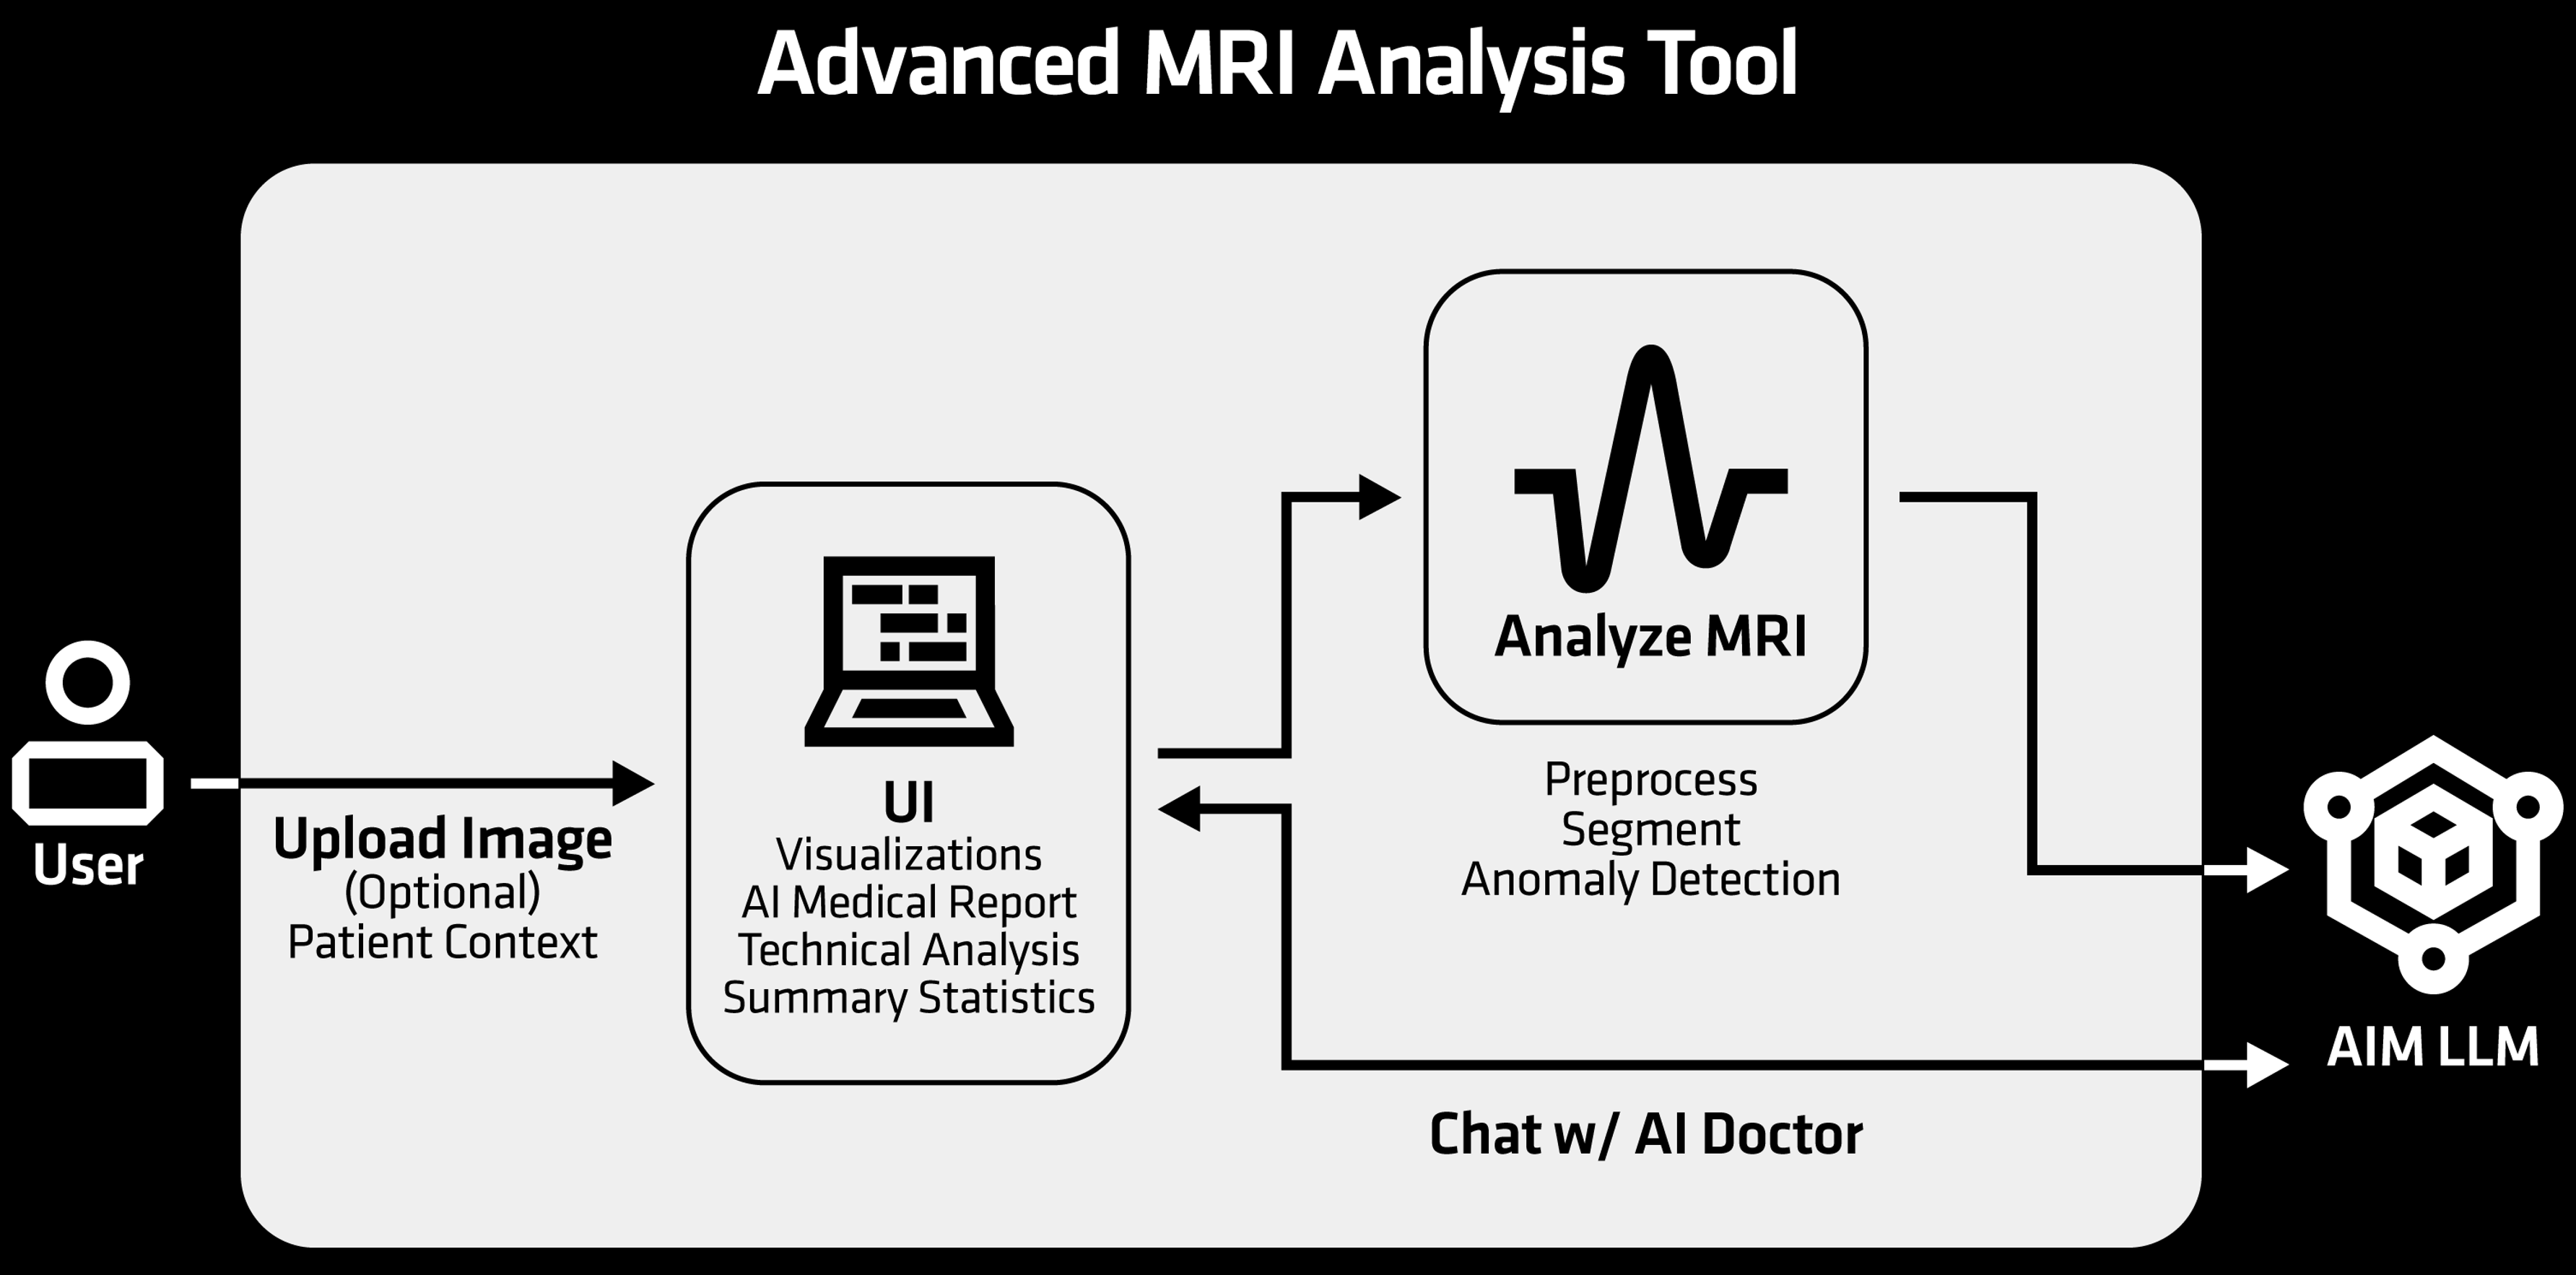
Figure 2: MRI Analysis Tool architecture diagram.
Deployment of the MRI Analysis Solution Blueprint#
AMD Solution Blueprints are packaged as OCI-compliant Helm charts and are available in the Docker Hub registry. The recommended deployment approach is to pipe the output of helm template to kubectl apply -f -. Let’s walk through the deployment process.
First we need to identify the AMD Solution Blueprint chart name from the Solution Blueprint MRI Docs. For the MRI Analysis Tool, the chart name is aimsb-mri-doc.
Next, we define the deployment parameters. For this deployment we will use the following:
Deployment name:
mri-docKubernetes namespace:
mri-analysis-blog(this corresponds to the AMD Resource Manager project)
Feel free to use a different existing namespace and choose your own deployment name.
Now, we generate the deployment manifest and save it to a file called mri-deployment.yaml for easier customization or debugging. This solution blueprint can be deployed on AMD Instinct (default) and AMD Radeon. To deploy on Radeon, include --set global.platform=radeon in the command below:
name="mri-doc"
namespace="mri-analysis-blog"
chart="aimsb-mri-doc"
helm template $name "oci://registry-1.docker.io/amdenterpriseai/$chart" \
  --set global.platform=radeon > mri-deployment.yaml
Finally, we apply the manifest to deploy the solution blueprint to our specified namespace:
kubectl apply -f mri-deployment.yaml -n $namespace
This command creates two deployments: one for the AIM LLM (Qwen3 VL 8B Instruct, the solution blueprint’s default Radeon AIM model) and one for the MRI Analysis Tool application itself.
To inspect the two underlying pods created, run the following command:
kubectl get pods -n $namespace
The command should produce output similar to the following once the deployments are up and running. Note that it can take some time for the AIM LLM to deploy:
NAME                            READY   STATUS    RESTARTS   AGE
aimsb-mri-doc-llm-mri-doc...    1/1     Running   0          5m
aimsb-mri-doc-mri-doc...        1/1     Running   0          5m
Once both deployments are shown as READY, let’s move on and connect to the UI.
Connecting to the UI#
To connect to the UI, we need to either port-forward or use HTTP routing. For simplicity, we will use port-forwarding in this blog. Port-forward port 7861. The UI will then be available at http://localhost:7861:
kubectl port-forward services/aimsb-mri-doc-$name 7861:80 -n $namespace
The UI can be seen in Figure 3 below.
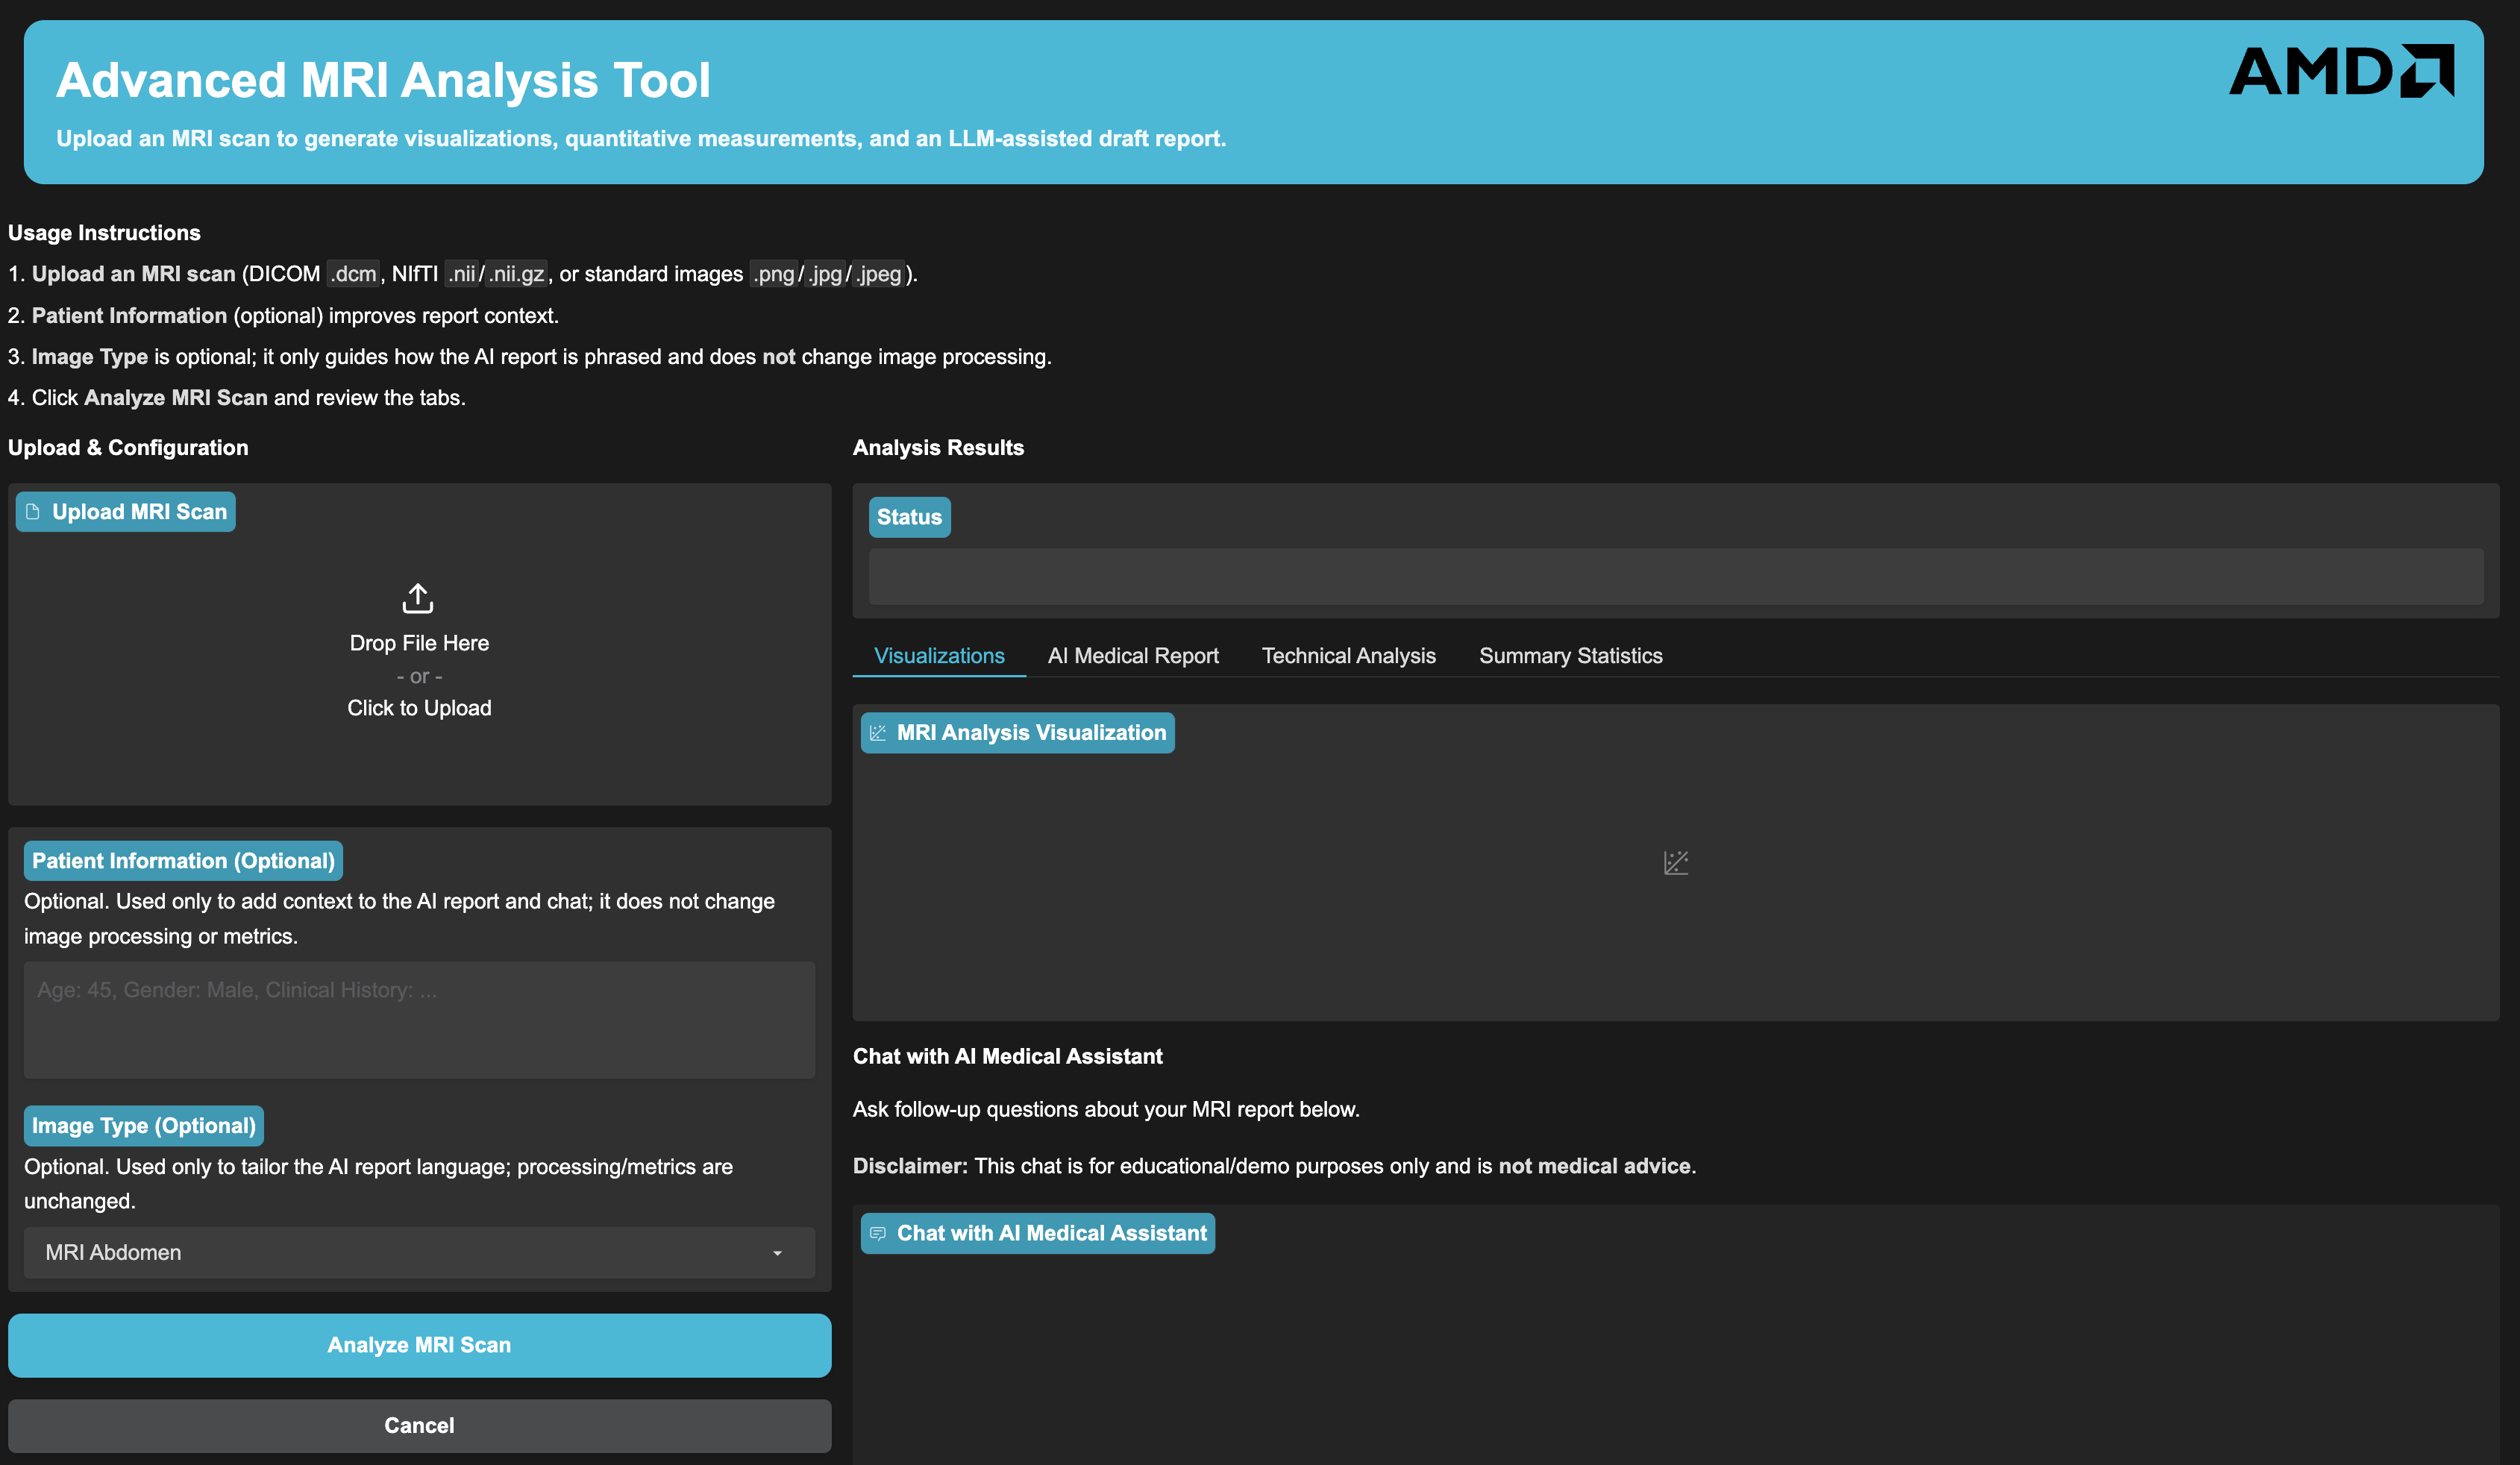
Figure 3: MRI Analysis Tool UI.
Using the MRI Analysis Tool#
Follow the steps below:
Upload an MRI scan: Use the file uploader to provide a scan in any of the supported formats: DICOM (
.dcm), NIfTI (.nii,.nii.gz), or a standard image (.png,.jpg,.jpeg). If you don’t have a scan on hand, there are starting points for finding sample datasets, such as the DICOM Library, TCIA, and OpenNeuro (always review each dataset’s license and terms before use).Provide optional patient context: Add any relevant background information, such as the scanned region or clinical question, to give the AIM LLM more context for the report it will draft. This step is optional.
Select the MRI type and run the analysis: Choose the MRI type that matches your scan and start the analysis.
Review the outputs: When the run completes, it provides four different outputs: AI-generated outputs may contain inaccuracies and should be independently reviewed
Visualizations: The original MRI, the enhanced image (CLAHE + Gaussian filter), the tissue segmentation (K-means), and the anomaly detection (if any anomalies are detected), all available to study visually. See Figure 4.
AI-Generated Report: An AI-generated analysis report containing a clinical impression, detailed findings, quantitative analysis, recommendations, technical quality, and a summary.
Technical Analysis: Tissue segmentation results and anomaly detection results, for a quick overview.
Summary Statistics: A processing summary that provides an overview of metrics such as processing time, image dimensions, and the number of anomalous regions detected.
In Figure 4, you see an example of an MRI scan in the Visualizations tab. This example uses a .jpg image. Results may vary based on image quality and other processing factors.
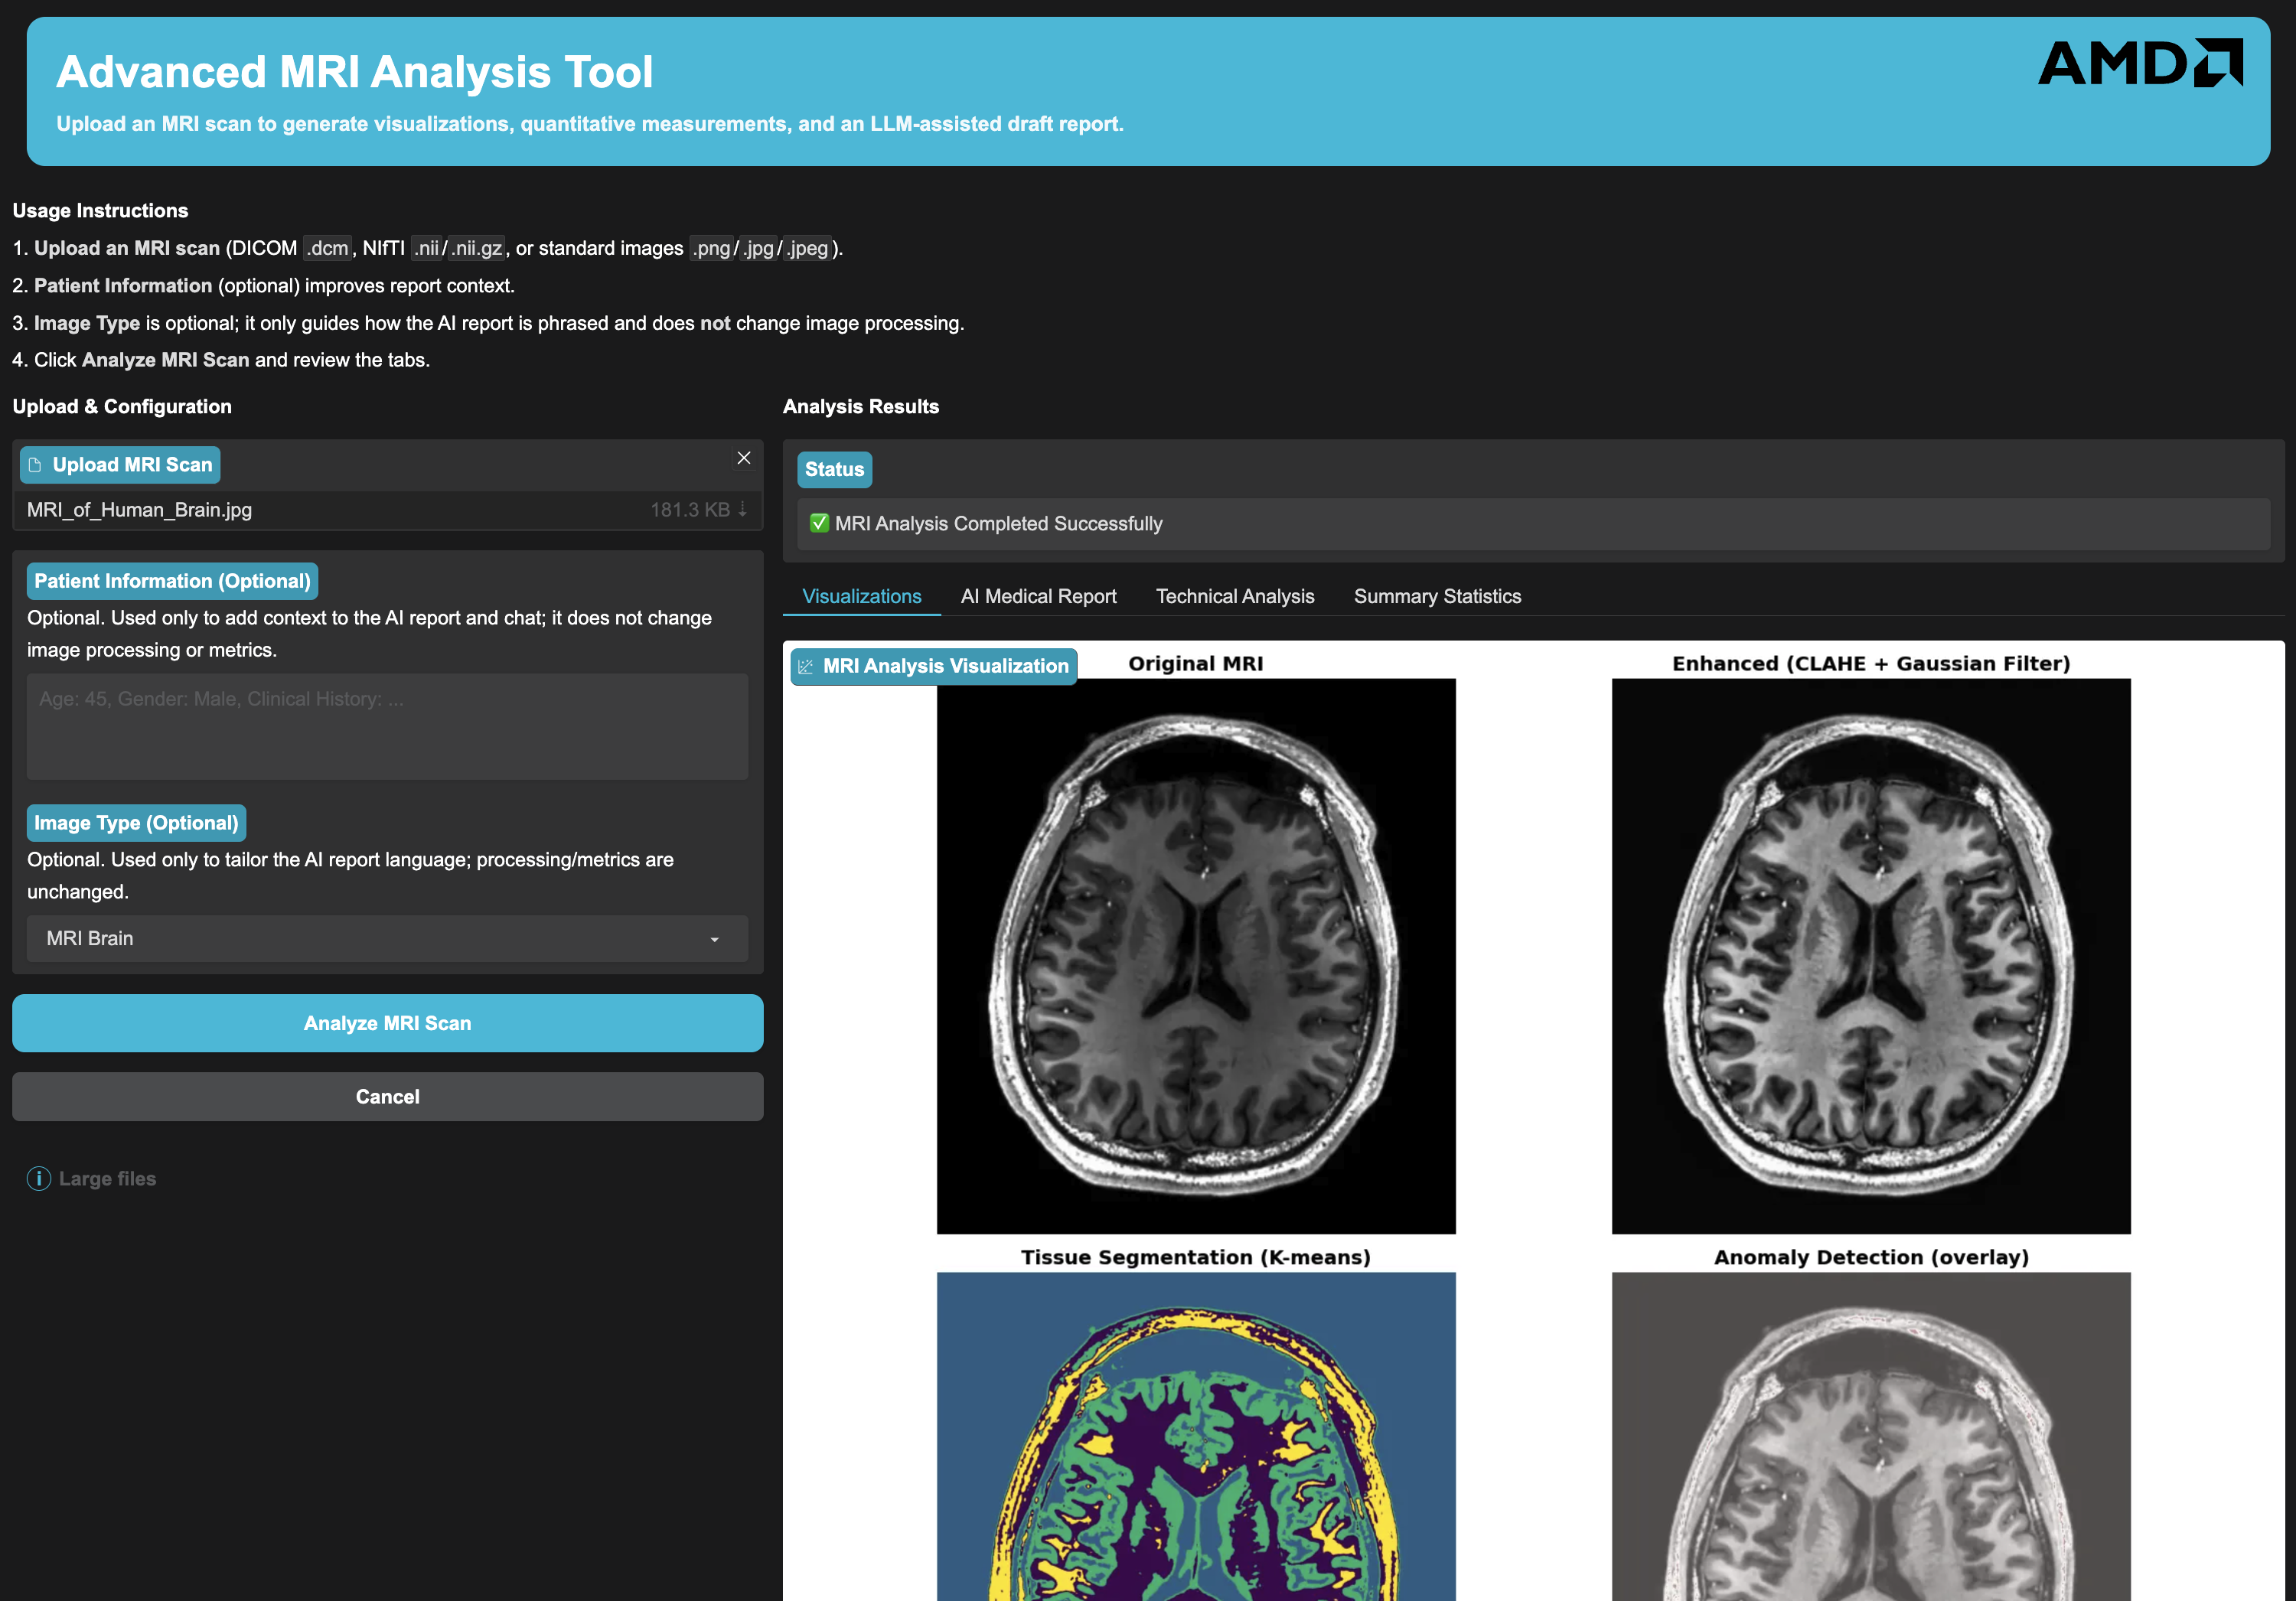
Figure 4: The analysis result view, displaying the visualization tab.
Image credit: Asnaebsa, MRI of Human Brain, licensed under https://creativecommons.org/licenses/by-sa/4.0/. Source: Wikimedia Commons – MRI of Human Brain. No changes were made.
Once the AI-generated analysis report is generated, you can chat with the AIM LLM and ask questions about the analysis results and findings from the AI-generated analysis. Figure 5, below, displays the technical analysis tab and the chat:
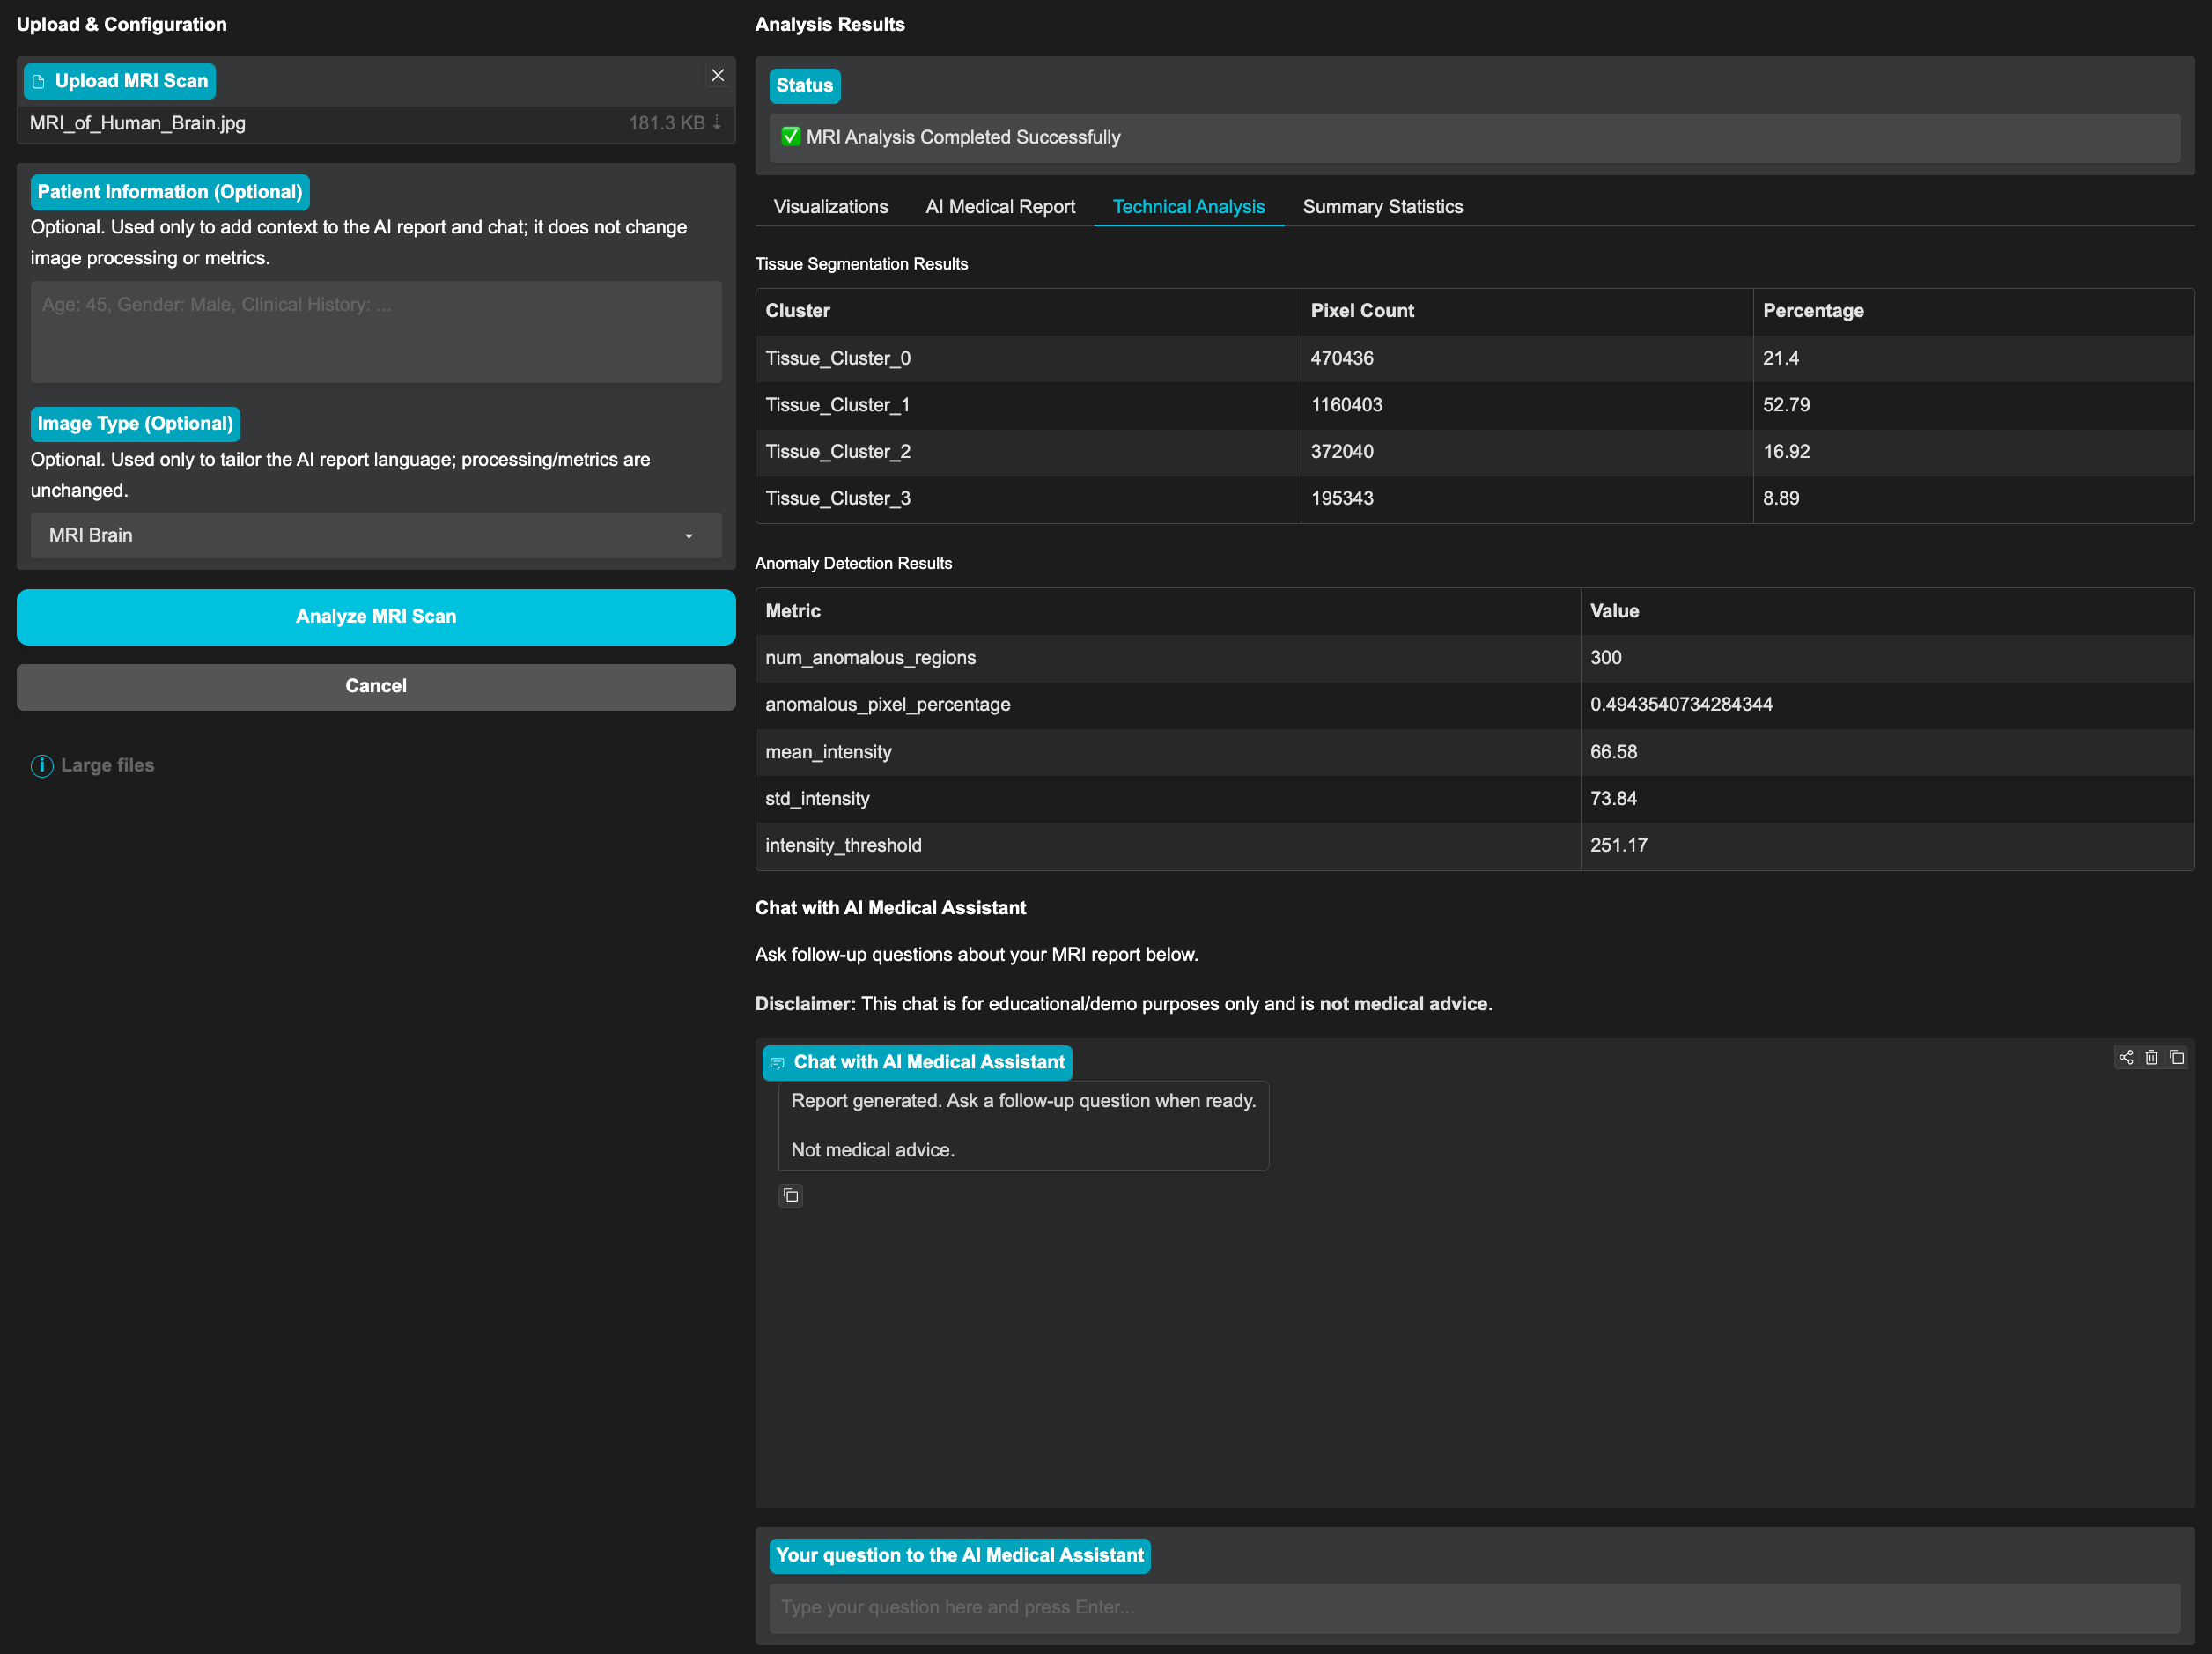
Figure 5: The Technical Analysis result view, displaying the technical analysis and the chat with assistant.
Once you’re done exploring the GUI, delete the deployed resources.
kubectl delete -f mri-deployment.yaml -n $namespace
Customizing the AMD Solution Blueprint#
So far we have deployed the MRI Analysis Tool with the default configuration for Radeon. You might want to customize the AMD Solution Blueprint to fit your needs. For example, you may want to change the AIM, reuse an existing AIM, or adapt the hardware allocations.
To demonstrate the flexibility of AIMs and AMD Solution Blueprints, we customize the deployment to use the google/gemma-3n-E4B-it AIM, and adjust the ephemeral storage. Visit the AIM Catalog to see which models are available.
Customized Deployment#
AIM images are hosted publicly on Docker Hub and do not require authentication to pull. However, google/gemma-3n-E4B-it is a gated model on Hugging Face and requires an access token before it can be downloaded. Run the command below to store your token as a Kubernetes secret in the namespace. Replace <YOUR_HF_TOKEN_HERE> with your token:
namespace="mri-analysis-blog"
kubectl create secret generic hf-token \
  --from-literal=hf-token="<YOUR_HF_TOKEN_HERE>" \
  -n $namespace
secret/hf-token created
In the MRI Analysis Tool Solution Blueprint, the AIM subchart is aliased as llm in the Chart.yaml file. That alias is the prefix for every AIM-related override. For example, you can change the AIM image by adjusting the llm.image variable at deployment. The image name can be found in the AIM Catalog.
Rather than using a long chain of --set flags, we will capture the customization in an override file. This keeps your configuration readable, easy to reuse, and it lets you adjust hardware allocation alongside the model. Below we replace Qwen3 VL 8B Instruct with gemma-3n-E4B-it, add the Hugging Face token and update the ephemeral storage.
Run the following command to create the override file:
cat > mri-override.yaml <<'EOF'
llm:
  image: "amdenterpriseai/aim-radeon-google-gemma-3n-e4b-it:0.12.0-preview"
  env_vars:
    HF_TOKEN:
      name: hf-token
      key: hf-token
  storage:
    ephemeral:
      quantity: 200Gi
EOF
In the mri-override.yaml file created above, llm.image selects the new AIM image, llm.env_vars.HF_TOKEN references the Kubernetes secret that holds your Hugging Face token, and llm.storage.ephemeral.quantity defines the amount of storage.
Pass the override file to helm template with the -f flag and apply the result:
name="mri-doc"
namespace="mri-analysis-blog"
chart="aimsb-mri-doc"
helm template $name oci://registry-1.docker.io/amdenterpriseai/$chart \
  --set global.platform=radeon \
  -f mri-override.yaml > mri-custom-deployment.yaml
kubectl apply -f mri-custom-deployment.yaml -n $namespace
The table below summarizes what we changed between the default deployment and the customized deployment:
Setting |
Default |
Customized |
|---|---|---|
AIM LLM |
qwen/qwen3-vl-8b-instruct |
google/gemma-3n-E4B-it |
HF token |
— |
|
AIM ephemeral storage |
120Gi |
200Gi |
Note
For customizing a specific solution blueprint, review the solution blueprint’s own documentation before customizing.
Connect to the UI as described above and run another analysis with the customized model.
Cleaning Up#
Delete the deployed resources.
kubectl delete -f mri-custom-deployment.yaml -n $namespace
Summary#
This blog walked through deploying the MRI Analysis Tool Solution Blueprint on AMD Radeon in Kubernetes: rendering a Helm chart to a manifest, applying it to the cluster, and connecting to the UI. We also showed how to customize the deployment by changing to a different AIM, configuring a Hugging Face token and adjusting the storage.
The same deploy-and-customize workflow applies across the Solution Blueprint catalog. Browse the catalog and adapt a solution blueprint to your use case.
Additional Resources#
Disclaimers#
The information presented in this document is for informational purposes only and may contain technical inaccuracies, omissions, and typographical errors. The information contained herein is subject to change and may be rendered inaccurate for many reasons, including but not limited to product and roadmap changes, component and motherboard version changes, new model and/or product releases, product differences between differing manufacturers, software changes, BIOS flashes, firmware upgrades, or the like. Any computer system has risks of security vulnerabilities that cannot be completely prevented or mitigated. AMD assumes no obligation to update or otherwise correct or revise this information. However, AMD reserves the right to revise this information and to make changes from time to time to the content hereof without obligation of AMD to notify any person of such revisions or changes. THIS INFORMATION IS PROVIDED ‘AS IS.” AMD MAKES NO REPRESENTATIONS OR WARRANTIES WITH RESPECT TO THE CONTENTS HEREOF AND ASSUMES NO RESPONSIBILITY FOR ANY INACCURACIES, ERRORS, OR OMISSIONS THAT MAY APPEAR IN THIS INFORMATION. AMD SPECIFICALLY DISCLAIMS ANY IMPLIED WARRANTIES OF NON-INFRINGEMENT, MERCHANTABILITY, OR FITNESS FOR ANY PARTICULAR PURPOSE. IN NO EVENT WILL AMD BE LIABLE TO ANY PERSON FOR ANY RELIANCE, DIRECT, INDIRECT, SPECIAL, OR OTHER CONSEQUENTIAL DAMAGES ARISING FROM THE USE OF ANY INFORMATION CONTAINED HEREIN, EVEN IF AMD IS EXPRESSLY ADVISED OF THE POSSIBILITY OF SUCH DAMAGES. AMD, the AMD Arrow logo, AMD Instinct, AMD Radeon, ROCm and combinations thereof are trademarks of Advanced Micro Devices, Inc. Other product names used in this publication are for identification purposes only and may be trademarks of their respective companies. © 2026 Advanced Micro Devices, Inc. All rights reserved