Deploy and Customize AMD Solution Blueprints#

AMD Solution Blueprints are ready-to-deploy, customizable reference applications built with AMD Inference Microservices (AIMs). They offer a microservice solution for a range of use cases, from standard chat interfaces to agentic frameworks, serving as both starting points for development and example implementations.
Packaged as Helm charts, the Solution Blueprints are off-the-shelf and ready to be deployed to a Kubernetes cluster running AMD compute. The Helm templating system allows you to customize each application. Every Solution Blueprint includes architecture diagrams and documentation, making it clear how the components of the Solution Blueprint fit together. For more information, see the previous blog post on AMD Solution Blueprints or the documentation.
This blog post demonstrates how to deploy and customize Solution Blueprints, including how to reuse an AIM LLM across multiple Solution Blueprints. We will be using two Solution Blueprints as examples, Agentic Translation (multi-agent collaborative translation) and AutoGen Studio (web-based interface for creating, configuring, and managing multi-agent AI conversations).
We will cover how to:
Deploy a Solution Blueprint directly from the terminal
Reuse an existing AIM deployment across multiple Solution Blueprints to conserve GPU resources
Swap the default AIM LLM (Llama 3.3 70B Instruct) for an alternative model (Qwen3-32B)
Adjust hardware configurations to match workload requirements
Note
Solution Blueprints can be customized in different ways; determining the right approach depends on your specific use case and requirements. If you plan to customize a Solution Blueprint for your environment, you should review the GitHub repository.
Prerequisites#
This blog post was validated on a cluster powered by AMD Instinct™ MI300X GPUs with 1+ TB of storage and with AMD Resource Manager installed. Before proceeding, ensure that the following prerequisites are met:
Kubernetes cluster: Access to a cluster (e.g., via
kubectl). You should be able to create resources in at least one namespace (we’re using AMD Resource Manager, for managing projects or namespaces, see below)Namespace: Access to at least one namespace. For this blog we’ve used AMD Resource Manager to get access to a project. We use a project called “demo”
kubectl and k9s: Installed and configured to communicate with your cluster
Helm: Installed on your machine
Basic technical proficiency: Familiarity with command-line tools,
kubectl, and cluster monitoring tools such ask9s
Note
If using a gated model, providing a Hugging Face token will be necessary. Create a Kubernetes secret (see Create secret) and pass it into the chart with --set llm.env_vars.HF_TOKEN.name=hf-token and --set llm.env_vars.HF_TOKEN.key=hf-token when running helm template.
Deploying Solution Blueprints#
In this section, we deploy two Solution Blueprints that will share a single AIM LLM. We start by deploying the AutoGen Studio Solution Blueprint directly from the terminal using kubectl apply. Each Solution Blueprint ships with a default AIM LLM (Llama 3.3 70B Instruct). Rather than deploying a separate model for each Solution Blueprint, we then deploy the Agentic Translation Solution Blueprint and connect it to the same AIM, sharing a single LLM across both Solution Blueprints. The resulting architecture is shown in Figure 1, below:
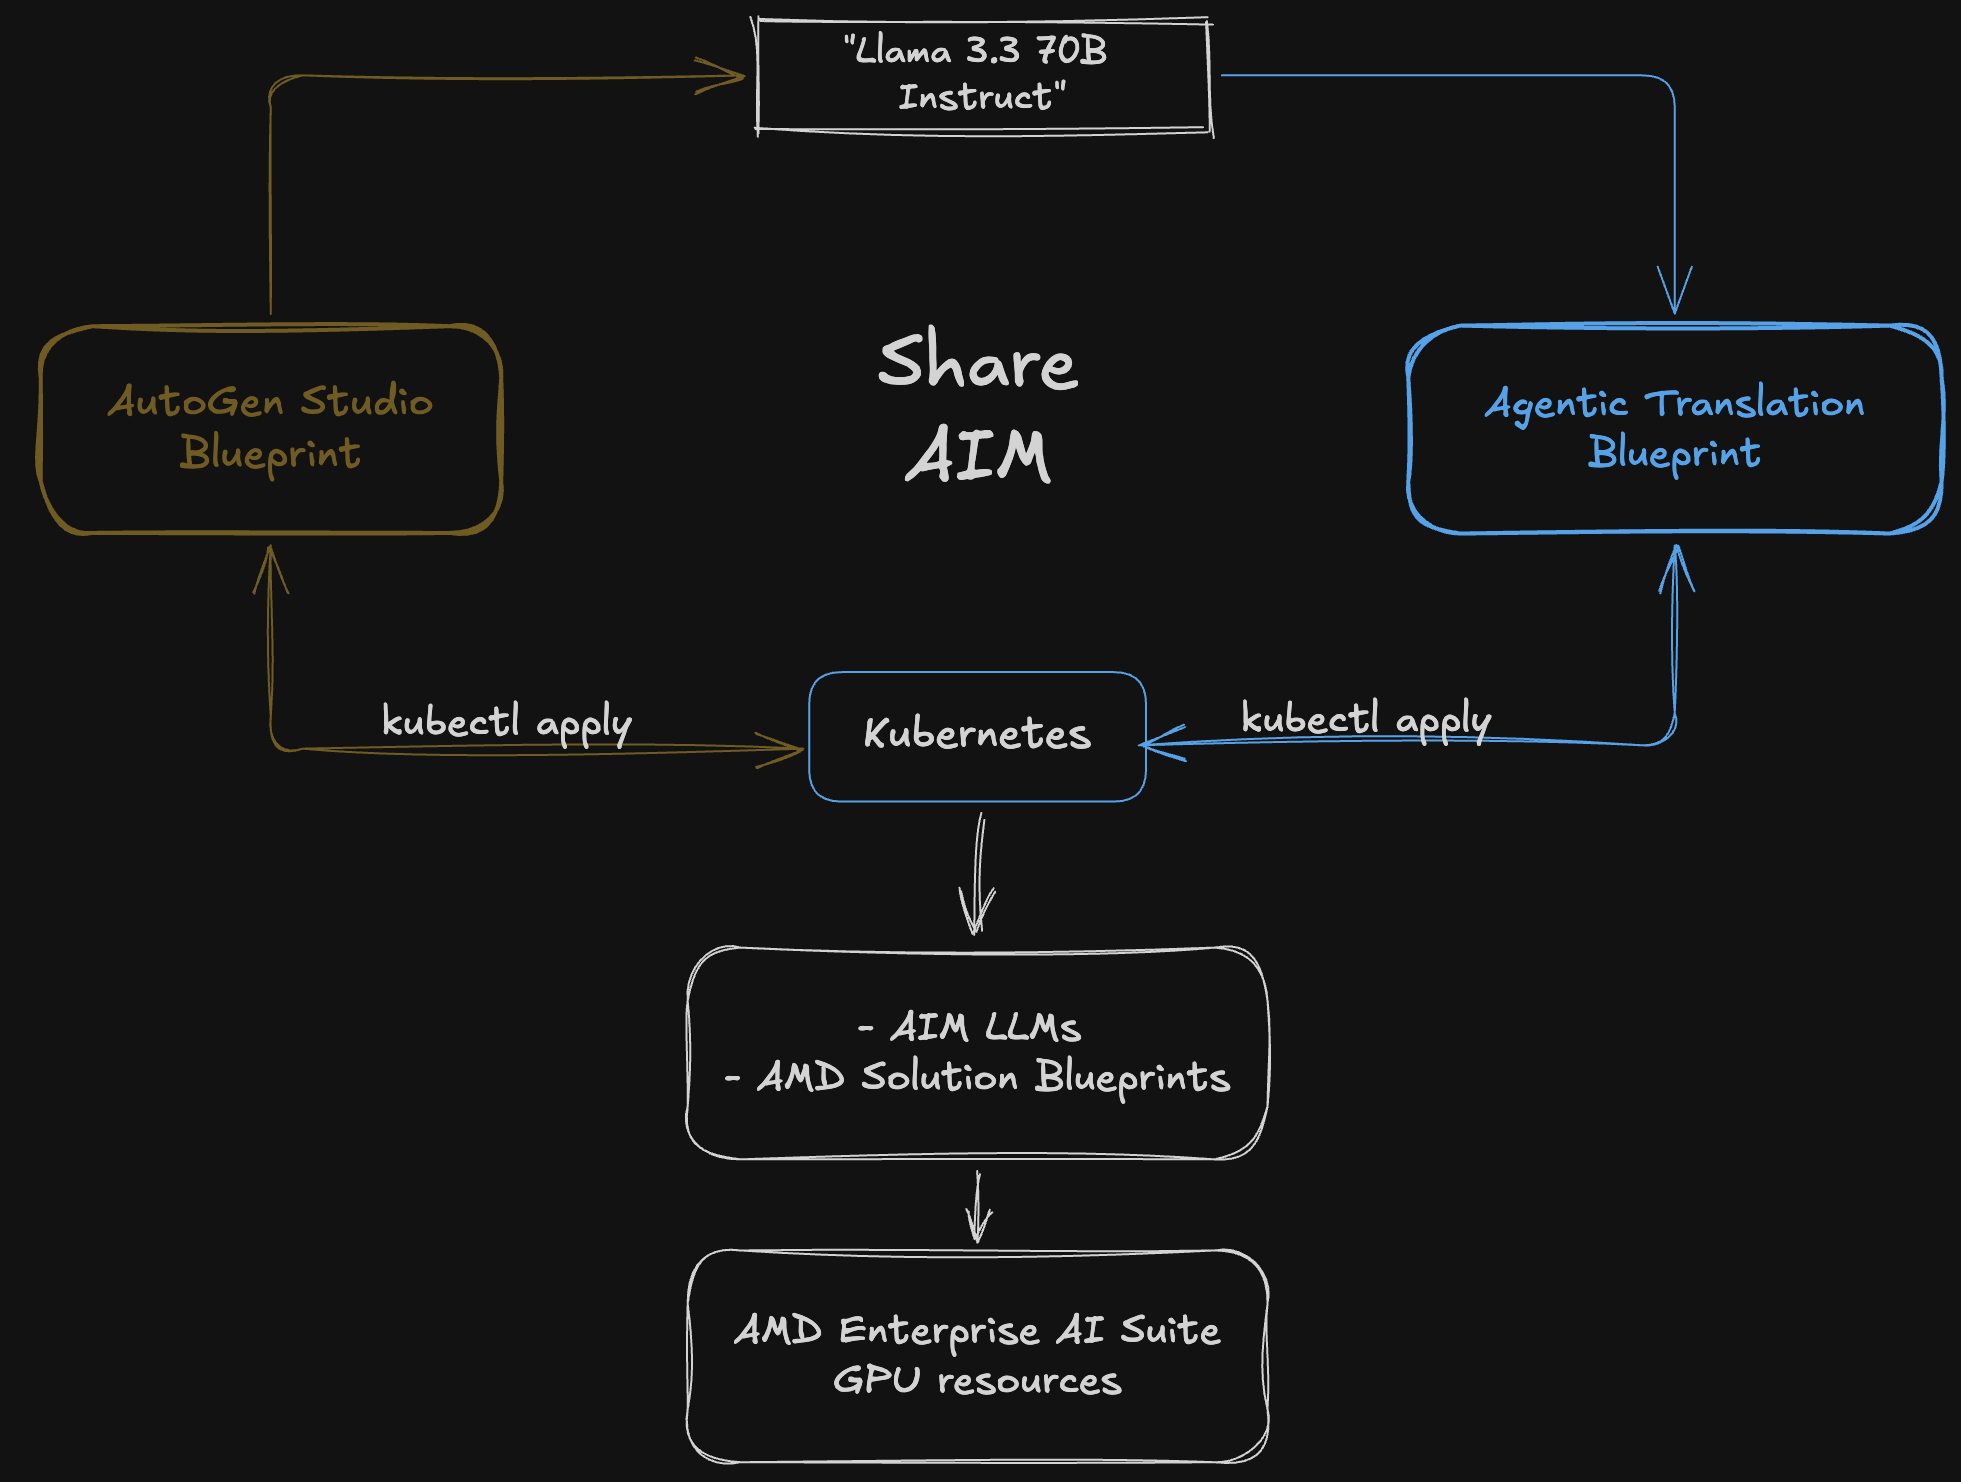
Figure 1: Two Solution Blueprints sharing a single AIM deployment (Llama 3.3 70B Instruct).
Deploying the AutoGen Studio Solution Blueprint#
We begin by deploying the default AutoGen Studio Solution Blueprint, which demonstrates how to deploy the AutoGen Studio Framework on AMD Enterprise AI Infrastructure. This AutoGen Studio Solution Blueprint provides a web-based interface for creating, configuring, and managing multi-agent AI conversations. For example, it allows users to create sophisticated multi-agent systems where different AI agents can collaborate, debate, and work together to solve complex problems, each with specialized roles and capabilities.
When you deploy a Solution Blueprint, the template will automatically deploy one or more AIMs for you based on the underlying requirements. As shown in Figure 2, the AutoGen Studio Solution Blueprint is backed by a single AIM, Llama 3.3 70B Instruct which powers the agent conversations.
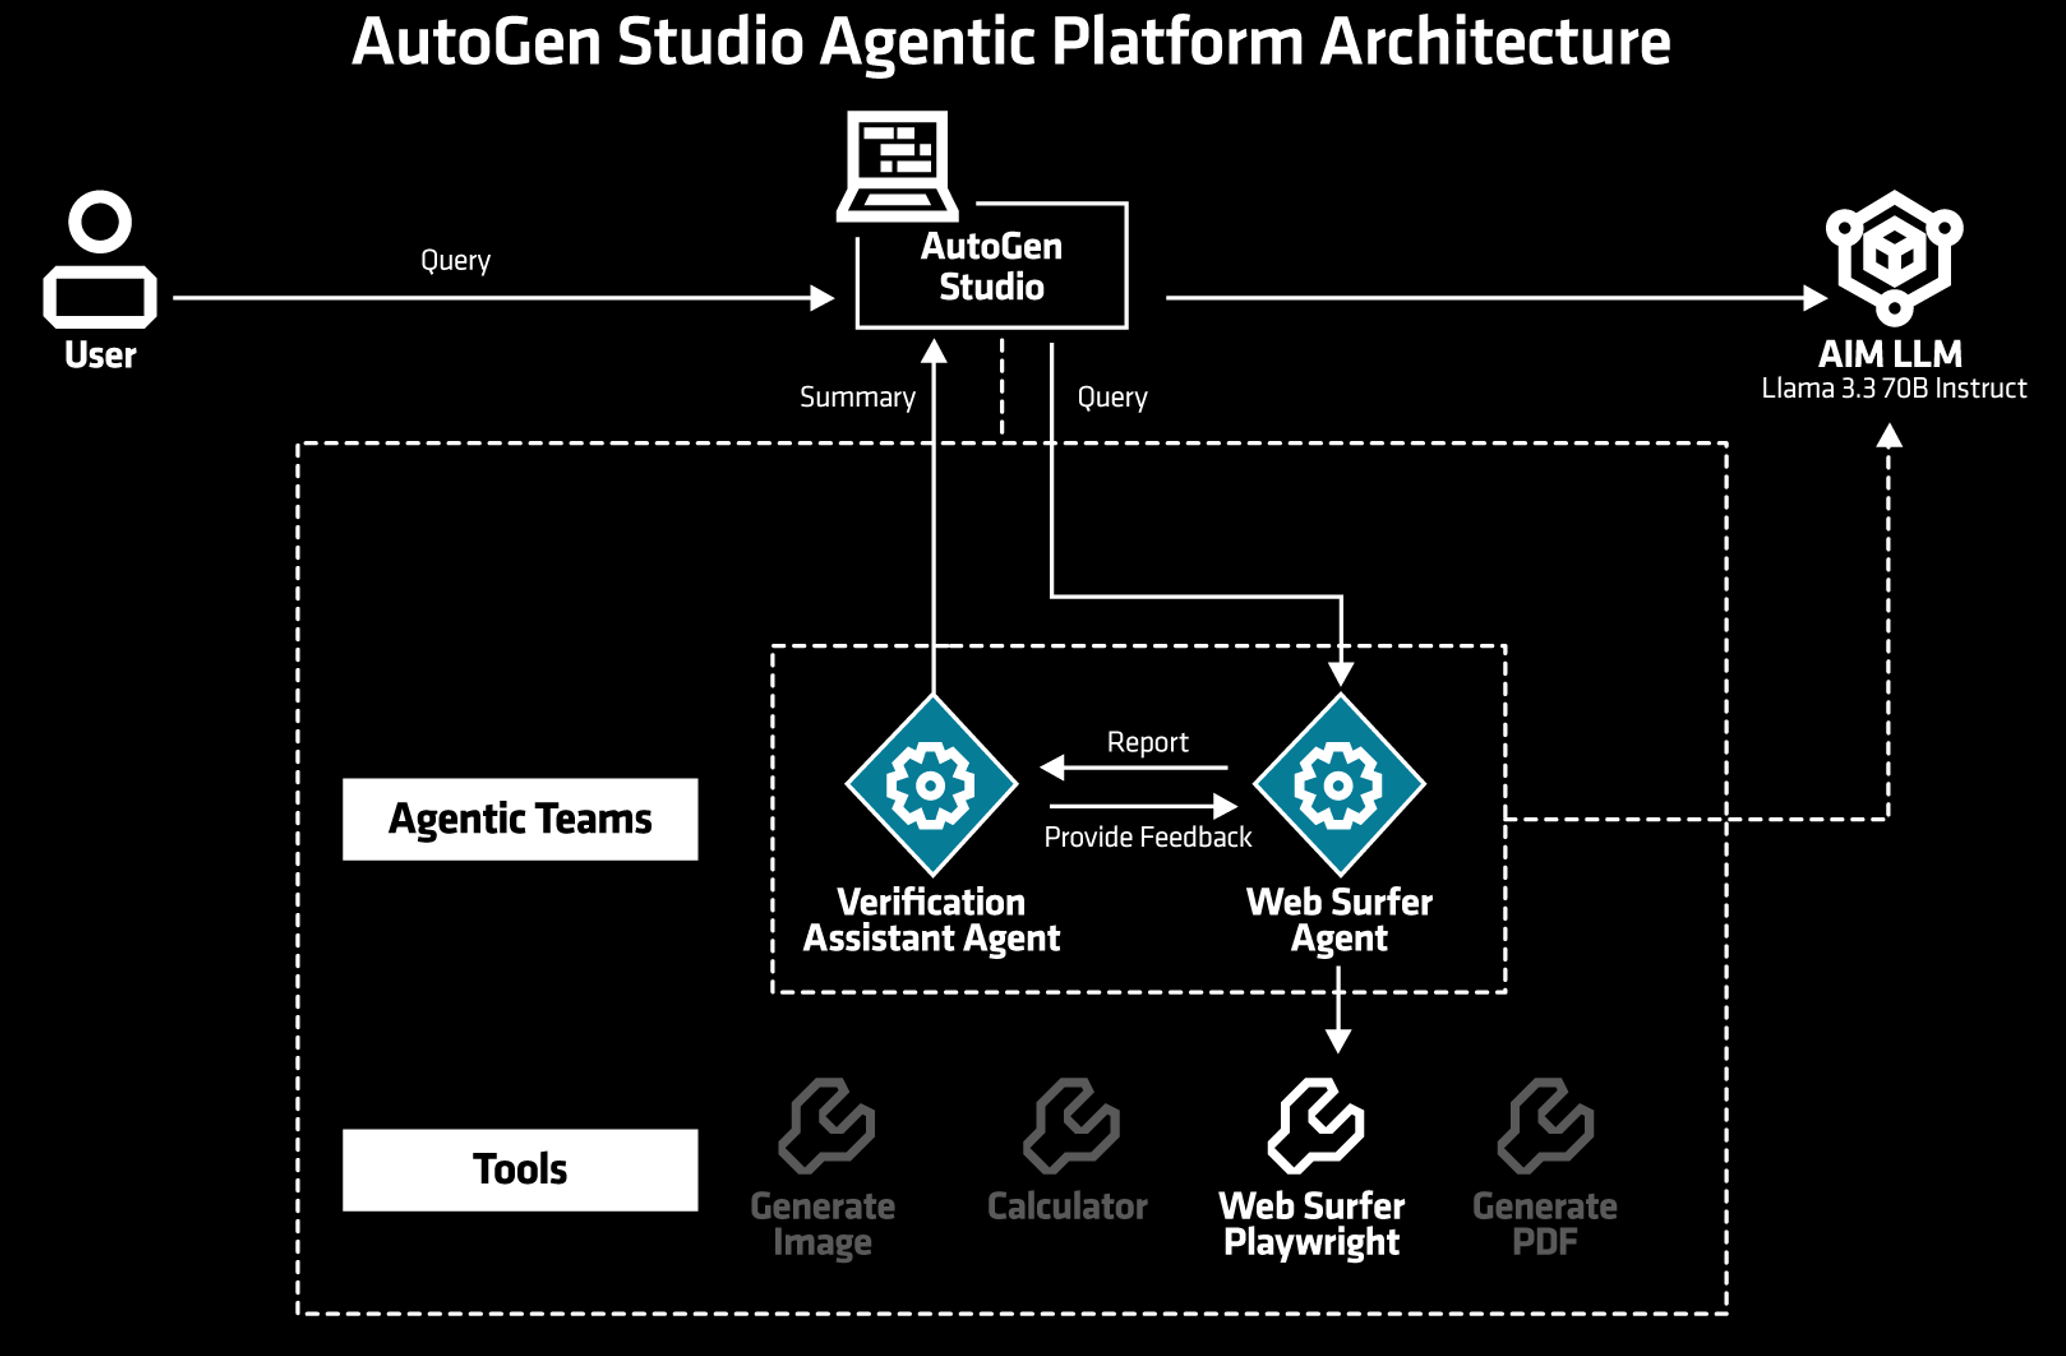
Figure 2: Autogen Studio Solution Blueprint architectural diagram.
Note
This blog focuses on deployment and customization, not the specifics of individual Solution Blueprints. For further information including third-party code, libraries, and terms of use, see the repository.
Deployment Process#
Solution Blueprints are packaged as OCI-compliant Helm charts in the Docker Hub registry. The recommended deployment approach is to pipe the output of helm template to kubectl apply -f -. Let’s start the deployment process.
Start by identifying the Solution Blueprint chart name from the Solution Blueprint Catalog. For our Solution Blueprint, the chart name is aimsb-autogenstudio.
Next, define the deployment parameters:
Deployment name:
autostudioKubernetes namespace:
demo(this corresponds to your AMD Resource Manager project)
Feel free to use a different existing namespace and a different deployment name.
Now, generate the deployment manifest and save it to a file called “ags-default-deployment.yaml” for easier debugging. The following command generates the manifest with the default configuration:
name="autostudio"
namespace="demo"
chart="aimsb-autogenstudio"
helm template $name oci://registry-1.docker.io/amdenterpriseai/$chart > ags-default-deployment.yaml
Finally, apply the manifest to deploy the Solution Blueprint:
kubectl apply -f ags-default-deployment.yaml -n $namespace
This command creates two deployments: one for the AIM LLM (Llama 3.3 70B Instruct) and one for the Solution Blueprint application (see Figure 3).
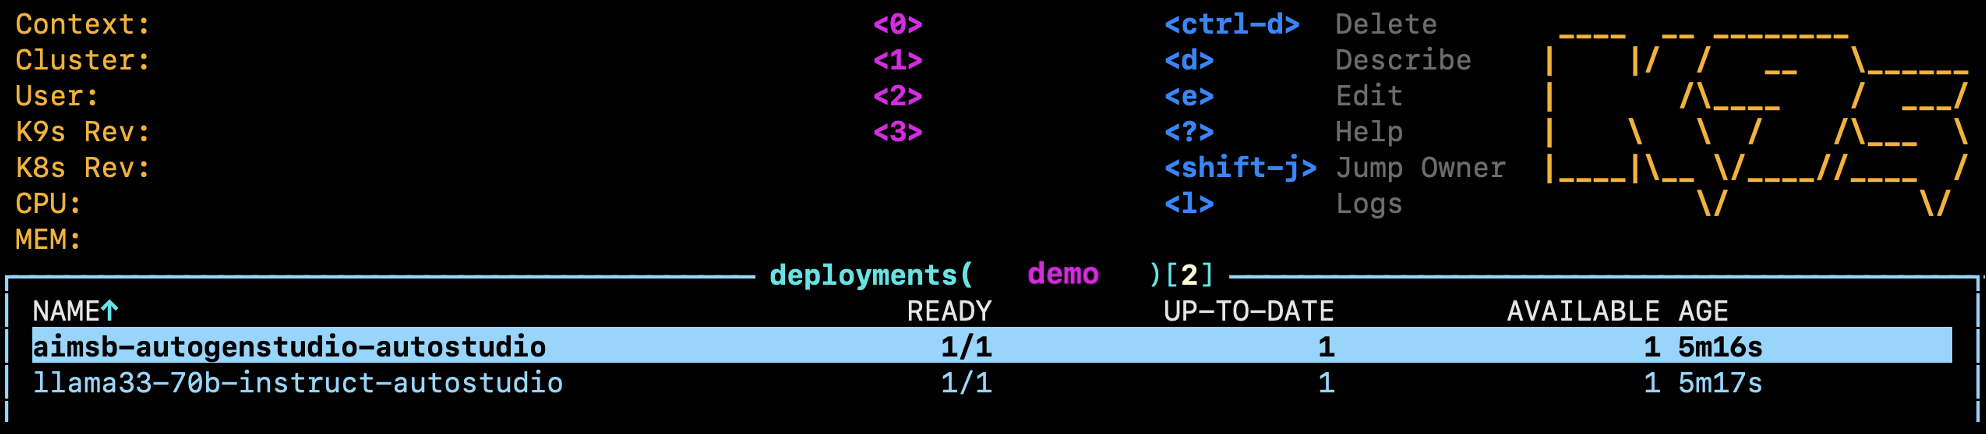
Figure 3: The two resulting deployments visible in k9s - the Solution Blueprint app (top) and the AIM LLM serving Llama 3.3 70B Instruct (bottom).
Connecting to the UI#
To connect to the UI, we need to either port-forward or use HTTP routing. For simplicity, we will only use port-forwarding in this blog.
To port-forward, use the following command:
kubectl port-forward services/aimsb-autogenstudio-$name 8082:8081 -n $namespace
The UI is then available at http://localhost:8082 in your browser.
Feel free to play around with the UI. For example you could:
Navigate to the
Team BuilderpageClick on the
From Gallerytab and use theWeb Agent Teamas a templateGo to the Playground page, select
New Sessionand then select the Web Agent TeamEnter a query (first query may take longer to complete)
Feel free to explore the UI and the Solution Blueprint before moving to the next section.
Reusing the AIM Service: Agentic Translation#
As stated in the introduction, we want both Solution Blueprints to share the same AIM service (see Figure 1). With Llama 3.3 70B Instruct already running, we will now deploy the Agentic Translation Solution Blueprint and connect it to the existing AIM rather than provisioning a second AIM.
The Agentic Translation Solution Blueprint#
The Agentic Translation Solution Blueprint deploys a translation app where multiple LLM agents collaborate to perform and refine the translation of the provided input. Figure 4 illustrates the architecture and multi-step process for the Agentic Translation Solution Blueprint. First, the user enters or pastes the text to be translated into the user interface and any potential specific instructions regarding the desired style of the translation. Once submitted, the text and instructions are forwarded to a series of agents that make up the translation service. Each agent performs a specific task: one translates the text, while another evaluates the quality of the translation by assigning a score. This cycle of translation and evaluation continues, with agents refining the output, until the judge agent determines that the translation meets the required standard and approves it. Throughout this workflow, all agents operate using the provided AIM, which by default serves Llama 3.3 70B Instruct.
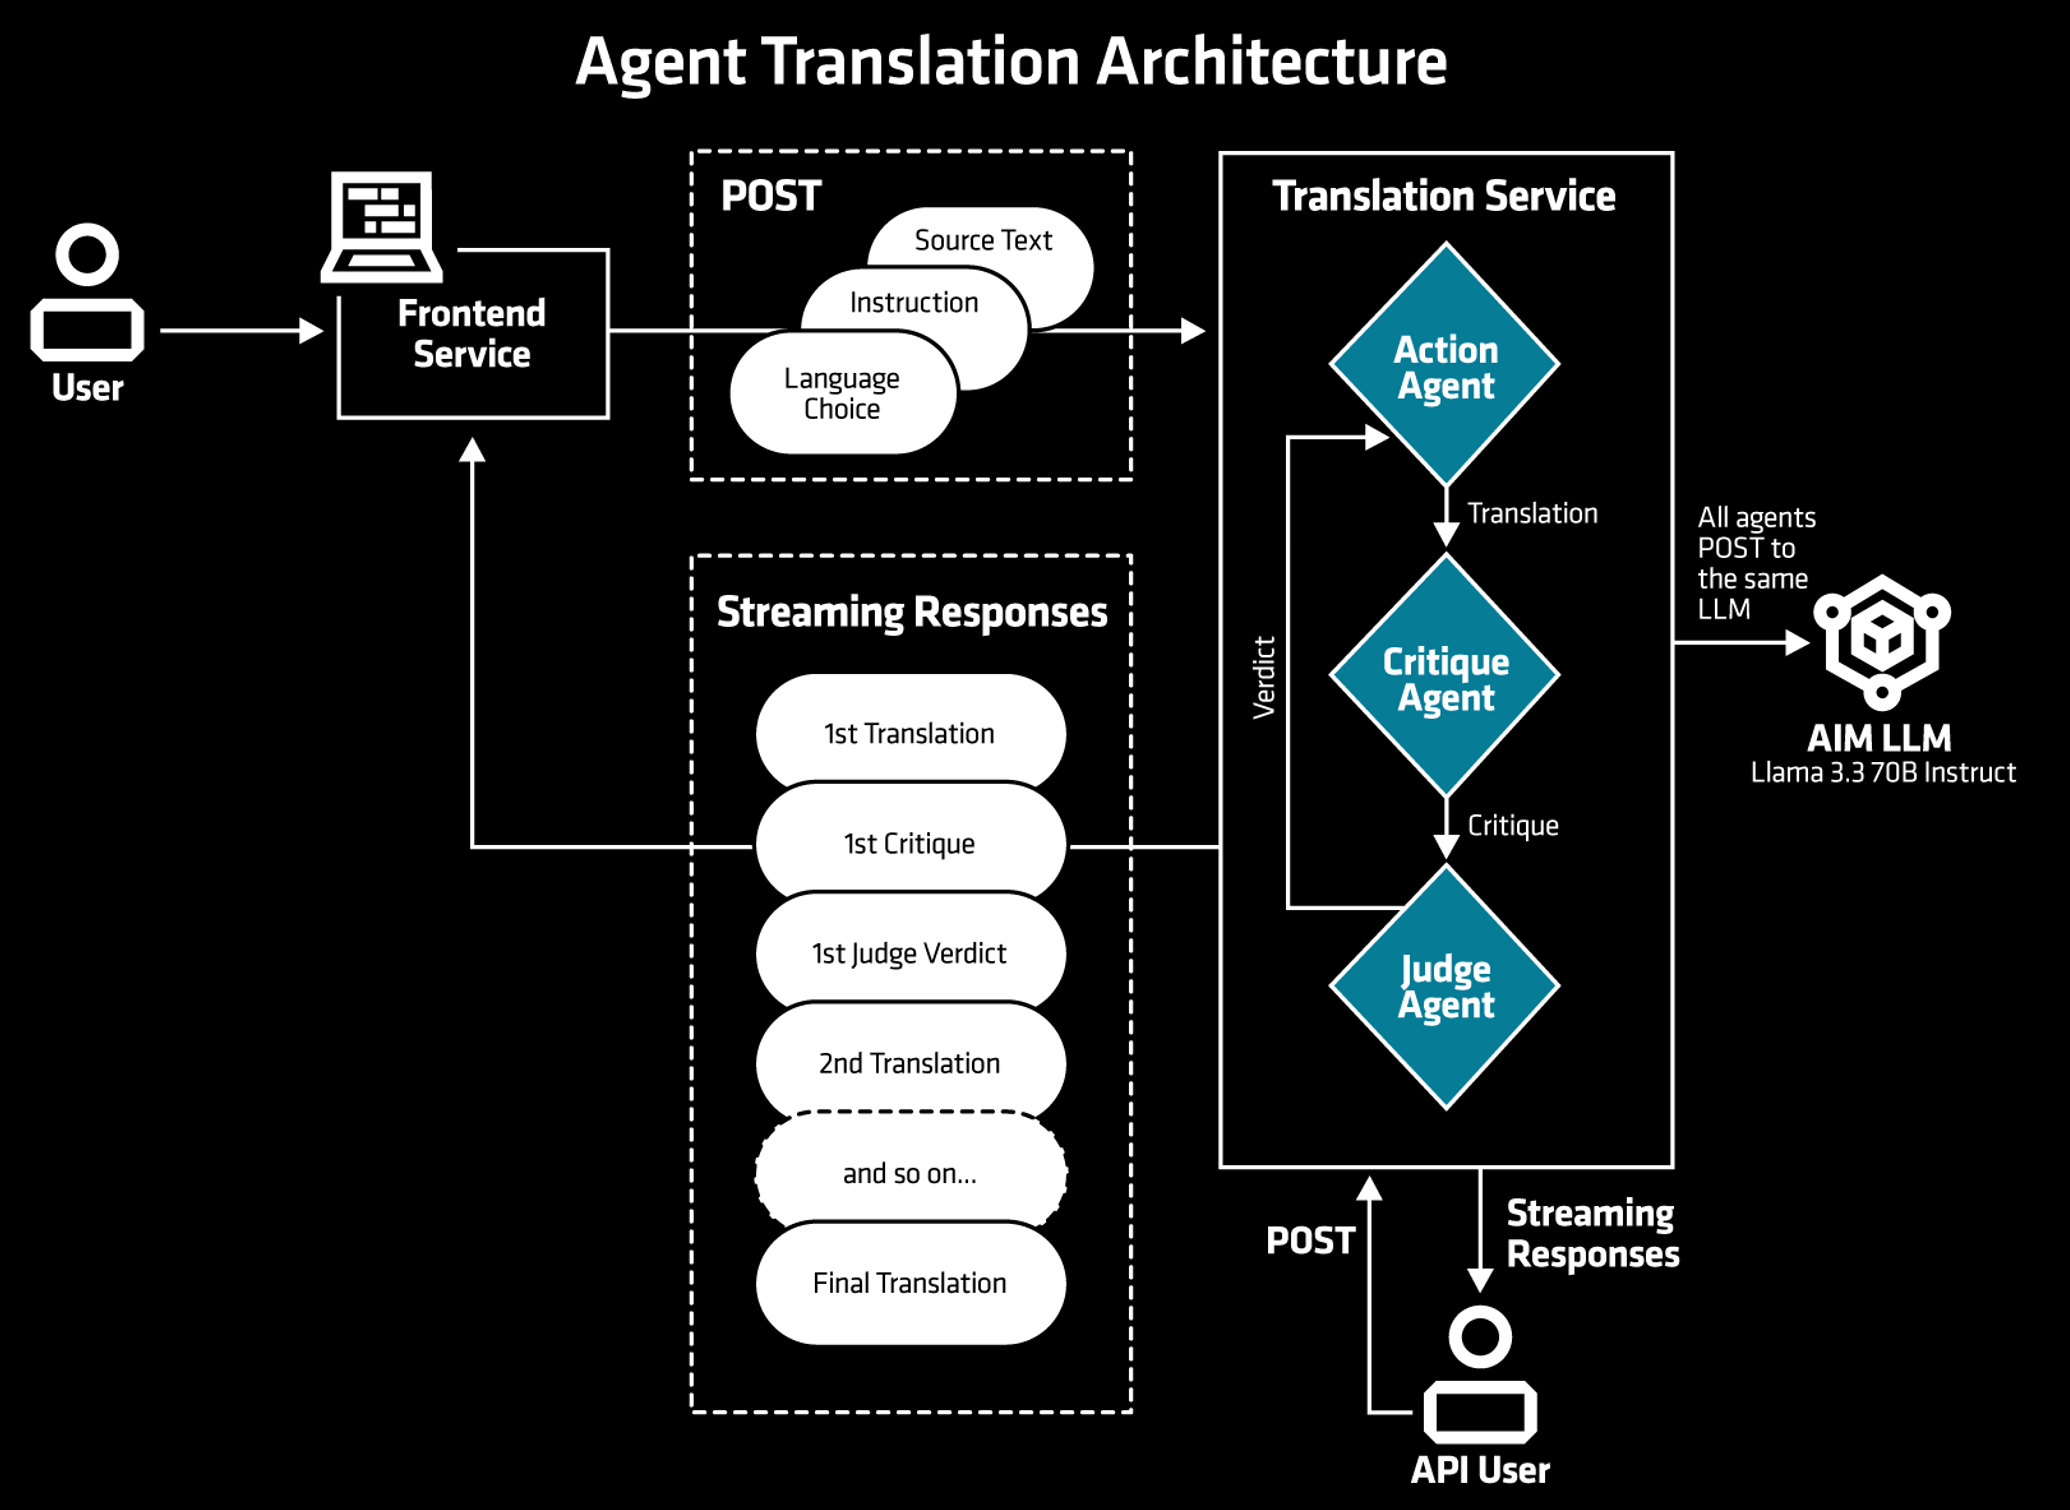
Figure 4: The Agentic Translation architectural diagram.
Deploying Agentic Translation#
As before, we start by defining the deployment parameters. We continue to use the “demo” namespace, and the chart name can be found in the Solution Blueprint Catalog:
Deployment name:
translatorKubernetes namespace:
demoChart name:
aimsb-agentic-translation
To reuse an existing AIM deployment instead of deploying a new one, we adjust the helm template command with the --set flag to configure the existingService parameter. Setting llm.existingService to the Kubernetes service name of the running AIM tells Helm to use that endpoint.
Note
If the service is in a different namespace, you can use the long form <SERVICENAME>.<NAMESPACE>.svc.cluster.local:<SERVICEPORT>, or if needed, you can also pass a full URL.
To get the service name of the deployed AIM (Llama 3.3 70B Instruct), run the following command:
namespace="demo"
kubectl get services -n $namespace
As we’ve previously deployed Llama 3.3 70B Instruct, you should receive the following output:
NAME
aimsb-autogenstudio-autostudio
llama33-70b-instruct-autostudio
From the output, note the AIM service name, in this case: “llama33-70b-instruct-autostudio”. You will pass this as the servicename variable in the next command. The full command to generate the manifest is shown below:
name="translator"
namespace="demo"
servicename="llama33-70b-instruct-autostudio"
chart="aimsb-agentic-translation"
helm template $name oci://registry-1.docker.io/amdenterpriseai/$chart \
--set llm.existingService=$servicename > at-deployment.yaml
Finally, apply the manifest to deploy the Solution Blueprint:
kubectl apply -f at-deployment.yaml -n $namespace
To confirm that only one AIM is deployed, run the following command:
kubectl get deployments -n $namespace
You should see a single AIM deployment (Llama 70B):
NAME
aimsb-agentic-translation-translator
aimsb-autogenstudio-autostudio
llama33-70b-instruct-autostudio
Once deployed, the user interface can be accessed via port forwarding (see previous section on port forwarding) using the following command:
kubectl port-forward services/aimsb-agentic-translation-$name 8501:8501 -n $namespace
The UI is then available at http://localhost:8501 in your browser (see Figure 5).
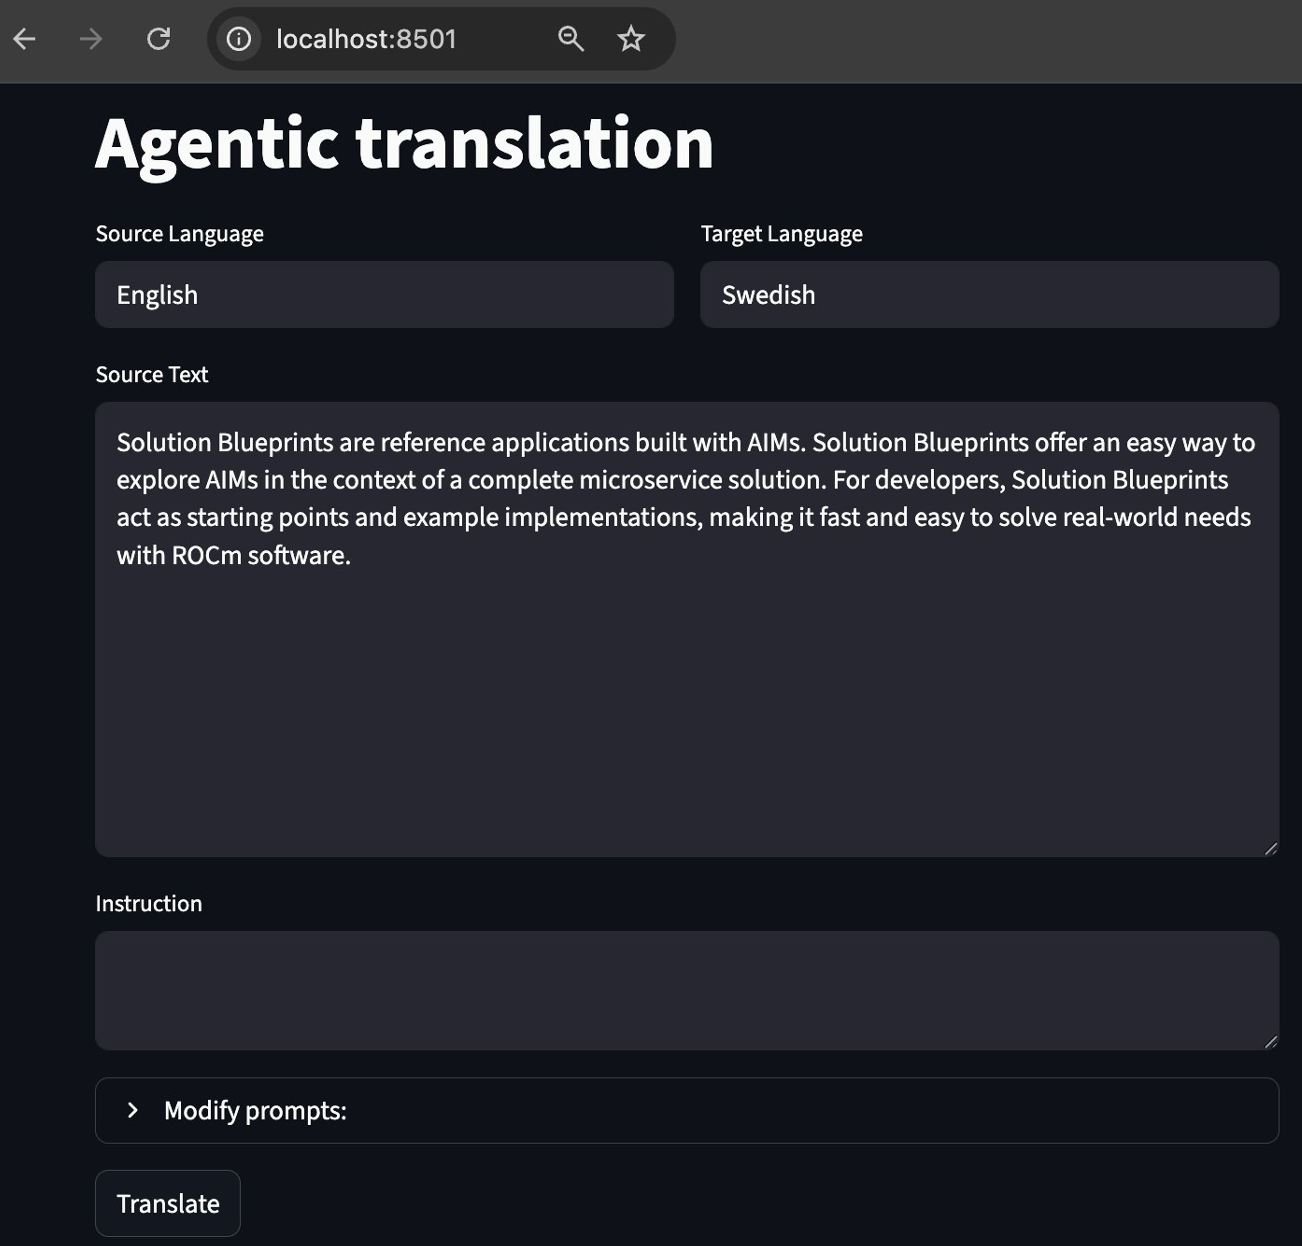
Figure 5: Agentic Translation UI.
Note
In the UI you can input source and target languages. In the lower box with the title “Instruction,” you can provide instructions about the style of the required translation, such as academic or casual.
Feel free to explore the UI and test the translation capabilities with different inputs and instructions.
Cleaning Up#
When you are done, clean up your environment and delete the deployed resources by running:
kubectl delete -f ags-default-deployment.yaml -n $namespace
kubectl delete -f at-deployment.yaml -n $namespace
Customizing the Solution Blueprint: Switching to Qwen3-32B#
Depending on your needs and use case when working with Solution Blueprints, you might want to change or configure the AIM LLM to fit your preferences. Since the Solution Blueprints are packaged as Helm charts, you can override the default values in the values.yaml file to adjust the configuration and parameters. This is useful for customizing a deployment to your specific requirements.
In this section, we change the default AIM using the --set flag method; this tells Helm to merge your values with the default values. This allows you to change settings without editing the original chart. Alternatively, you could clone the public repository and modify the files directly, but for simplicity, we use the flag.
For the upcoming adjustments, we assume you have access to the public repository, which contains two main folders:
aimcharts/aimchart-llm: Deploys AMD Inference Microservice (AIM) LLMs. This chart includes functionality designed for being used as a subchart (a dependency in a larger application such as a Solution Blueprint). If you wish to understand the AIM deployment, this folder is a good starting point.solution-blueprints: Contains all available Solution Blueprints, with corresponding code, documentation, and reference architectures.
In Helm, when a chart is added as a dependency, you can assign it an alias. For the Agentic Translation, the AIM chart is aliased as llm, as shown in the Chart.yaml.
This alias is important when customizing the deployment, as it determines the key name used to override AIM-related settings.
Note
While the upcoming customizations are valid for the Agentic Translation Solution Blueprint, other Solution Blueprints may require different adjustments. Before customizing a Solution Blueprint, review its corresponding documentation.
Re-Deploying Agentic Translation#
Let’s replace the default Llama 3.3 70B Instruct model with Qwen3-32B. First, we need to identify the LLM target image from the AIM Catalog, in this case amdenterpriseai/aim-qwen-qwen3-32b:0.10.0.
Next, generate the manifest with --set flags to override the default model. Here, llm.image specifies the new AIM image, llm.nameOverride sets the name for the AIM resources and llm.env_vars.AIM_PRECISION sets the model precision. The Solution Blueprint’s model precision defaults to fp8, but we override this to fp16 to align with the Qwen3-32B AIM configuration.
name="translator-qwen"
namespace="demo"
chart="aimsb-agentic-translation"
helm template $name oci://registry-1.docker.io/amdenterpriseai/$chart \
--set llm.image=amdenterpriseai/aim-qwen-qwen3-32b:0.10.0 \
--set llm.env_vars.AIM_PRECISION=fp16 \
--set llm.nameOverride=qwen3-32b > at-qwen-deployment.yaml
Finally, apply the manifest to deploy the Solution Blueprint:
kubectl apply -f at-qwen-deployment.yaml -n $namespace
Verify the deployment of the new AIM with k9s or kubectl (see Figure 6).
kubectl get deployments -n $namespace
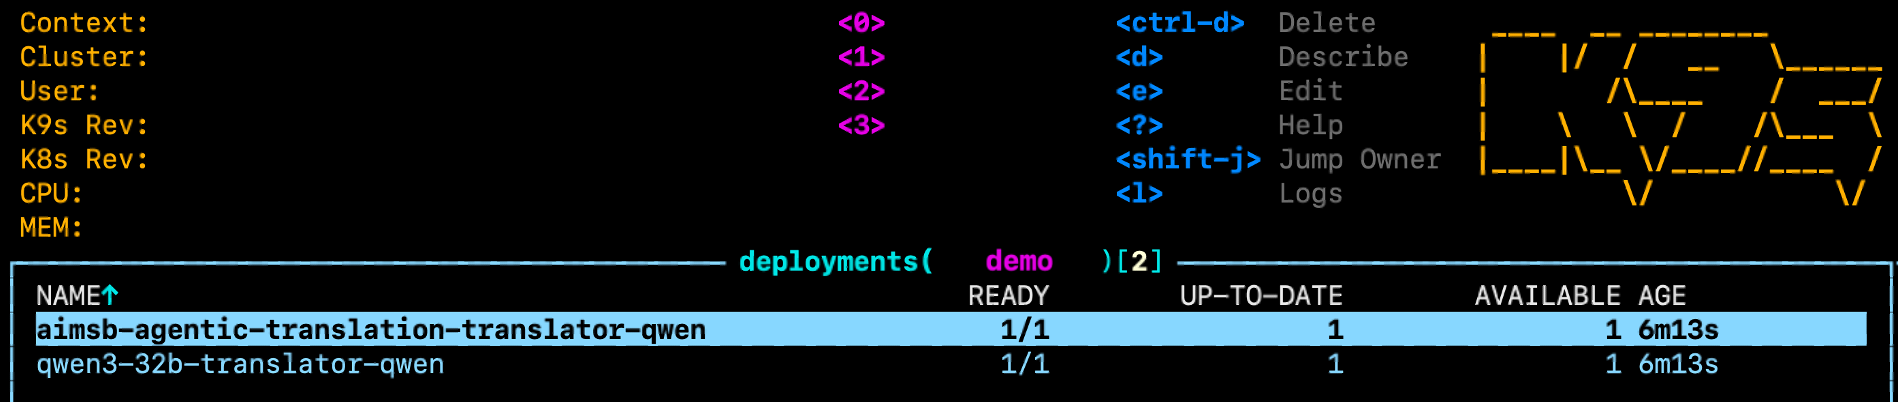
Figure 6: Deployments in k9s - the AIM now runs Qwen3-32B instead of Llama 3.3 70B Instruct.
If you need further confirmation, you can inspect the logs or describe the pod in k9s (e.g., press “l” or “d” while selecting the pod).
As a final check, feel free to port-forward and connect to the UI to confirm that it’s working. Note, the first query may take longer to complete compared to subsequent queries. Once done, delete the resources:
kubectl delete -f at-qwen-deployment.yaml -n $namespace
Customizing Multiple Parameters with an Override File#
In this section, we dive deeper into customizing the Agentic Translation Solution Blueprint by creating and passing an override file during deployment. Using an override file enables you to make several changes to your deployment and have your configurations tracked in a .yaml file, without using --set flags. This enables you to use version control, increases readability, and makes it easier to track your changes. Providing an override file to the Helm command is done by using the -f flag; it tells Helm to merge the values from your override file over the default values.
The following table summarizes the changes for the AIM deployment:
AIM Settings |
Default (Llama-3.3 70B Instruct) |
Customized (Qwen3-32B) |
|---|---|---|
Model |
|
|
Precision |
fp8 |
fp16 |
GPU |
1 |
1 |
CPU |
4 |
8 |
Ephemeral storage |
512Gi |
350Gi |
Create the Override File#
To apply the changes from the table above, create a file named solution-blueprint-override.yaml with the following content:
llm:
  image: "amdenterpriseai/aim-qwen-qwen3-32b:0.10.0"
  env_vars:
    AIM_PRECISION: "fp16"
  nameOverride: qwen3-32b
  cpu_per_gpu: 8
  storage:
    ephemeral:
      quantity: 350Gi
Deploying the Customized Solution Blueprint#
Generate the deployment manifest using the default command, but with the override file attached:
name="customized-translator"
namespace="demo"
chart="aimsb-agentic-translation"
helm template $name oci://registry-1.docker.io/amdenterpriseai/$chart \
-f solution-blueprint-override.yaml > at-custom-deployment.yaml
Then, apply the manifest to deploy the Solution Blueprint:
kubectl apply -f at-custom-deployment.yaml -n $namespace
Verifying the Customization#
Confirm the customization by inspecting the deployed pod. First, find the AIM pod name:
kubectl get pods -n $namespace
Look for the pod whose name contains qwen3-32b, then describe it:
kubectl describe pod <YOUR-AIM-POD-NAME> -n $namespace
In the output, you should see the updated image and resource requests matching the values from the table:
Containers:
  aim-llm:
    ...
    Image:   amdenterpriseai/aim-qwen-qwen3-32b:0.10.0
    ...
    Requests:
      amd.com/gpu:  1
      cpu:          8
You can also verify the storage allocation by inspecting the PersistentVolumeClaim (PVC), which should show 350Gi:
kubectl get pvc -n $namespace | grep qwen3-32b
Once done, delete the resources by running:
kubectl delete -f at-custom-deployment.yaml -n $namespace
Summary#
In this tutorial, you learned how to deploy a Solution Blueprint with default configuration, how to swap the underlying LLM using --set flags, configure it using a custom yaml file and how to reuse a single AIM service across multiple Solution Blueprints to conserve GPU resources. These techniques apply across the full Solution Blueprint catalog, not just the two covered here. Head over to the Solution Blueprint Catalog to explore the full list and start deploying your own. Stay tuned to the AMD enterprise AI reference stack release notes for updates on AIMs, Solution Blueprints, and other components.
Additional Resources#
Ready to build on what you have learned? Use the additional resources below to get started:
Disclaimers#
Third-party content is licensed to you directly by the third party that owns the content and is not licensed to you by AMD. ALL LINKED THIRD-PARTY CONTENT IS PROVIDED “AS IS” WITHOUT A WARRANTY OF ANY KIND. USE OF SUCH THIRD-PARTY CONTENT IS DONE AT YOUR SOLE DISCRETION AND UNDER NO CIRCUMSTANCES WILL AMD BE LIABLE TO YOU FOR ANY THIRD-PARTY CONTENT. YOU ASSUME ALL RISK AND ARE SOLELY RESPONSIBLE FOR ANY DAMAGES THAT MAY ARISE FROM YOUR USE OF THIRD-PARTY CONTENT.
Updated on 12 May 2026
Updated the blog to clarify usage of AMD enterprise AI reference stack components.