Onboard and Deploy Custom Models in AMD AI Workbench#

The AIM Catalog gives you a curated set of models that are ready to deploy on AMD hardware, but sometimes you might want to run a model that isn’t in the catalog, for example a model from the Hugging Face Hub, or one you or your team trained for a specific task. AMD AI Workbench lets you do that, directly through the graphical user interface (GUI). You point the AI Workbench at a Hugging Face repository or your own model registry, choose how the model should run, and the AMD AI Workbench onboards it into your project so you can deploy it like an AMD Inference Microservice (AIM).
AMD AI Workbench is part of the AMD enterprise AI reference stack, it enables users to develop, deploy, and run AI workloads on a Kubernetes platform built for AMD compute. Custom model deployment is served through the same AMD Inference Microservice framework that powers the AIM catalog. Built natively on ROCM™ and Kubernetes, AIMs abstract away the complexities of model serving by providing an orchestration layer that automatically configures the runtime environment, detects available accelerators, and selects a performance profile. An imported model works the same way as a catalog AIM: you deploy it, connect to it, chat with it, and call it from your own applications through an OpenAI-compatible API. You also keep the AI Workbench features, such as scaling, profile parameters, API keys, and monitoring.
In this blog we will walk through the workflow in the AMD AI Workbench GUI:
Adding the required project secrets
Importing a model from the Hugging Face Hub via the Models page and the Custom Models tab
Deploying the model through the AIM Engine
Interacting with the model in the Chat interface and calling it from your own code through an OpenAI-compatible API
By the end we will have an OpenAI-compatible endpoint serving a model and you will know how to bring in models for your own use cases.
Key terms used in this blog:
AIM: A container that serves a model with an inference profile for AMD accelerators. The curated AIMs live in the AIM Catalog.
Custom model: A model you bring into a project yourself, e.g., imported from a Hugging Face repository. Custom models are scoped to the project you import them into.
Runtime profile: The baseline settings that describe how a model runs when it is deployed, including the container image and version, the accelerator type, the model precision, and any engine arguments or environment variables. The AIM Engine supplies defaults, so you only change what you need to.
Deployment: A running instance of a model, served as an inference endpoint. Deployments appear under Deployed Models.
Note
This blog focuses on importing models from Hugging Face. For the underlying mechanics, see the AIM Engine custom models and custom profiles documentation.
Prerequisites#
This blog post was validated on a cluster powered by AMD Instinct™ MI300X GPUs with more than 1 TB of storage and with AMD AI Workbench v2.0.0 and AMD Resource Manager v2.0.0 installed. Before you begin, ensure the following prerequisites are met:
Access to AMD AI Workbench:
You need access to an installed instance of AMD AI Workbench, see the documentation for e.g.: On-premise Installation or DigitalOcean Cloud Installation
A project with capacity: Create a project named
custom-model-blogwith at least one allocated GPU. Projects isolate resources, workloads, and secrets, and custom models are only visible and deployable within the project you import them into. Deployments consume project resources, so check your quota before deploying a large model. See Manage Projects for more information.A Hugging Face repository: To import the model from, either as a repository ID (for example,
Qwen/Qwen3-8B) or as a full URL (for example,https://huggingface.co/Qwen/Qwen3-8B).
Creating and Adding Project Secrets#
To ensure you have access to storage and models, add the following secrets to your custom-model-blog project:
Storage: Custom model onboarding requires access to internal cluster storage for the model weights, for this blog we’re using an S3 Bucket storage. A storage secret, named minio-credentials-fetcher, is automatically created for you as part of the installation process of AMD Resource Manager v2.0.0. To confirm a minio-credentials-fetcher secret exists, visit the Secrets page of AMD AI Workbench. If it is unavailable, use the following guide to add it: Secrets Overview.
Why Custom Models Matter#
The AIM Catalog consists of standardized, preconfigured models from the Hugging Face community, but it doesn’t include every model in the rapidly growing AI ecosystem. Deploying custom models lets you bring in specific models to your use case, as well as your own proprietary or fine-tuned models that you want to experiment with or run.
AMD AI Workbench provides three ways to serve models through the AIM framework:
Deploy an off-the-shelf model from the AIM Catalog (see the Getting Started with AMD AI Workbench blog).
Fine-tune a model on your own data, then deploy it.
Import and deploy your own model from Hugging Face, which is the focus of this blog.
Before you import a model, keep a few things in mind. Gated models (such as those in the Llama or Gemma families) require a valid Hugging Face token, whereas public models can be deployed without one. The model’s architecture must be supported by the AIM Engine, and the model size must fit within the GPU memory allocated to your project, so larger models may require additional GPUs.
Finding Your Way Around the Models Page#
Most of this blog happens on the Models page. It is organized into a few sections:
AIM Catalog: The curated AIMs you can deploy out of the box.
Custom Models: The models you bring into the project yourself.
Fine-tune models: Fine-tuned models you create in the project.
Deployed Models: Every active deployment in the project, with its operational status.
You’ll start on the Custom Models tab, import a model, and follow its deployment on the Deployed Models tab once it is running.
Onboarding a Model from Hugging Face#
We will use a public, instruction-tuned model, Qwen3-8B, the same workflow applies to gated models, where you simply attach or create a Hugging Face token.
Importing a model is driven by the Add new model wizard, which walks you through three steps:
Model source
Model information
Runtime profile
To open the Add new model wizard, go to the Models page, open the Custom Models tab, and click Onboard model in the top-right toolbar (see Figure 1).
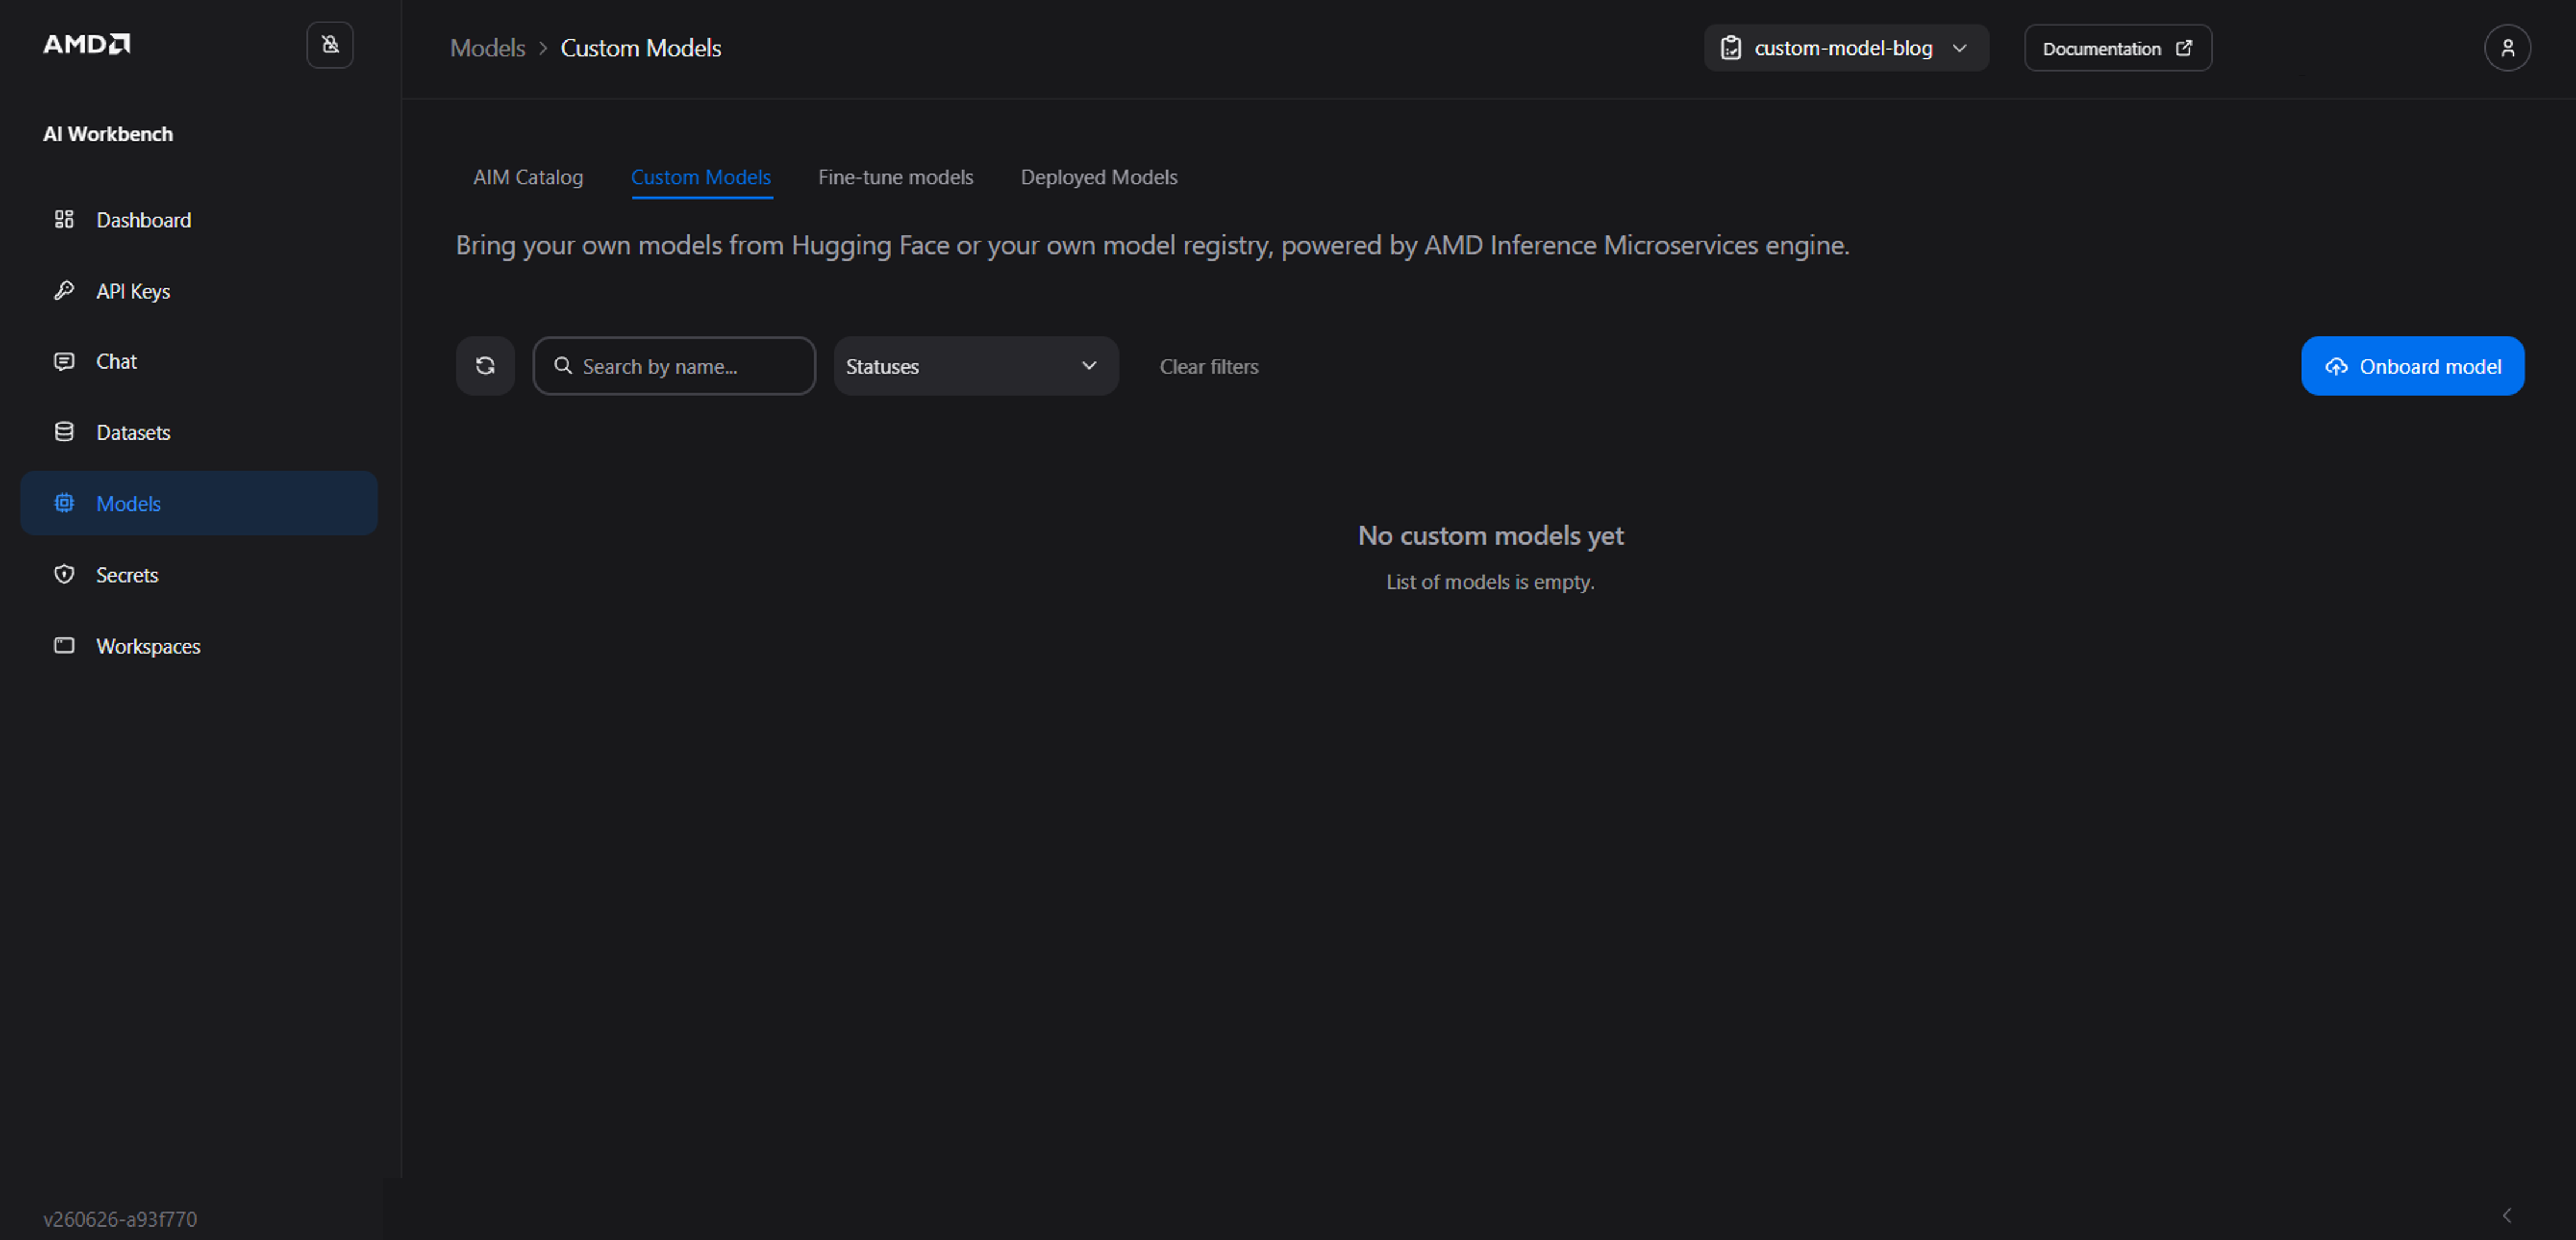
Figure 1: Custom Models tab in the Models page.
Note
Both the display properties in Model information and the profile parameters in Runtime profile can be updated after onboarding.
Step 1: Point to a Hugging Face Source#
In the Model source step, enter the repository ID or Hugging Face URL of the model you want to onboard. For this blog, you can use https://huggingface.co/Qwen/Qwen3-8B. The model is public and does not require a token.
Select Preview model, as seen in Figure 2, to fetch the repository’s details from Hugging Face.
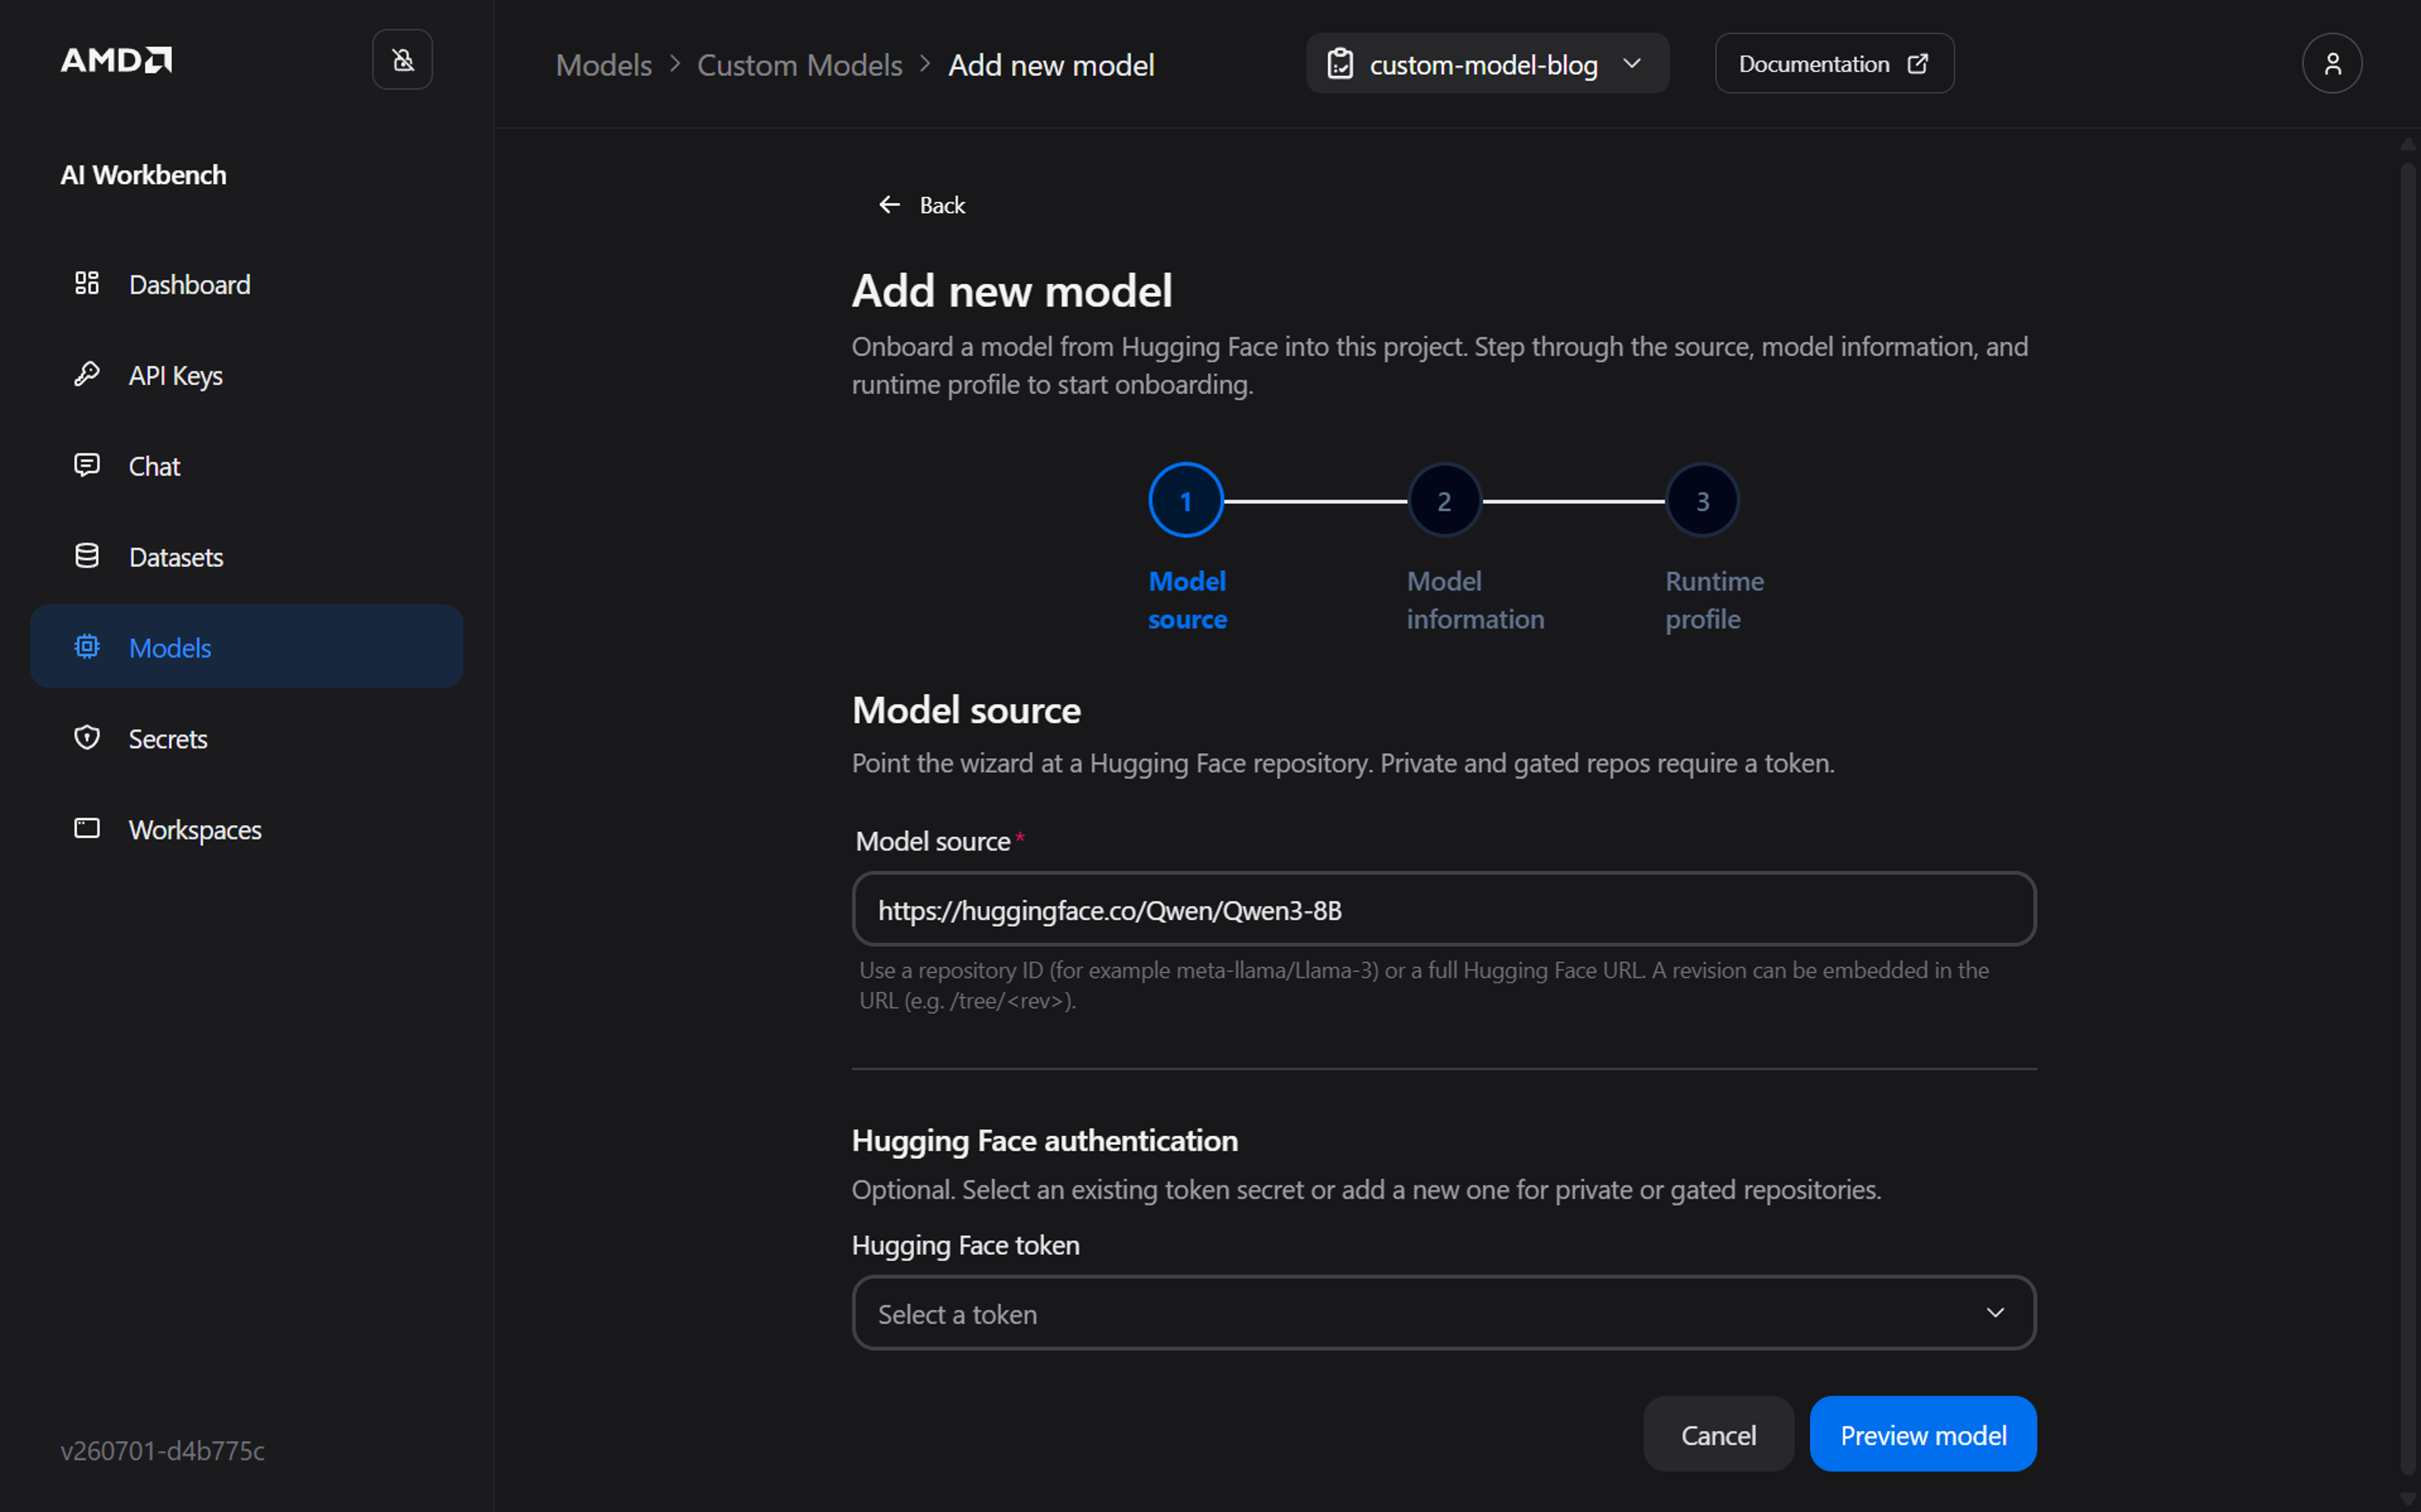
Figure 2: Add new model wizard: Model source step.
Important
Gated and private repositories need a Hugging Face token to read their metadata and download their weights. If you preview a gated model without a token, the AI Workbench can’t access it. If you are sure a repository exists but it shows up as “not found”, check your token before assuming the source is wrong.
Step 2: Confirm the Model Information#
The Model information step displays the fetched information from Hugging Face, starting with the Canonical name, which is read-only, it comes from the source and can’t be changed. Below it you can adjust the Display properties:
Model display name: The human-readable title used for the model card. It must not be empty. For this blog, use
Qwen3 8B blog model.Description: A short catalog description. For example,
Onboarded model for the ROCm blog post.Tags: Comma-separated tags, prefilled from Hugging Face.
You can also update the display properties later from Model settings.
Continue to the Runtime profile step by clicking Next - Define runtime parameters, as seen in Figure 3.
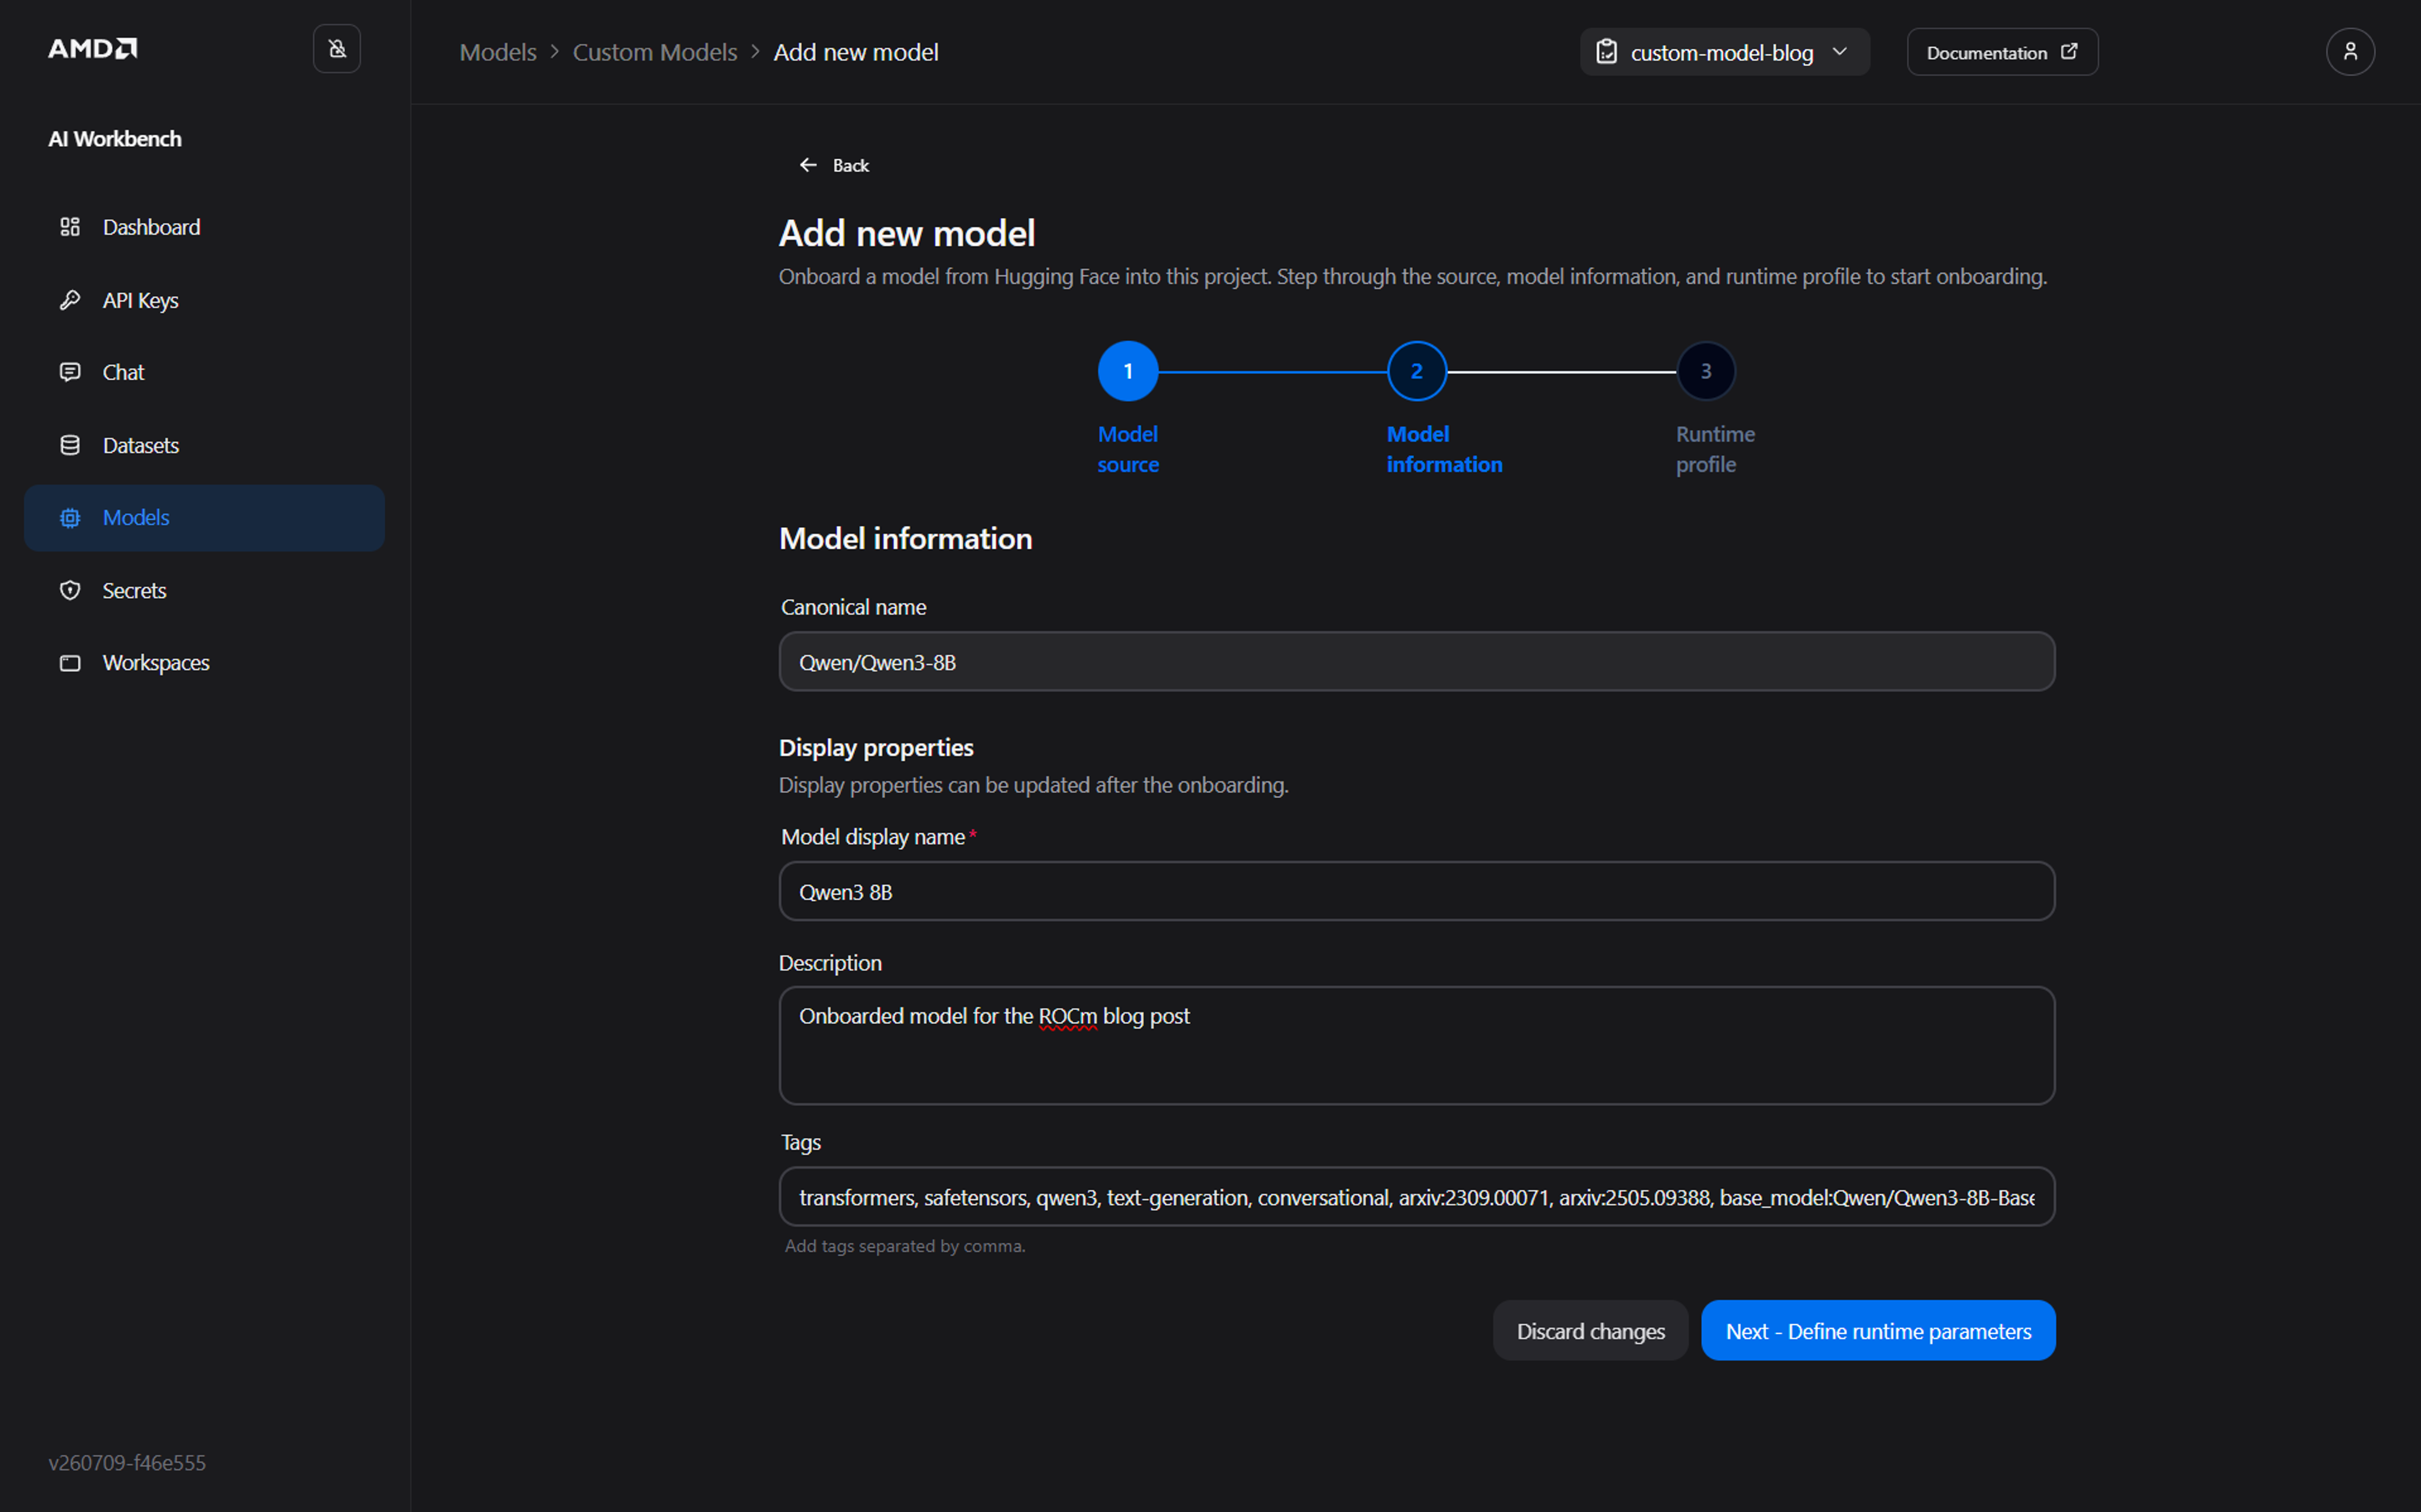
Figure 3: Add new model wizard: Model information step.
Step 3: Set the Runtime Profile#
The Runtime profile step is where you choose the container image that serves your model and the hardware profile it runs on. The wizard presets these from the options detected for your cluster. Under Profile parameters, as shown in Figure 4, you set:
Container image: The base image that serves your model, for example
aim-basefor AMD Instinct, with Radeon™-specific images where applicable.Container version: The image version (tag), shown when the selected image offers different versions.
Accelerator type and Accelerator: The hardware type (for example, GPU) and the specific accelerator within it (for example, AMD Instinct MI300X).
Accelerator count: How many accelerators a single replica uses. Larger models may need more than one.
Model precision: The numerical precision the model runs at (for example,
bf16).
The Runtime profile step also includes the optional sections Engine arguments and Environment variables for advanced tuning, which the next section covers in more detail. You can leave them empty for now and we will adjust them later.
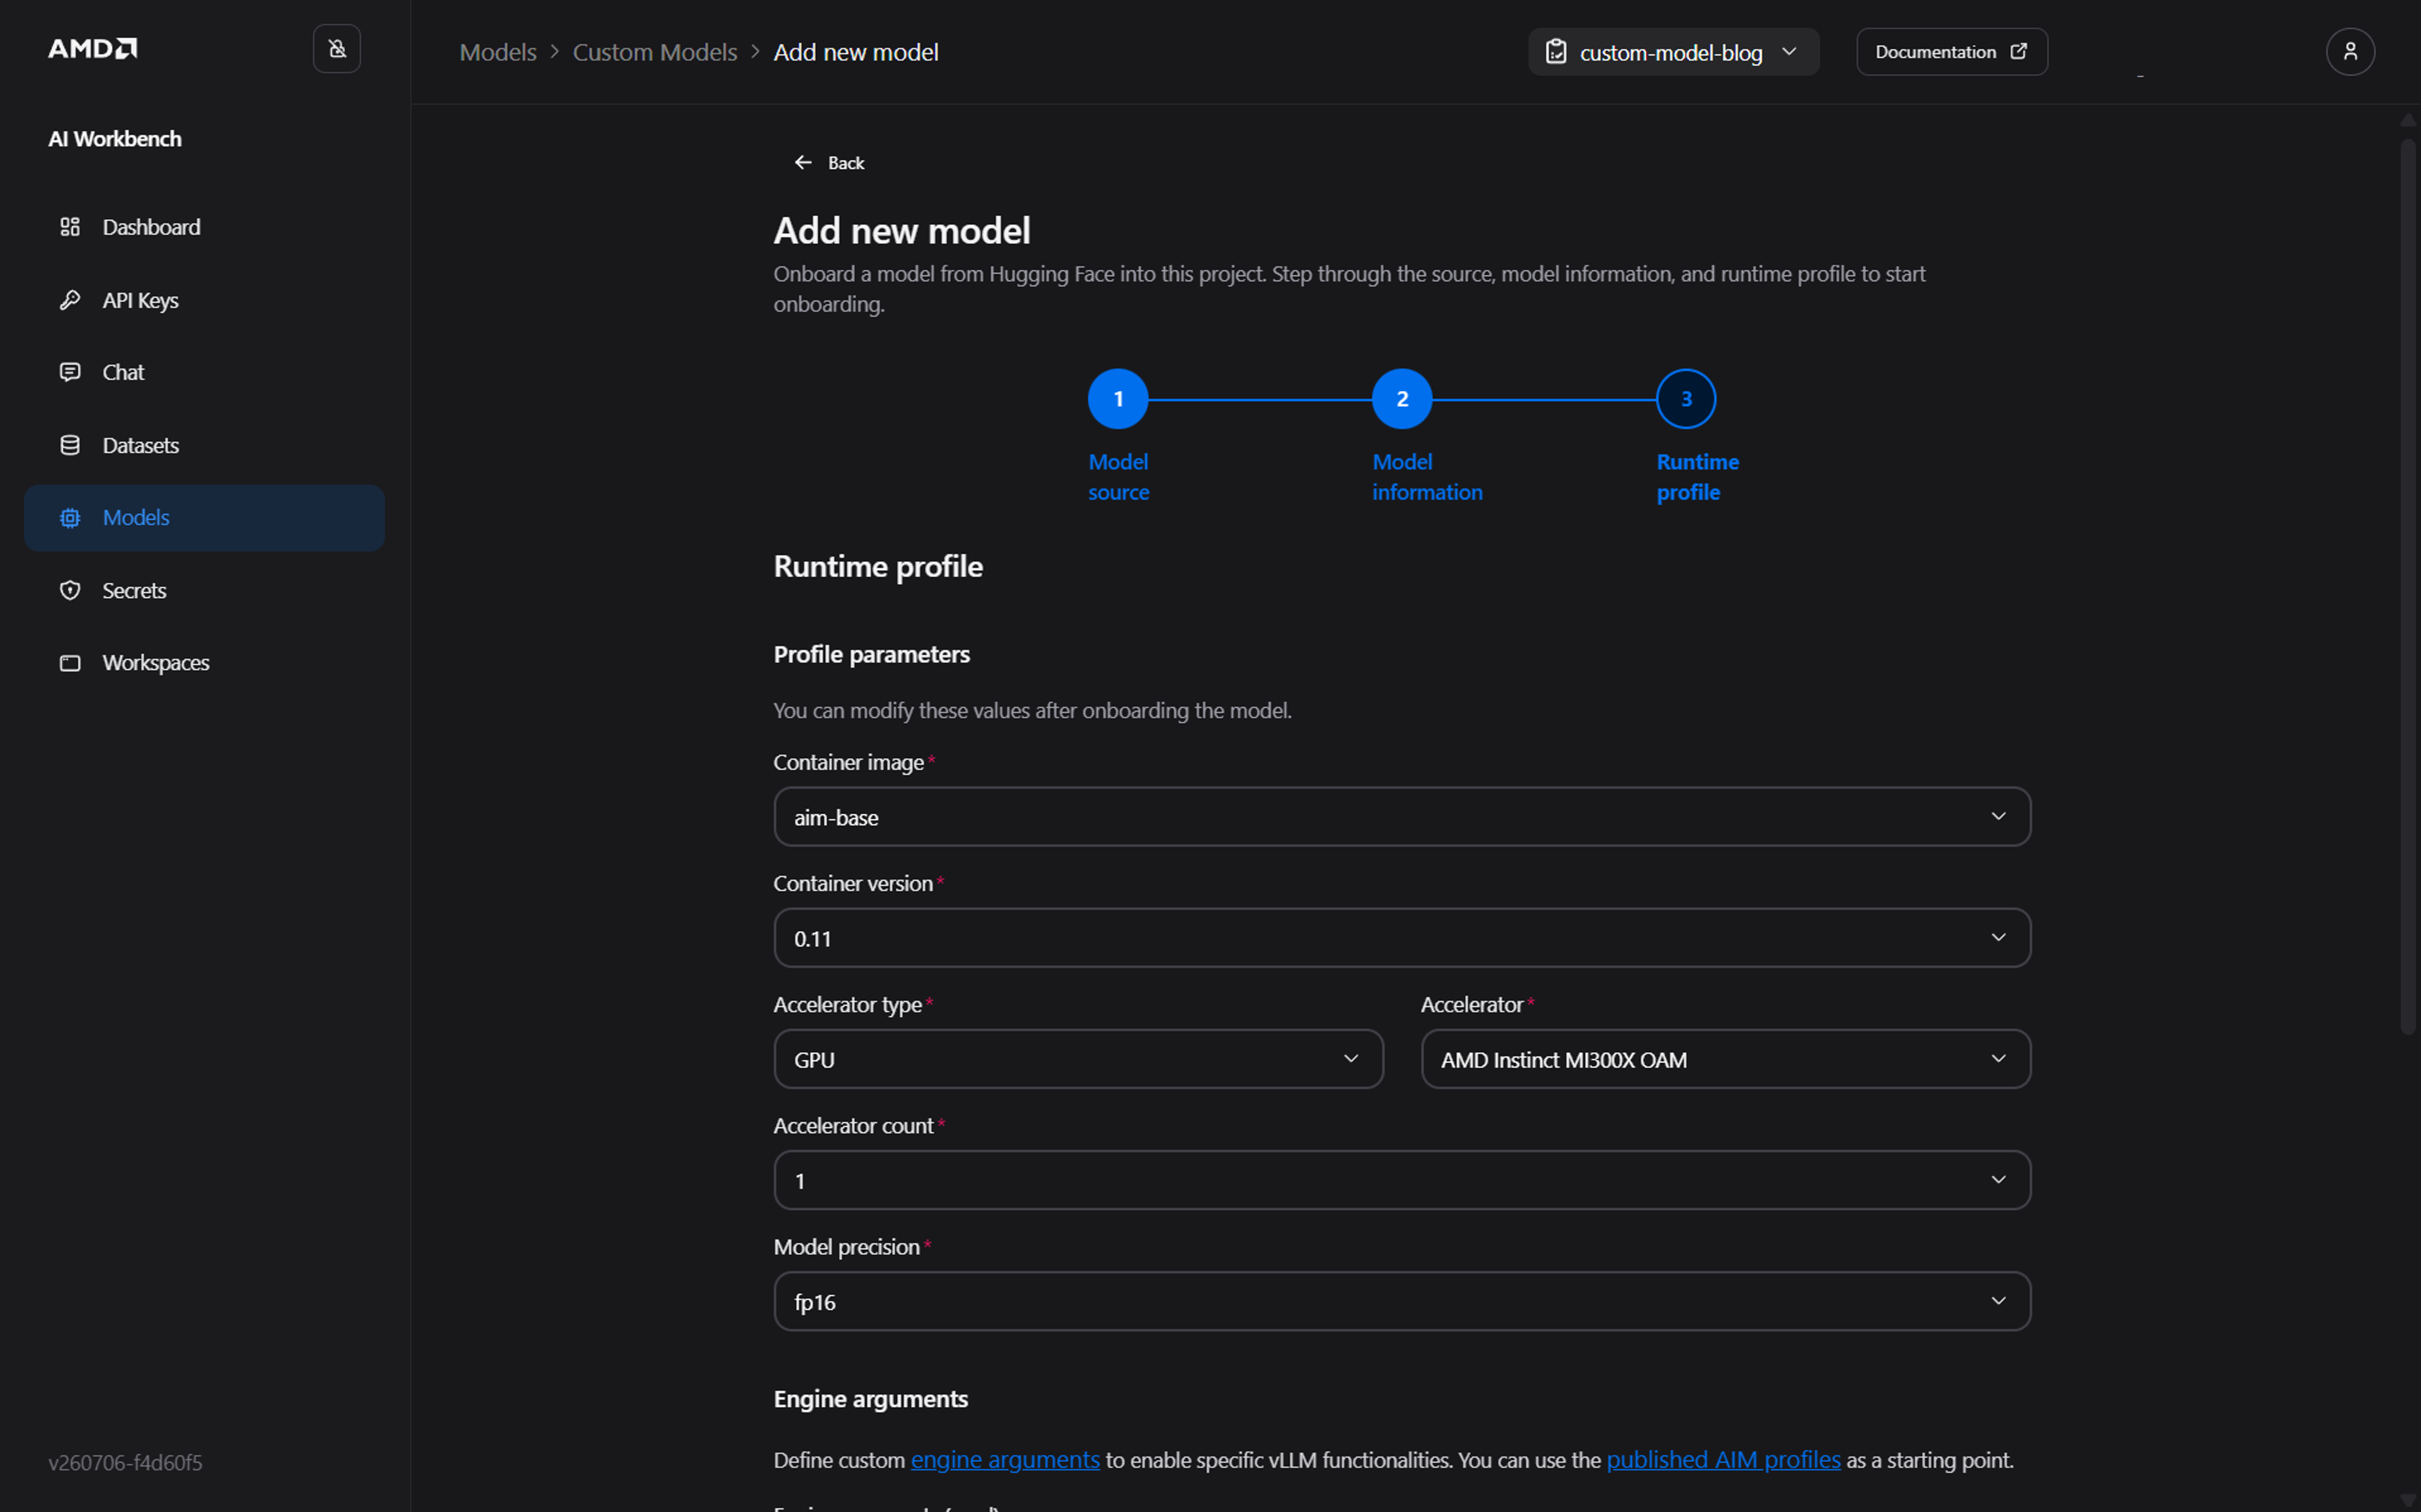
Figure 4: Add new model wizard: Runtime profile step.
Start Onboarding and Track Its Status#
Select Save and start onboarding at the bottom of the page to start onboarding the model to your project. The AMD AI Workbench validates your selections, re-checks the source against Hugging Face, and then imports the model’s weights in the background. You are returned to the Custom Models tab, where your new model appears as a model card. The import continues on its own, and it can take a while for large models because the weights are downloaded and copied into your project’s storage.
Each Custom model card shows its current status:
Importing: The model’s weights are being downloaded into your project; expect this right after you start.
Onboarding: The model is being prepared after the import finishes.
Failed: Onboarding did not complete; confirm your token and repository access, then try again.
When a model is ready to deploy, its card shows no status and its Deploy button is enabled, as shown in Figure 5.
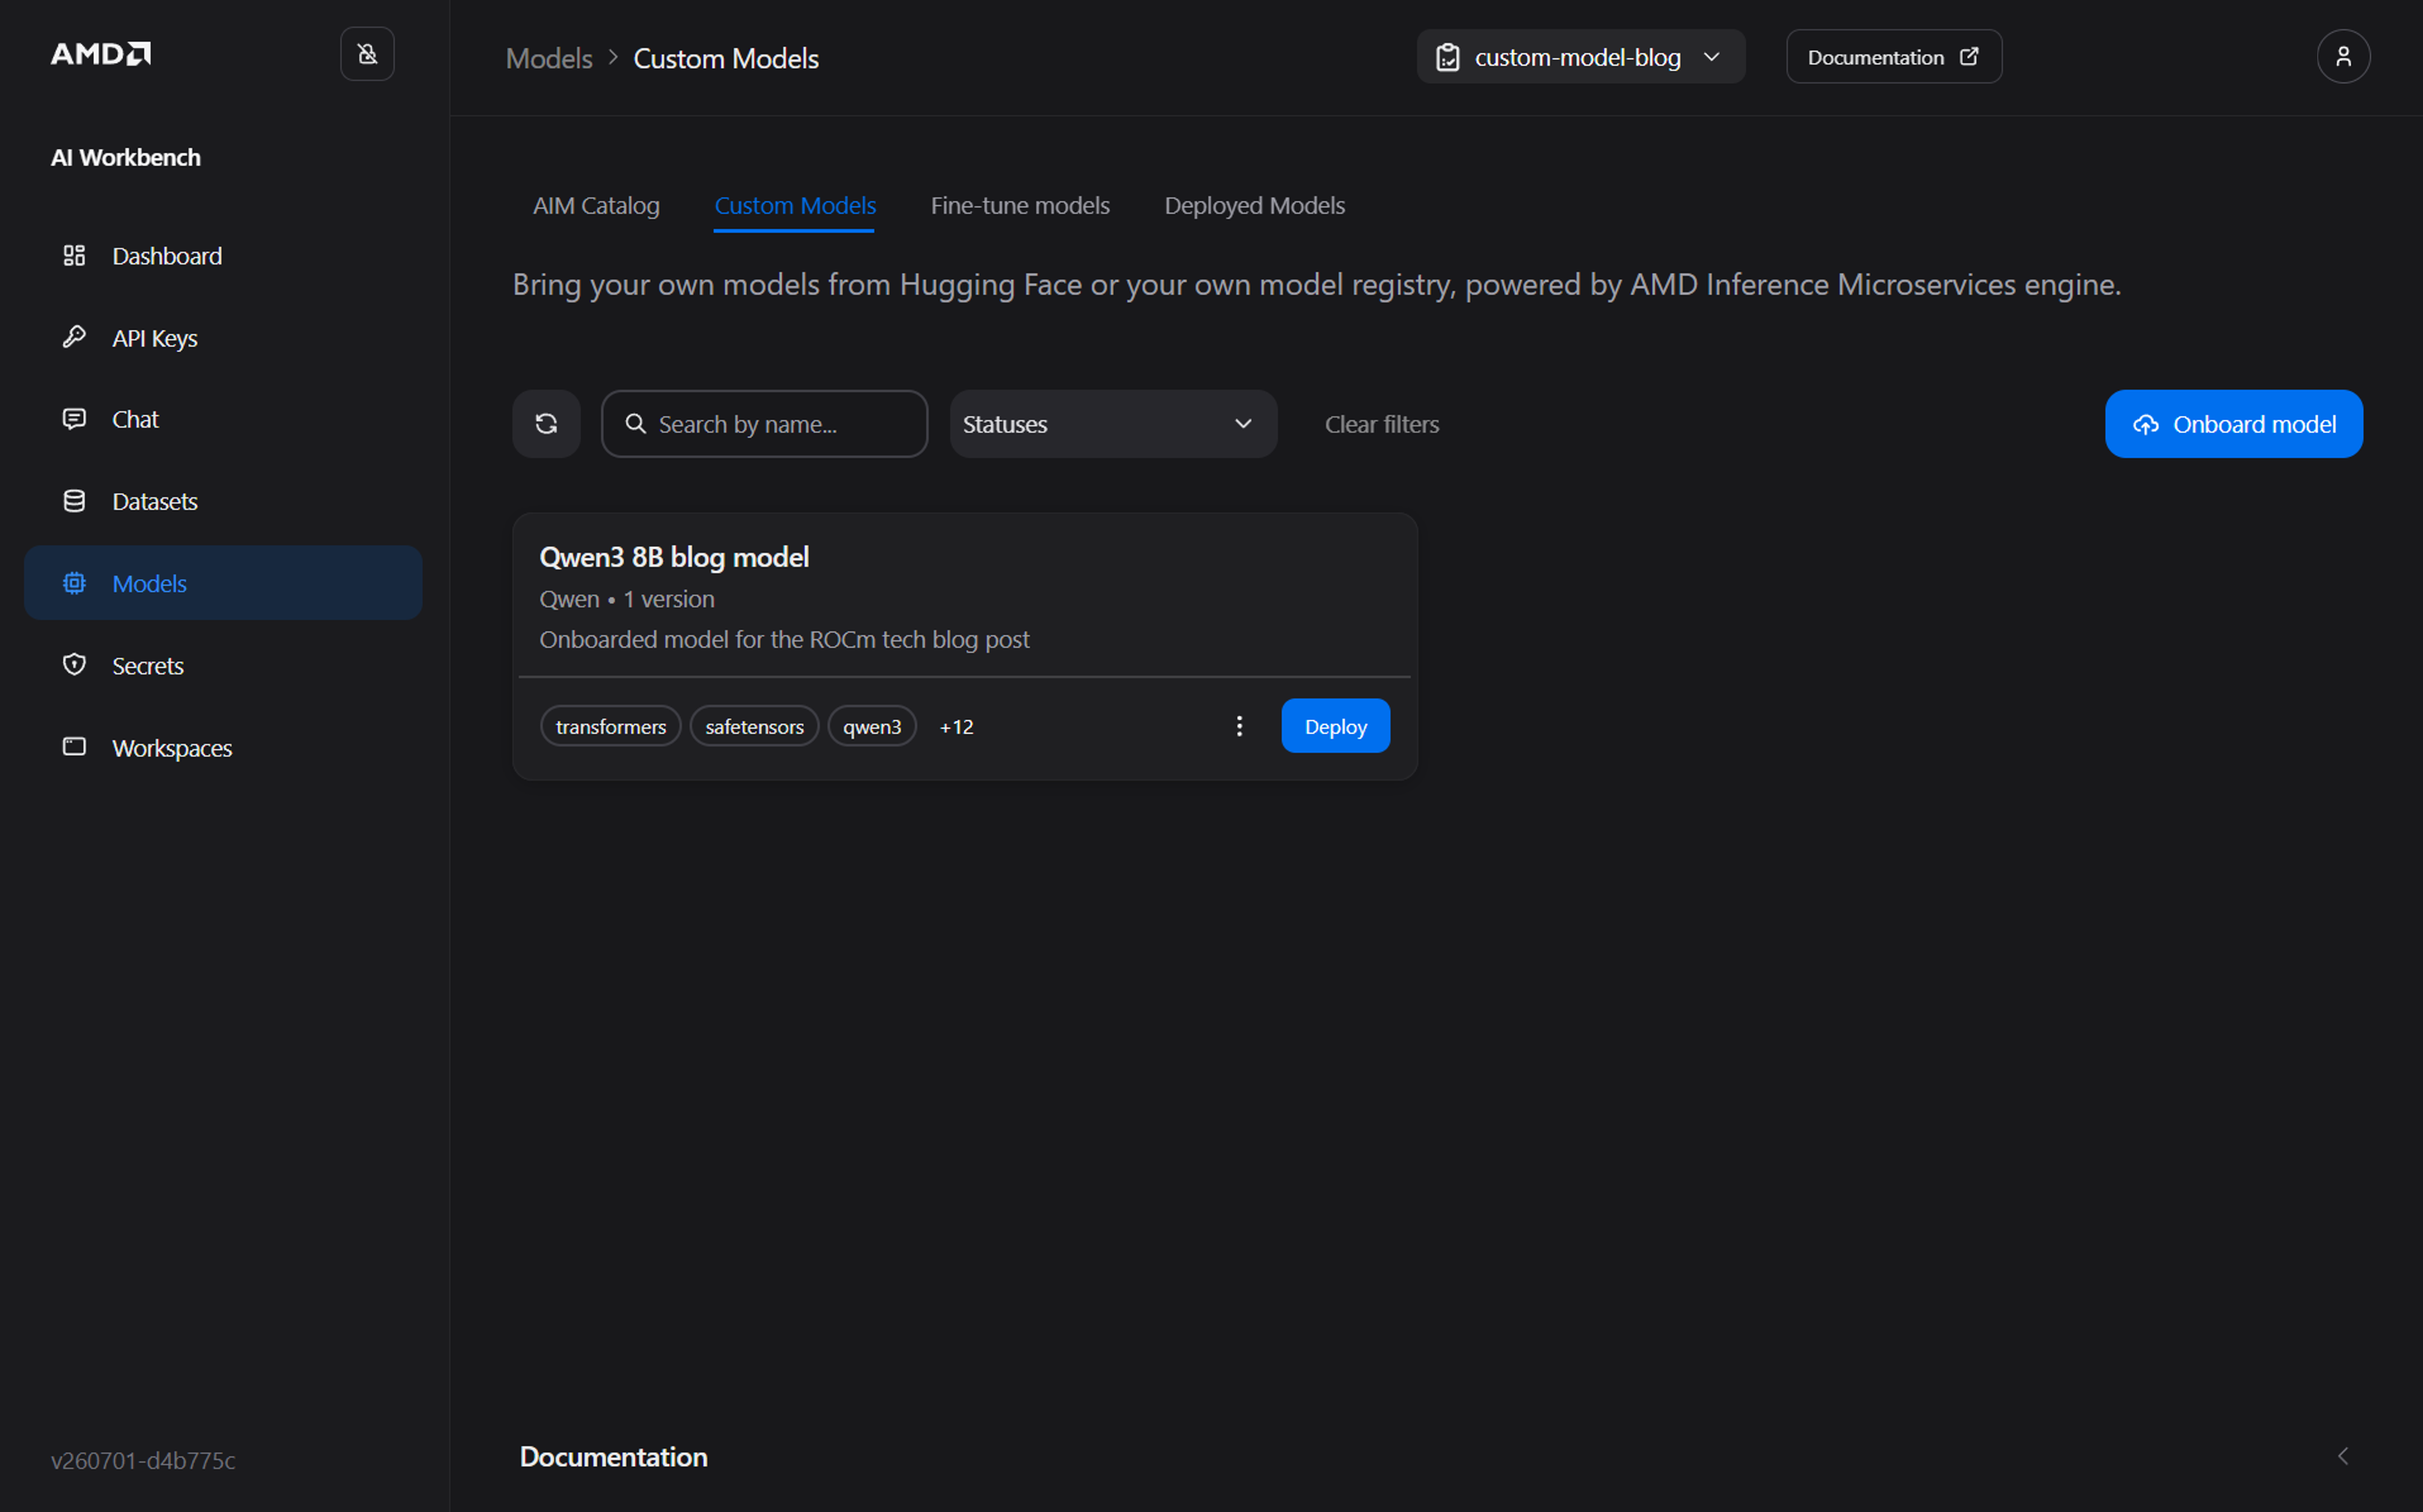
Figure 5: Custom models tab: Model card.
The model is now ready to be deployed, but before we deploy it, let’s look at how we can tune the runtime profile.
Tuning the Runtime Profile#
The runtime profile sets the baseline defaults for the model itself, and you can set it in two places: during onboarding (Step 3 above) and in Model settings at any time afterward. To update the runtime profile, open a model’s action menu (the three vertical dots on the model card) on the Custom Models tab and select Model settings. This opens the Edit model flow. The Model source is fixed, but the Model information and Runtime profile can be updated. Click through to Runtime profile.
Note
Editing the runtime profile updates the model’s baseline for subsequent deployments. Deployments that are already running are not changed retroactively; to apply your changes, re-deploy the model. There is no automatic version history, so if a change causes problems, edit the profile again to restore the previous values and redeploy.
The Engine arguments and Environment variables fields in the Runtime profile let you pass the configuration straight to the inference engine. Both are entered as key-value pairs in YAML.
Engine arguments enable specific inference engine functionality, for example, you might want to set the max context window size (input and output) with max-model-len or change the maximum number of requests processed in parallel (max-num-seqs). Good for throughput tuning. Enter the following in the Engine arguments (YAML) section:
max-model-len: 32768
max-num-seqs: 512
Environment variables tune the model through its runtime environment. Here, we’ll turn on the AMD AITER kernel library within vLLM. Enter the following in the Environment variables (YAML) section:
VLLM_ROCM_USE_AITER: "1"
These map to the underlying engine’s options. For guidance on engine arguments and environment variables, see the vLLM references for engine arguments and environment variables.
Warning
Engine arguments and environment variables are advanced options. Invalid keys, unsupported values, or combinations that don’t match your model or hardware can prevent a deployment from starting.
Once ready, click Save at the bottom of the page, as shown in Figure 6, to save your edits and be redirected back to the Custom Models tab.
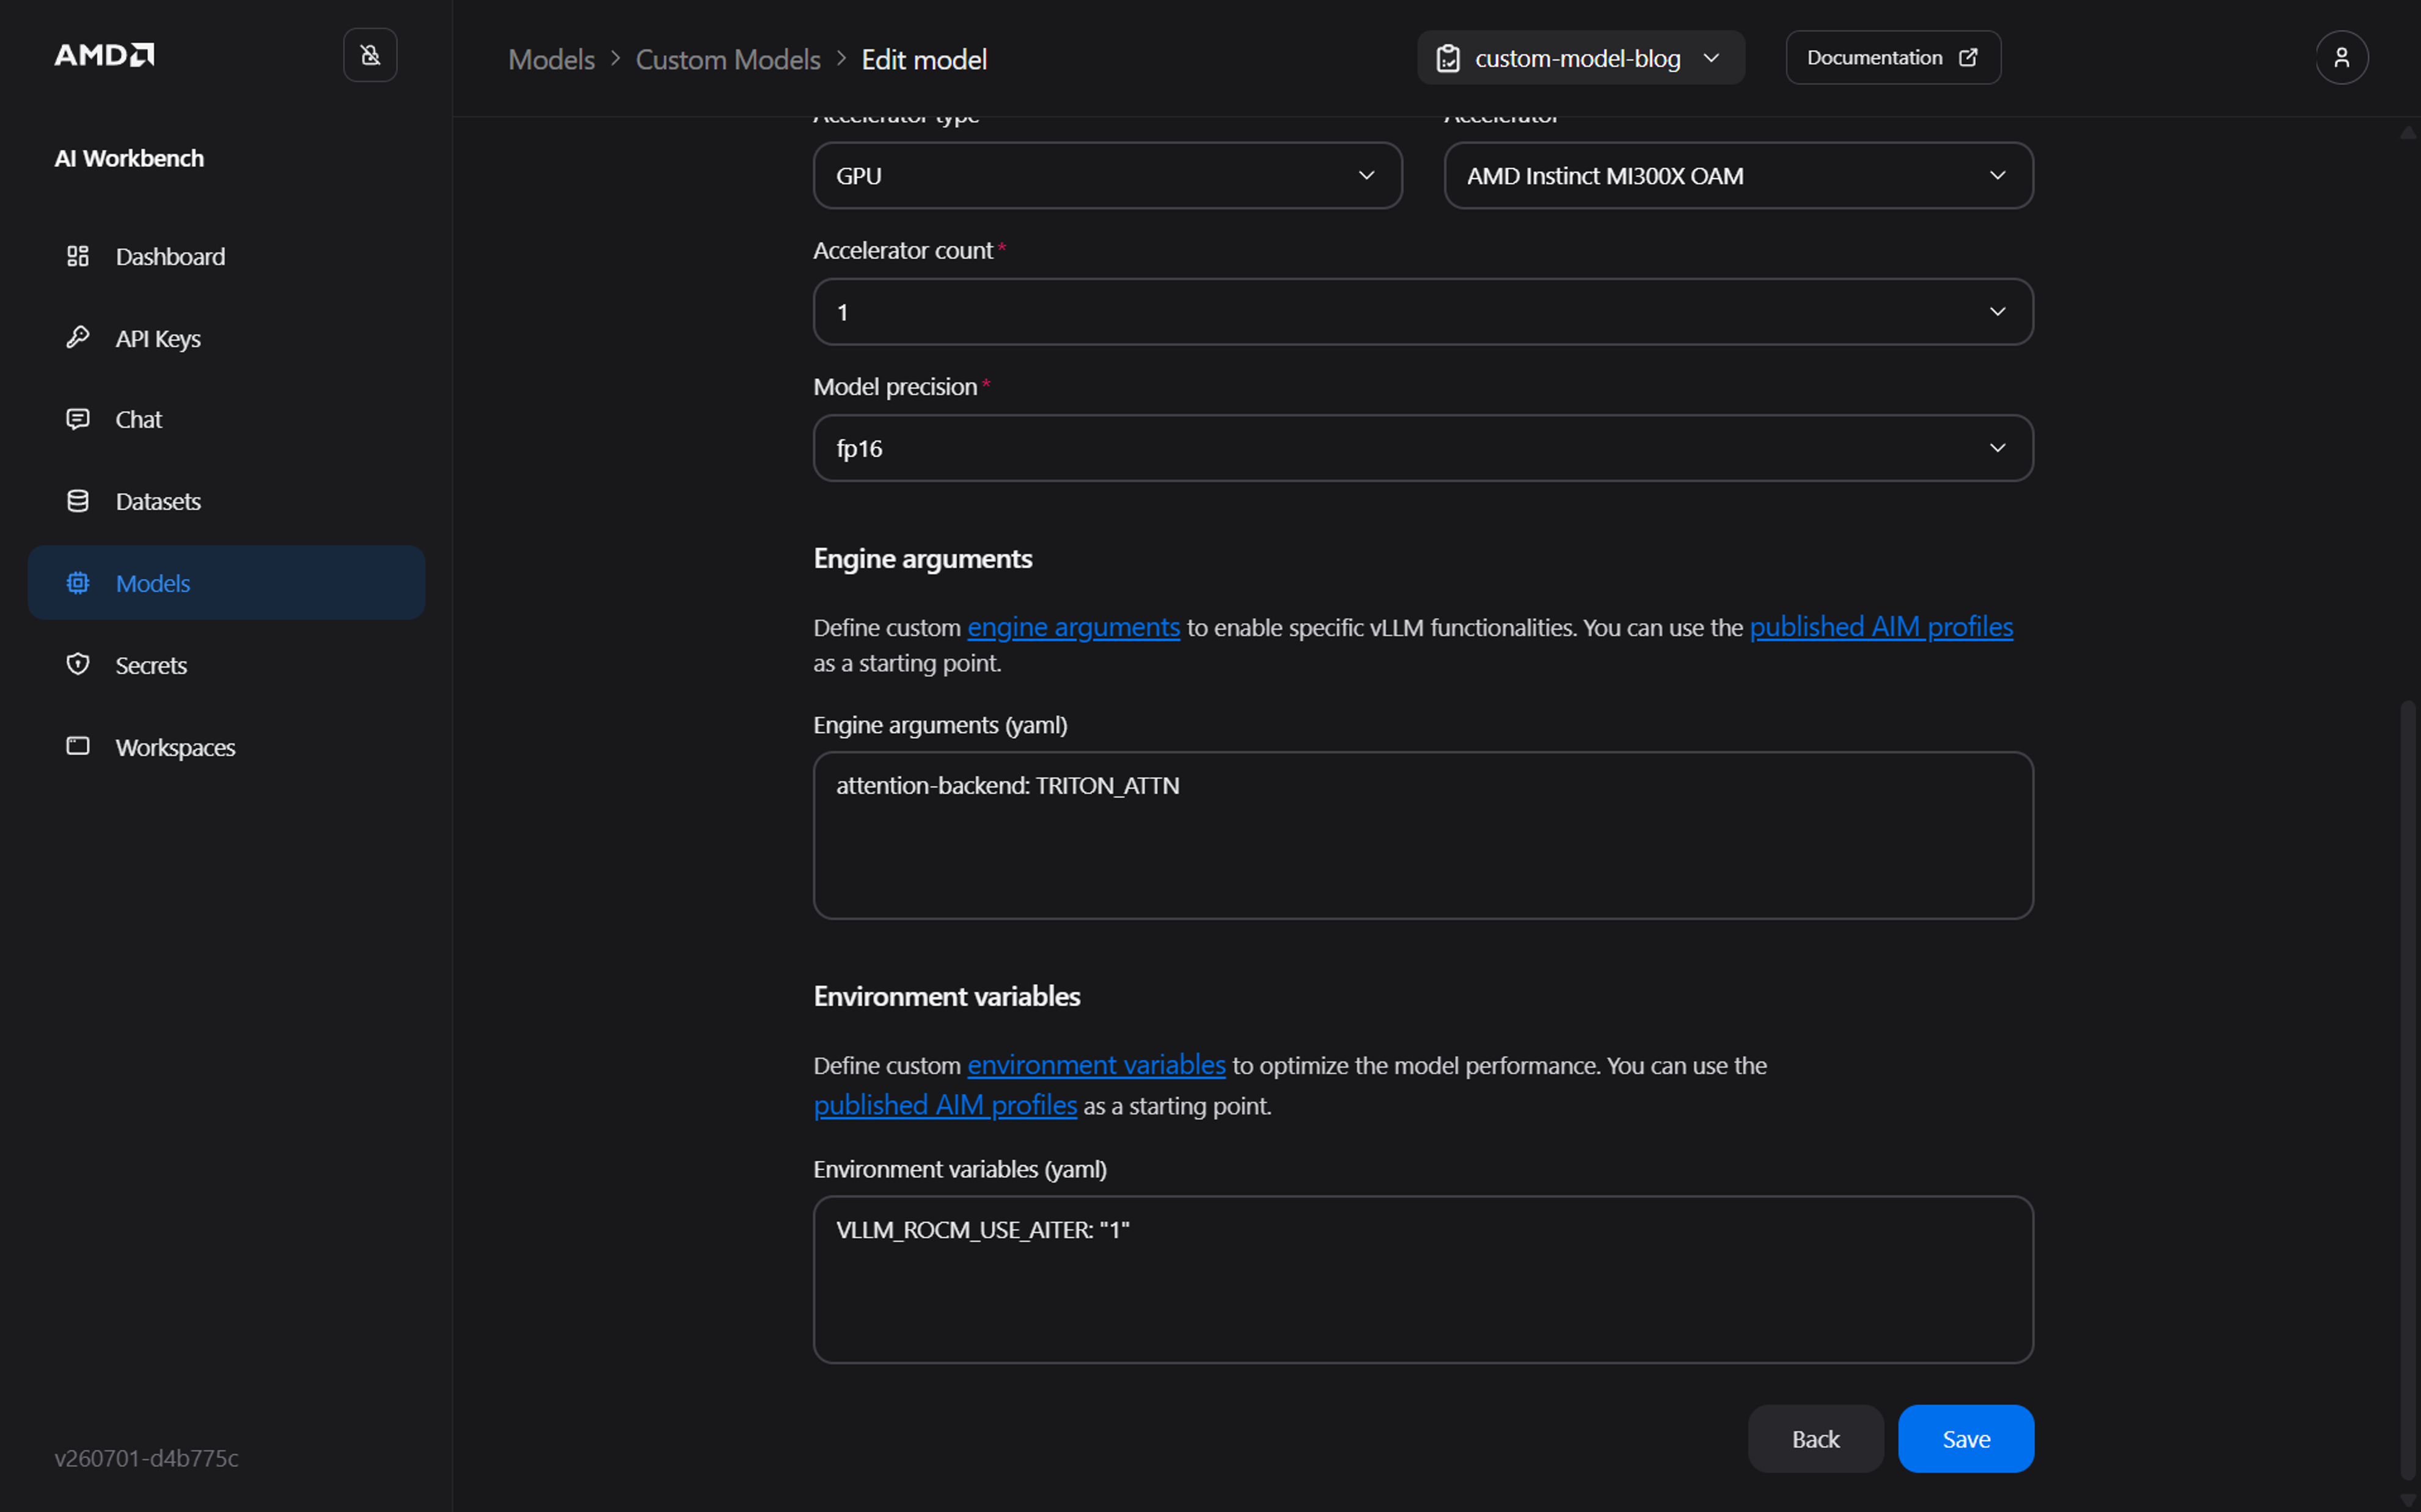
Figure 6: Model settings: Runtime profile.
Deploying Your Custom Model#
Once the model is ready, deploy it:
Go to the Models page and the Custom Models tab.
Find the model and select Deploy.
In the Custom model deployment drawer (Figure 7), set the deployment options:
Display name: An optional descriptive name for this deployment. We use
Qwen3 8B blog model, or leave it empty to get a generated name.Autoscaling: Optionally enable autoscaling so the deployment adjusts its replica count with demand. Autoscaling can only be enabled at deploy time. We’re leaving this disabled.
Select Deploy.
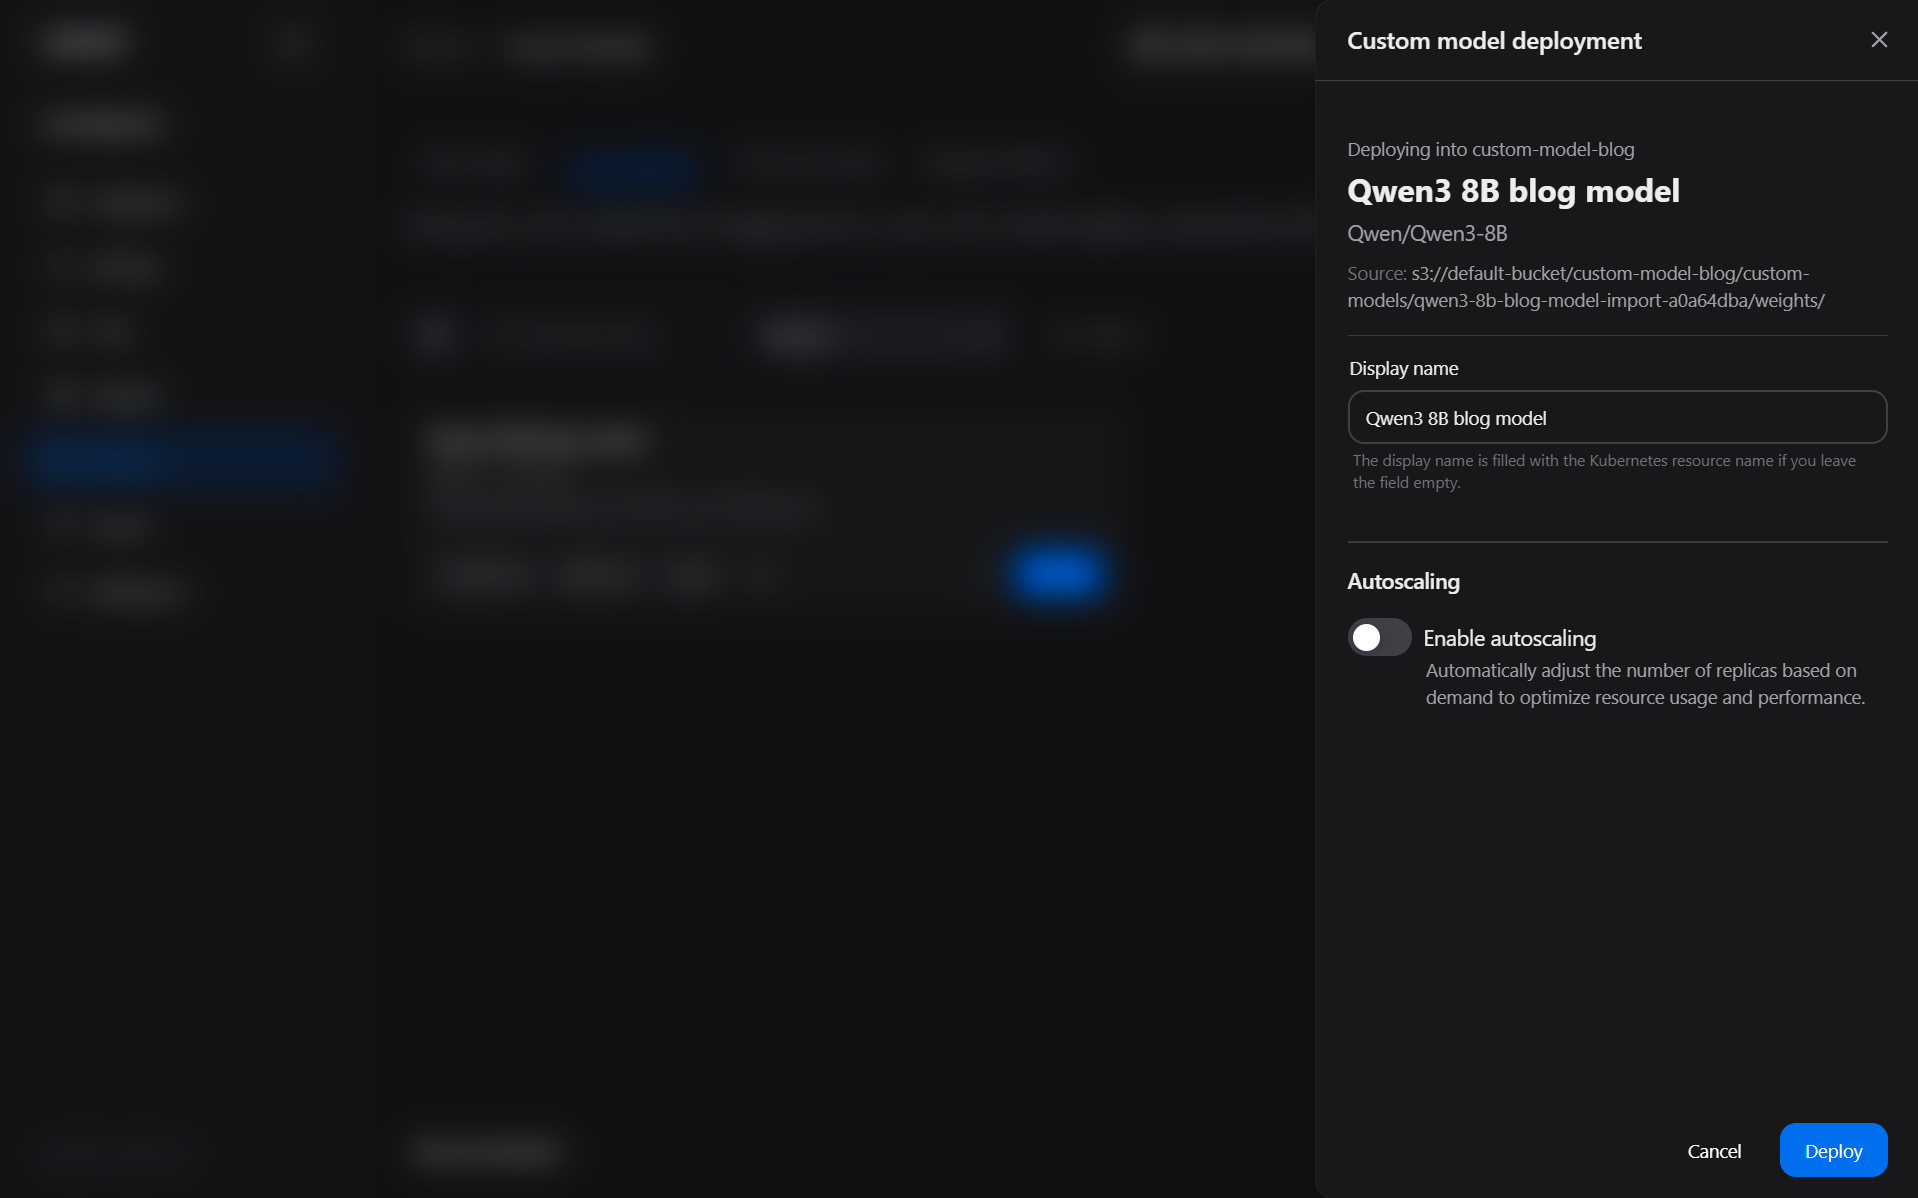
Figure 7: Custom model deployment drawer.
When the AMD AI Workbench deploys the model, it must schedule the workload, pull the container image, and load the model weights before the deployment is ready to serve requests, so the first deployment of a model can take several minutes. To follow the progress, navigate to the Deployed Models tab (Figure 8), where the deployment moves through Pending to Starting to Running. A deployment in the Running state is ready to receive requests. To dig into a deployment, open its action menu (the three dots) and select Open details to review its components and inference metrics.
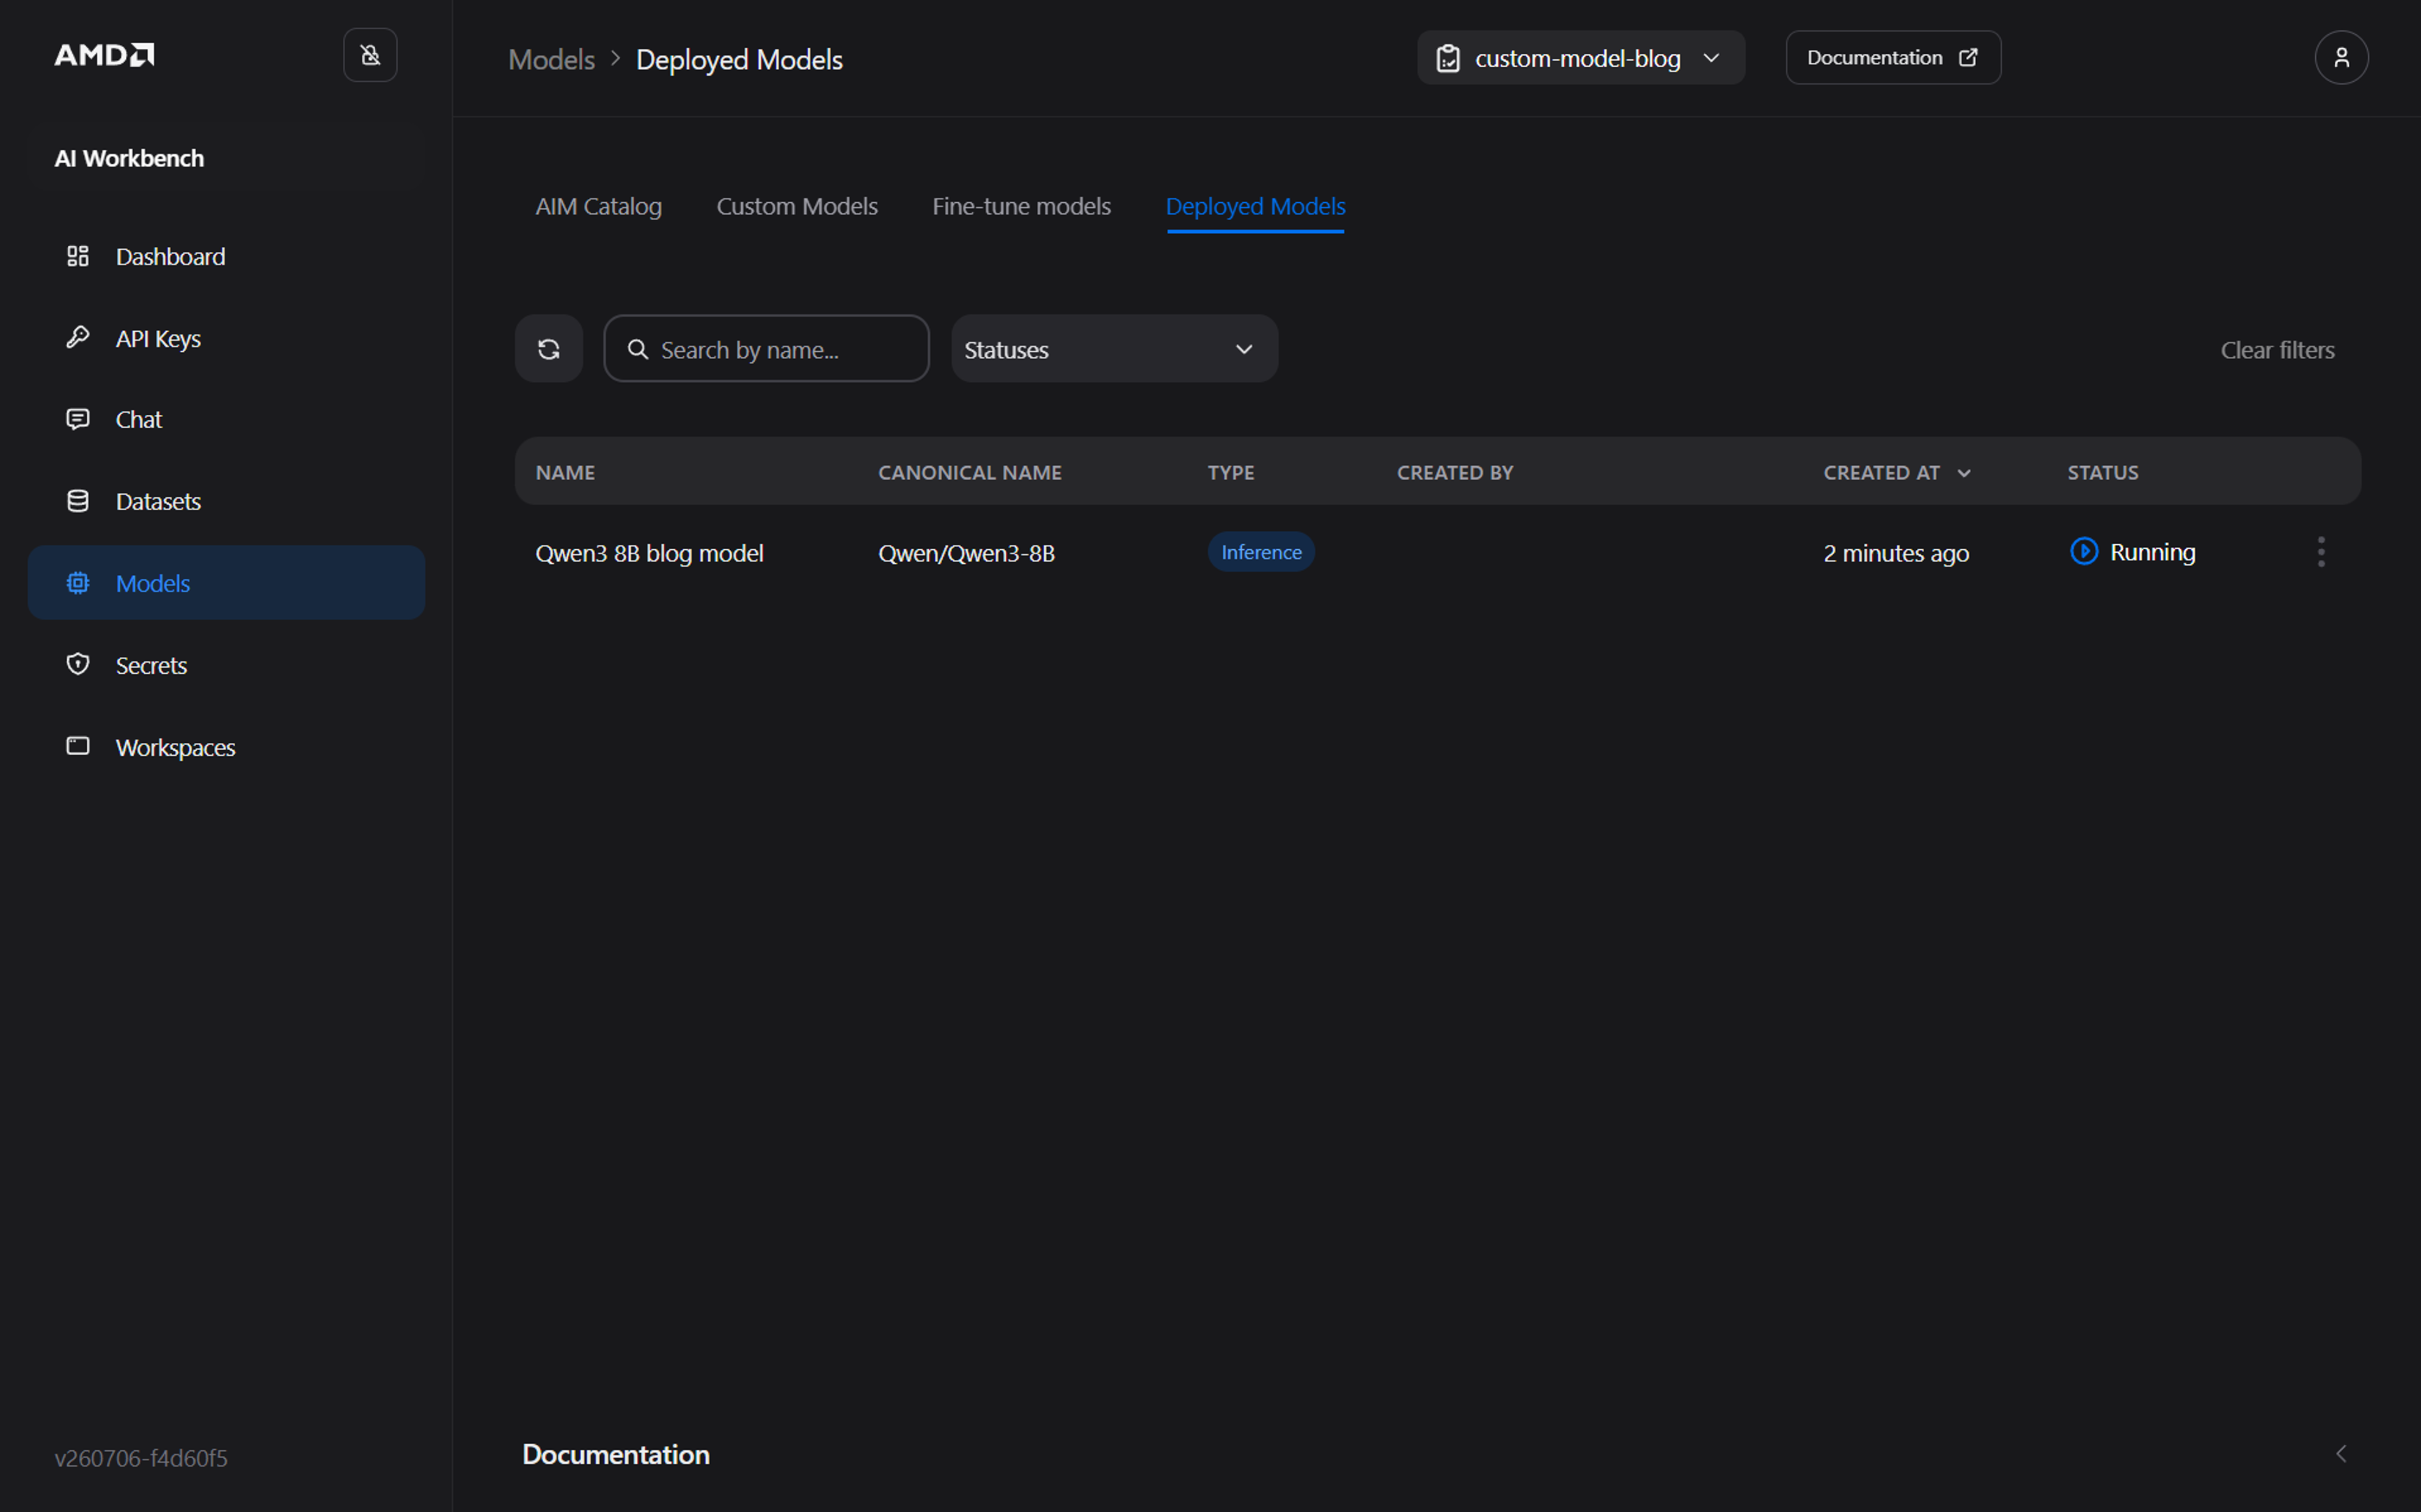
Figure 8: Deployed Models tab: Custom model deployed.
Using Your Deployed Model#
To start using your deployed model, go to the Deployed Models tab and open the deployment’s action menu (the three dots) to:
Chat with model: Opens the Chat page with the deployment selected, so you can try it interactively. Chat is available for deployments that support chat-style responses.
Connect to model: Presents the connection details (such as the model’s endpoints) that you need in order to call it from your own applications.
Open details: Reviews the deployment’s health and inference metrics.
Let’s try out the deployed model by chatting with it:
Click on Chat with model.
On the Chat page, type in your prompt, e.g., Write me a short poem about summer.
Observe your custom model’s answer to your prompt (see example in Figure 9).
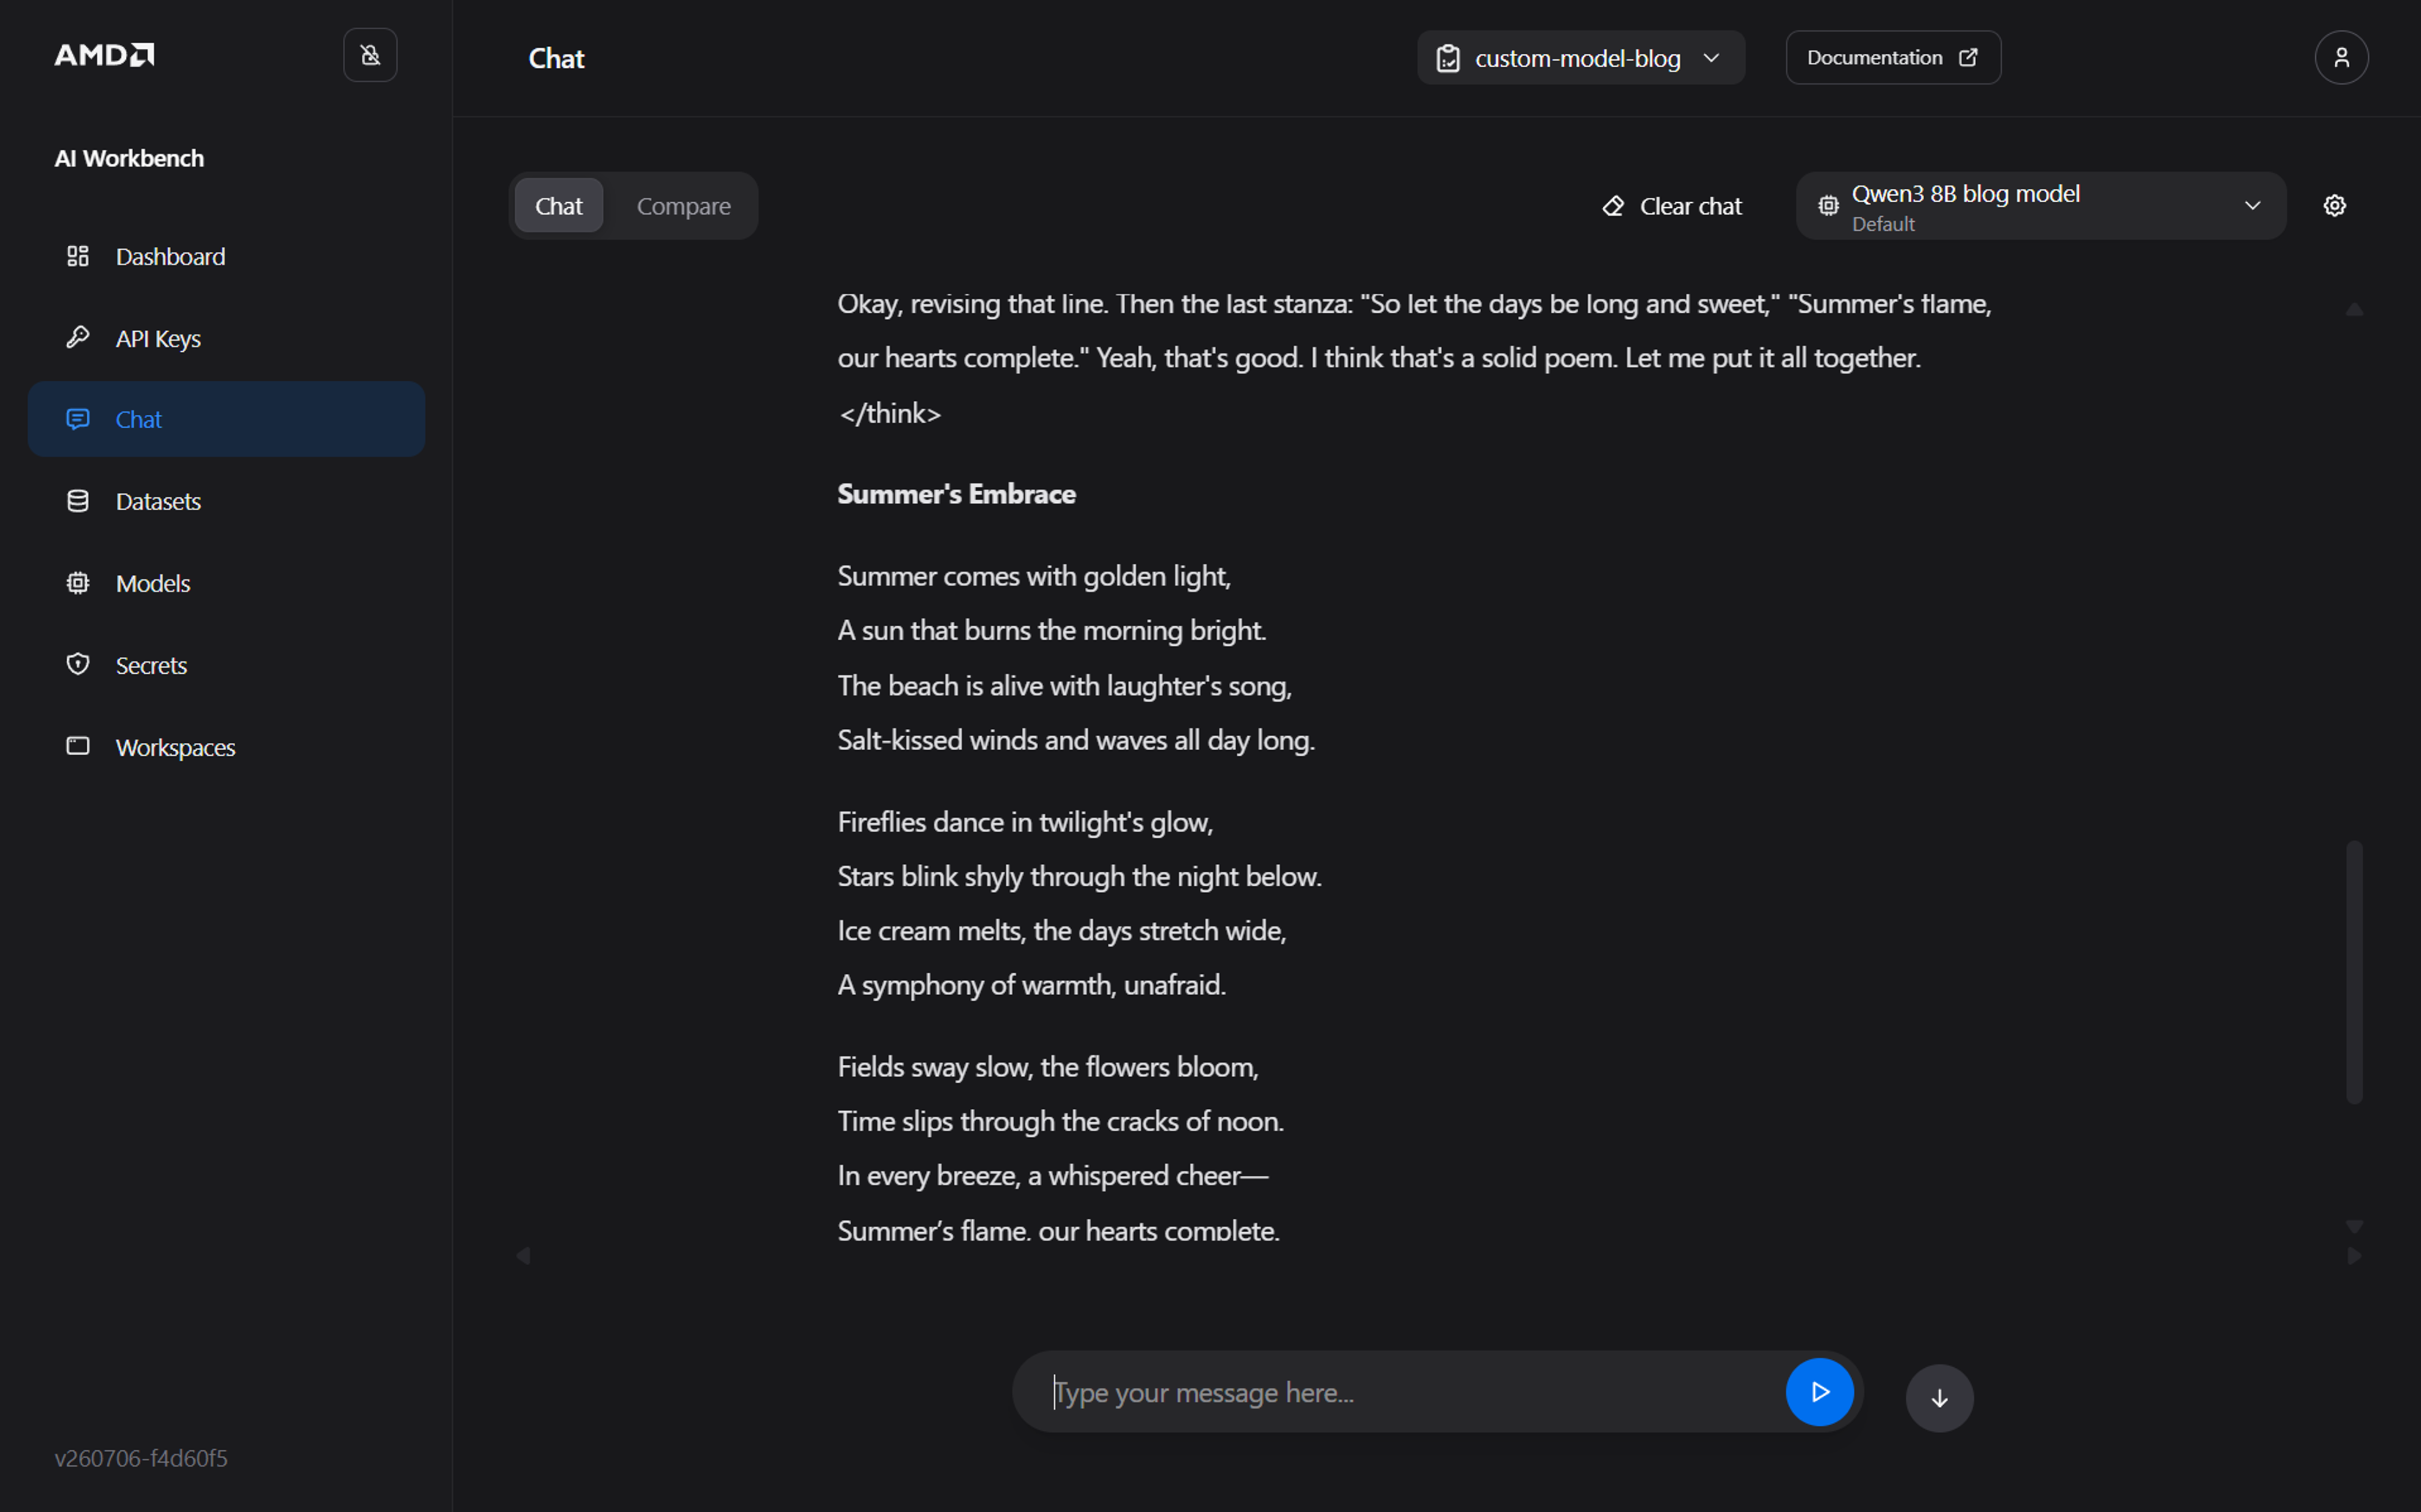
Figure 9: Chat with the deployed model: Custom model chat response.
Managing and Cleaning Up#
Managing your custom models as your project evolves is straightforward and done in the following three ways:
Edit: Update display information or the runtime profile at any time from Model settings.
Undeploy: From Deployed Models, stop a deployment to free its resources. The onboarded model stays in Custom Models and can be deployed again later.
Delete: Remove an onboarded model from Custom Models. Deletion is blocked while the model still has active deployments, so undeploy first.
Once you are done with your deployment, either Undeploy or Delete it from your project unless you have a continuous need for it.
Note
Reusing an existing custom model’s display name doesn’t create a second model. Importing under a name that already exists and points to the same source overwrites that model’s settings; pointing it at a different source is rejected so the wrong model isn’t modified. Custom models are not versioned the way the AIM Catalog is, so pick distinct display names if you want to keep models separate.
Summary#
In this blog post, we walked through the Custom model workflow in AMD AI Workbench:
Importing a model from the Hugging Face Hub
Setting its runtime profile
Deploying it as an inference service through the AIM Engine
Interacting with it from the Chat page
You’ve learned how AMD AI Workbench serves a model you import onto the platform, providing it with key features such as scaling, monitoring, and API access, all through the GUI. To apply this to your own work, import a model that fits your use case, adapt the runtime profile parameters as needed, and deploy it.
Additional Resources#
Disclaimers#
The information presented in this document is for informational purposes only and may contain technical inaccuracies, omissions, and typographical errors. The information contained herein is subject to change and may be rendered inaccurate for many reasons, including but not limited to product and roadmap changes, component and motherboard version changes, new model and/or product releases, product differences between differing manufacturers, software changes, BIOS flashes, firmware upgrades, or the like. Any computer system has risks of security vulnerabilities that cannot be completely prevented or mitigated. AMD assumes no obligation to update or otherwise correct or revise this information. However, AMD reserves the right to revise this information and to make changes from time to time to the content hereof without obligation of AMD to notify any person of such revisions or changes. THIS INFORMATION IS PROVIDED ‘AS IS.” AMD MAKES NO REPRESENTATIONS OR WARRANTIES WITH RESPECT TO THE CONTENTS HEREOF AND ASSUMES NO RESPONSIBILITY FOR ANY INACCURACIES, ERRORS, OR OMISSIONS THAT MAY APPEAR IN THIS INFORMATION. AMD SPECIFICALLY DISCLAIMS ANY IMPLIED WARRANTIES OF NON-INFRINGEMENT, MERCHANTABILITY, OR FITNESS FOR ANY PARTICULAR PURPOSE. IN NO EVENT WILL AMD BE LIABLE TO ANY PERSON FOR ANY RELIANCE, DIRECT, INDIRECT, SPECIAL, OR OTHER CONSEQUENTIAL DAMAGES ARISING FROM THE USE OF ANY INFORMATION CONTAINED HEREIN, EVEN IF AMD IS EXPRESSLY ADVISED OF THE POSSIBILITY OF SUCH DAMAGES. AMD, the AMD Arrow logo, AMD Instinct, AMD Radeon, ROCm and combinations thereof are trademarks of Advanced Micro Devices, Inc. Other product names used in this publication are for identification purposes only and may be trademarks of their respective companies. © 2026 Advanced Micro Devices, Inc. All rights reserved