Leveraging AMD AI Workbench and Autoscaling to Scale LLM Inference for Optimal Resource Utilization#

Explore how autoscaling with AMD Inference Microservices (AIMs) and AMD AI Workbench can automatically scale your resources in response to shifting AI workload demand. AI inference can be computationally intensive, with resource requirements that vary depending on traffic e.g., the number of inference requests your workload receives at any given time. Autoscaling addresses this by scaling resources up during peak traffic to maintain performance, and scaling them back down during quieter periods to reduce cost and resource consumption.
This blog outlines how you can use the AMD AI Workbench and its autoscaling features together with AIMs. Furthermore, you will learn how to use the underlying AIM Engine directly to enable and configure autoscaling when deploying AIMs from the command line interface (CLI). These approaches combine the UI capabilities of AMD AI Workbench with the flexibility of the pre-packaged, containerized AIMs for deploying inference microservices on AMD Instinct™ GPUs.
Prerequisites#
This blog utilizes the AMD AI Workbench (1.0.3). Before proceeding, please ensure the following prerequisites are met:
Access to AMD AI Workbench: You will need access to an instance of the AMD AI Workbench. Refer to the Supported Environments documentation for installation details of the AMD enterprise AI reference stack
Project Membership: Ensure you have access to a project in AMD AI Workbench. We will be using a project/namespace called “demo-blog”, which has been set up using the AMD Resource Manager throughout the blog. Projects are essential for organizing and isolating resources, workloads, and secrets. For setup assistance, see Manage projects for assistance
GPU Resources: You will need a project/namespace configured with at least three GPUs
Note
This blog post was validated on a cluster running the AMD enterprise AI reference stack, powered by AMD Instinct™ MI300X GPUs with 1+ TB of storage.
Optional: While this blog utilizes public models, a Hugging Face token is required to explore gated models. Instructions for adding the token to the AMD AI Workbench can be found in the Documentation.
Autoscaling#
Autoscaling for inference services is a feature that automatically adjusts computing resources for workloads, based on real-time traffic. It ensures that workloads have sufficient resources to handle incoming requests, based on defined scaling policies. By defining scaling policies and thresholds for key performance metrics (e.g., response latency, throughput, or GPU utilization), you determine how workloads scale in response to traffic variations. For example, you might configure lower scaling thresholds for critical workloads, enabling them to scale up more rapidly when traffic increases. Conversely, non-critical workloads can be assigned higher thresholds, requiring greater traffic levels before triggering resource scaling.
To enable Kubernetes based autoscaling, the AMD AI Workbench, through the AIM Engine, supports autoscaling with Kubernetes Event-Driven Autoscaling (KEDA) and OpenTelemetry metrics, an open-source component extending Kubernetes autoscaling capabilities. For more information on AIM Engine and KEDA, see the AIM Engine Scaling & Autoscaling Documentation and KEDA documentation.
AMD AI Workbench#
AMD AI Workbench is a low-code interface that lets AI developers deploy and manage AI workloads through an easy-to-use GUI. Through the AIM Catalog, it provides one-click deployment of AIMs. You can also fine-tune models with your own data or launch development workspaces pre-configured for AMD compute. For a full overview, see the AMD AI Workbench blog post or the AMD AI Workbench documentation.
In this section, we will walk you through how to use the AMD AI Workbench GUI to:
Deploy an AIM
Enable autoscaling
Adjust autoscaling settings
Increase the traffic (number of requests) to scale your AI workload
Clean your environment
Autoscaling in AMD AI Workbench#
AMD AI Workbench provides built-in autoscaling functionality for AIM models deployed through the GUI. Autoscaling must be enabled at deployment; once enabled, its settings can be adjusted on the running workload.
Autoscaling through the GUI allows you to control the autoscaling requirements, such as replica counts, scaling metrics, aggregation methods, and the thresholds that trigger the scaling, all without having to write a single line of code. Default parameters are provided to facilitate initial setup, allowing you to deploy immediately and refine the configuration as you gain insight into your workload’s scaling needs.
As described previously, KEDA and OpenTelemetry are used for enabling autoscaling, for the GUI all of this is handled in the background.
Deploy an AIM#
Autoscaling is configured as part of the AIM deployment process. The AIM catalog on the Models page provides a curated collection of production-ready inference services optimized for AMD Instinct™ GPUs. In this blog, we’ll use the Mixtral 8x7B Instruct v0.1 model.
To deploy an AIM:
Navigate to the Models page. You should see the AIM Catalog tab. Here, you will find the available models organized by model name and version, as shown in Figure 1 below
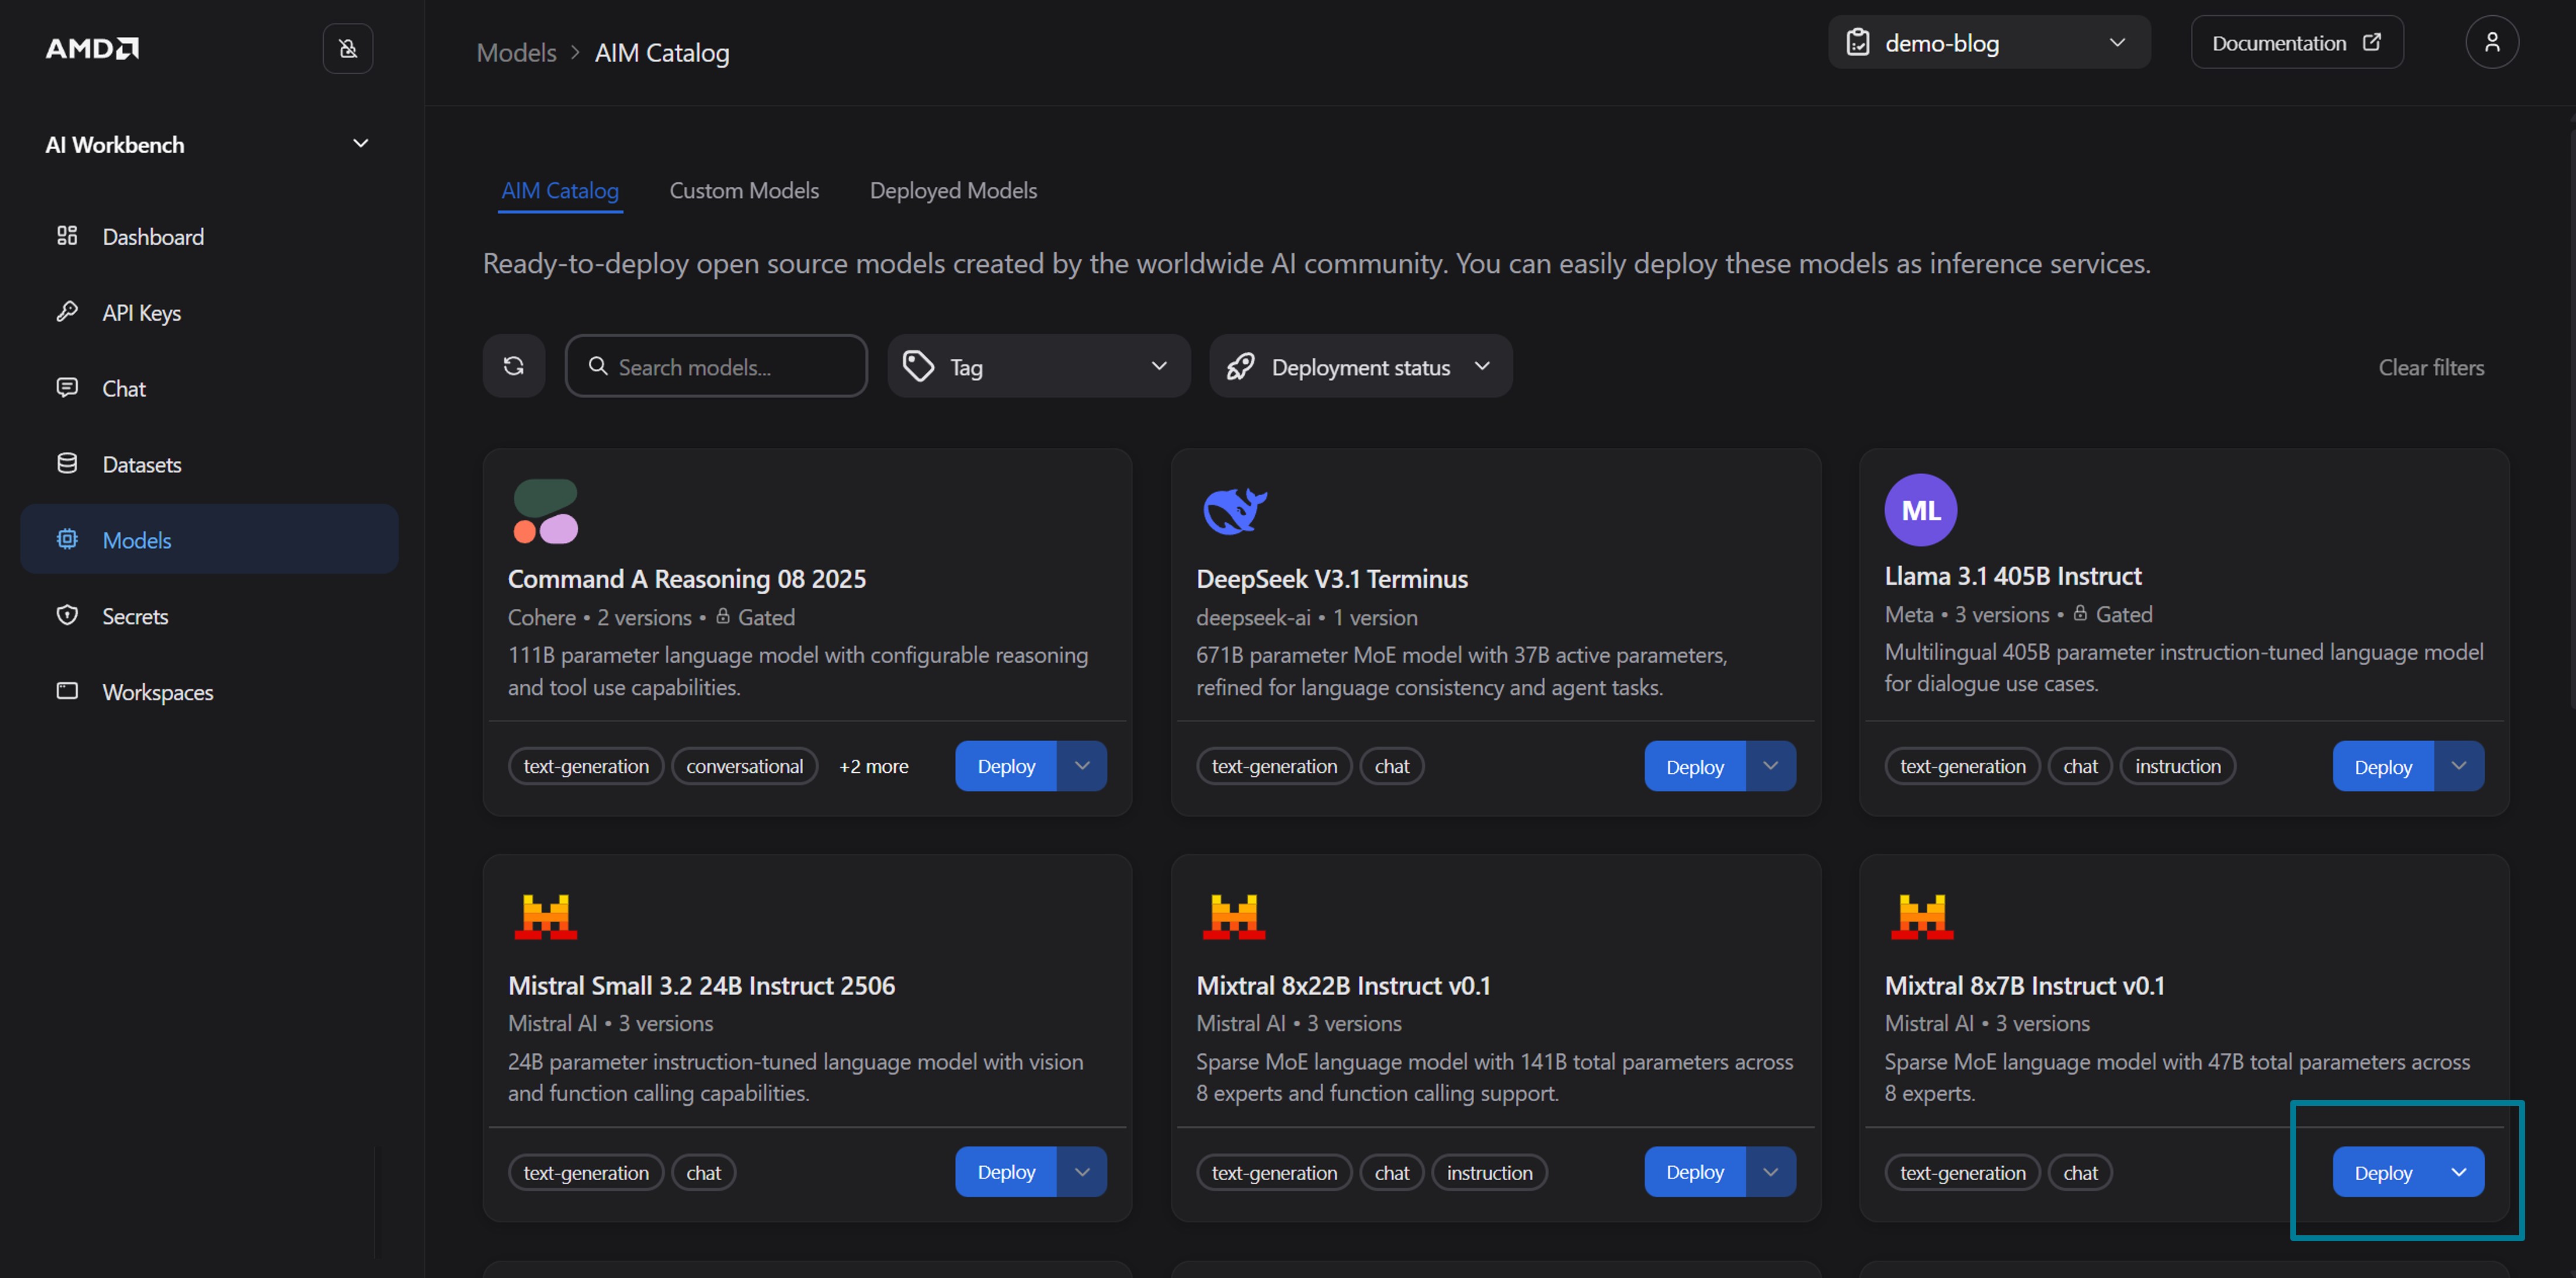
Figure 1: The AIM Catalog in the Models page.
Identify
Mixtral 8x7B Instruct v0.1and click Deploy (see Figure 1), to open the deployment drawerIn the deployment drawer configure the following settings (see Figure 2):
Container version: The latest version is selected by default. Keep that selection for this blog
Performance metric: For this blog, select Default, which automatically picks the most appropriate metric based on your model and hardware. You may also manually choose between:
Latency: Prioritize low end-to-end latency
Throughput: Prioritize sustained requests per second
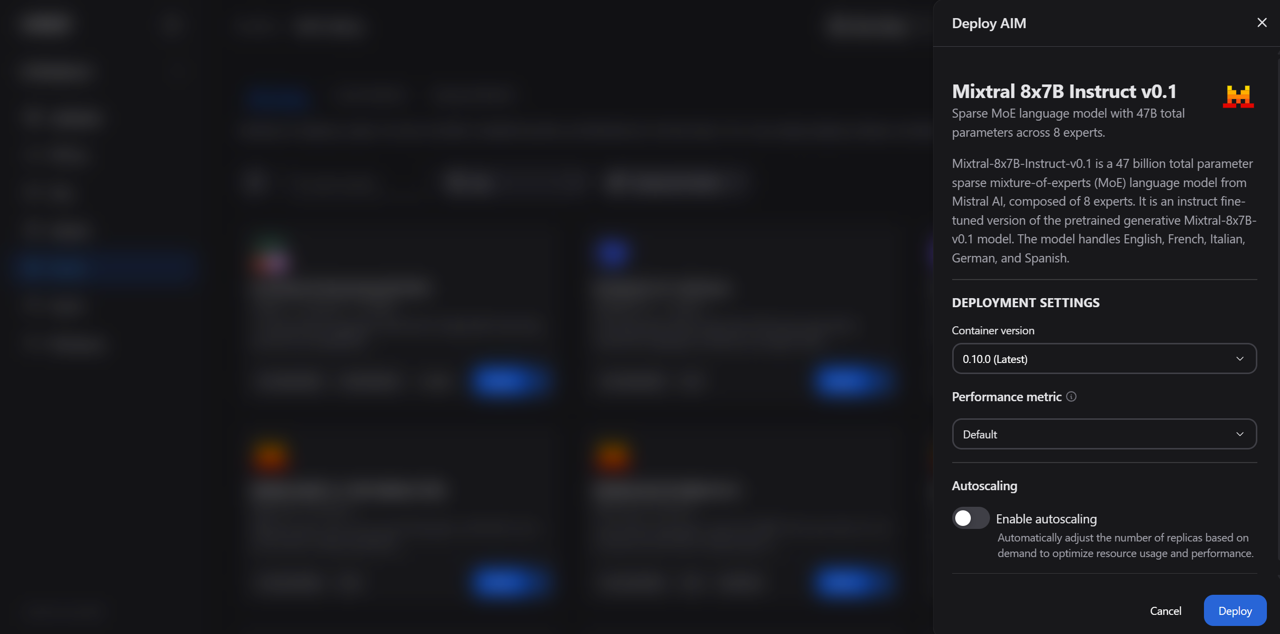
Figure 2: The deployment drawer showing container version, performance metric, and autoscaling configuration.
Toggle Enable autoscaling to reveal the scaling configuration form, as shown in Figure 3 below:
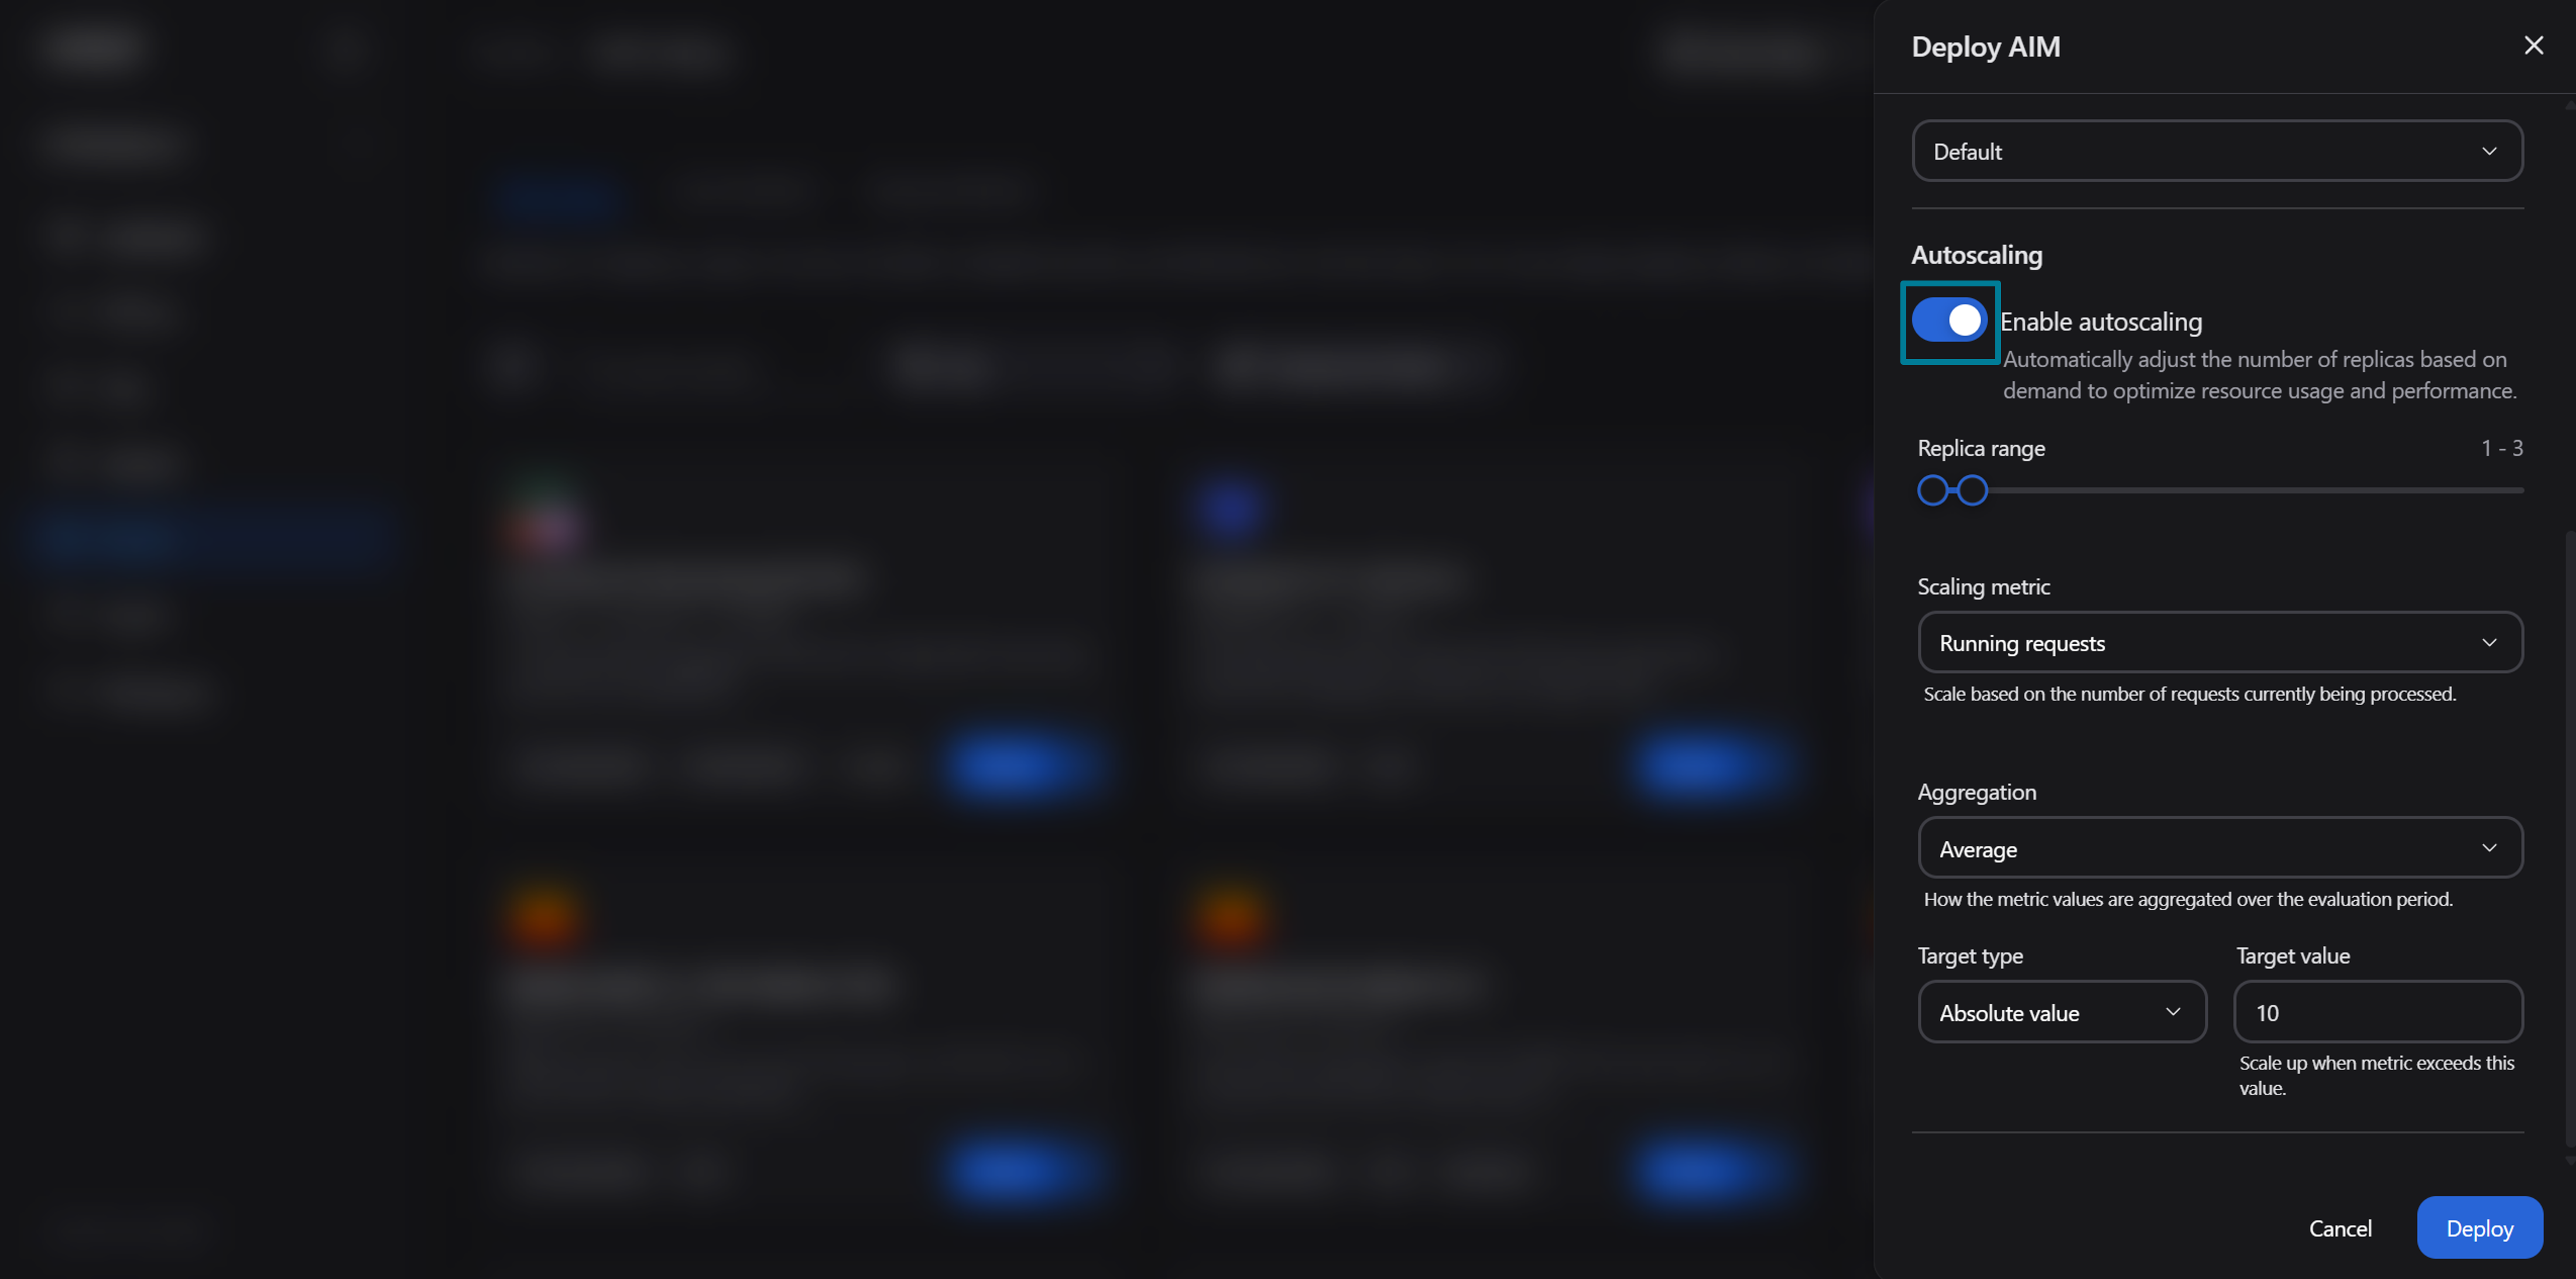
Figure 3: The deployment drawer with autoscaling enabled.
The form exposes the following settings. You can use the default values for now. Later, we will explore how you can change the settings for a deployed model
Replica range (1 – 30): A slider that sets the minimum and maximum number of replicas. Defaults to 1 min, 3 max. A higher minimum is used for capacity at all times; a higher maximum accommodates traffic bursts
Scaling metric: The vLLM metric that drives scaling decisions:
Running requests (default): The number of requests currently being processed
Waiting requests: The number of requests queued. Reacts before latency degrades, since a growing queue is an early indicator of saturation
Aggregation: How metric values across all pods are combined during each evaluation period:
Average (default): Average metric value across pods. For a more stable, gradual scaling
Maximum: Highest value observed across any pod. Reacts to peak load on any single replica
Minimum: Lowest value across pods. Triggers scaling when every pod is busy, making it the most conservative option
Target type: How the target value is interpreted for scaling decisions:
Absolute value (default): Scales when the total metric across all pods exceeds the target
Average per pod: Scales when the average metric per pod exceeds the target. This is often a choice for request-based metrics, since it normalizes across the current replica count
Target value: The numeric threshold that triggers scaling. The default is 10
Example: With the default settings (running requests, average aggregation, absolute value, target 10), the system adds replicas when the total number of running requests across all pods exceeds 10.
Click Deploy to deploy the AIM with autoscaling enabled
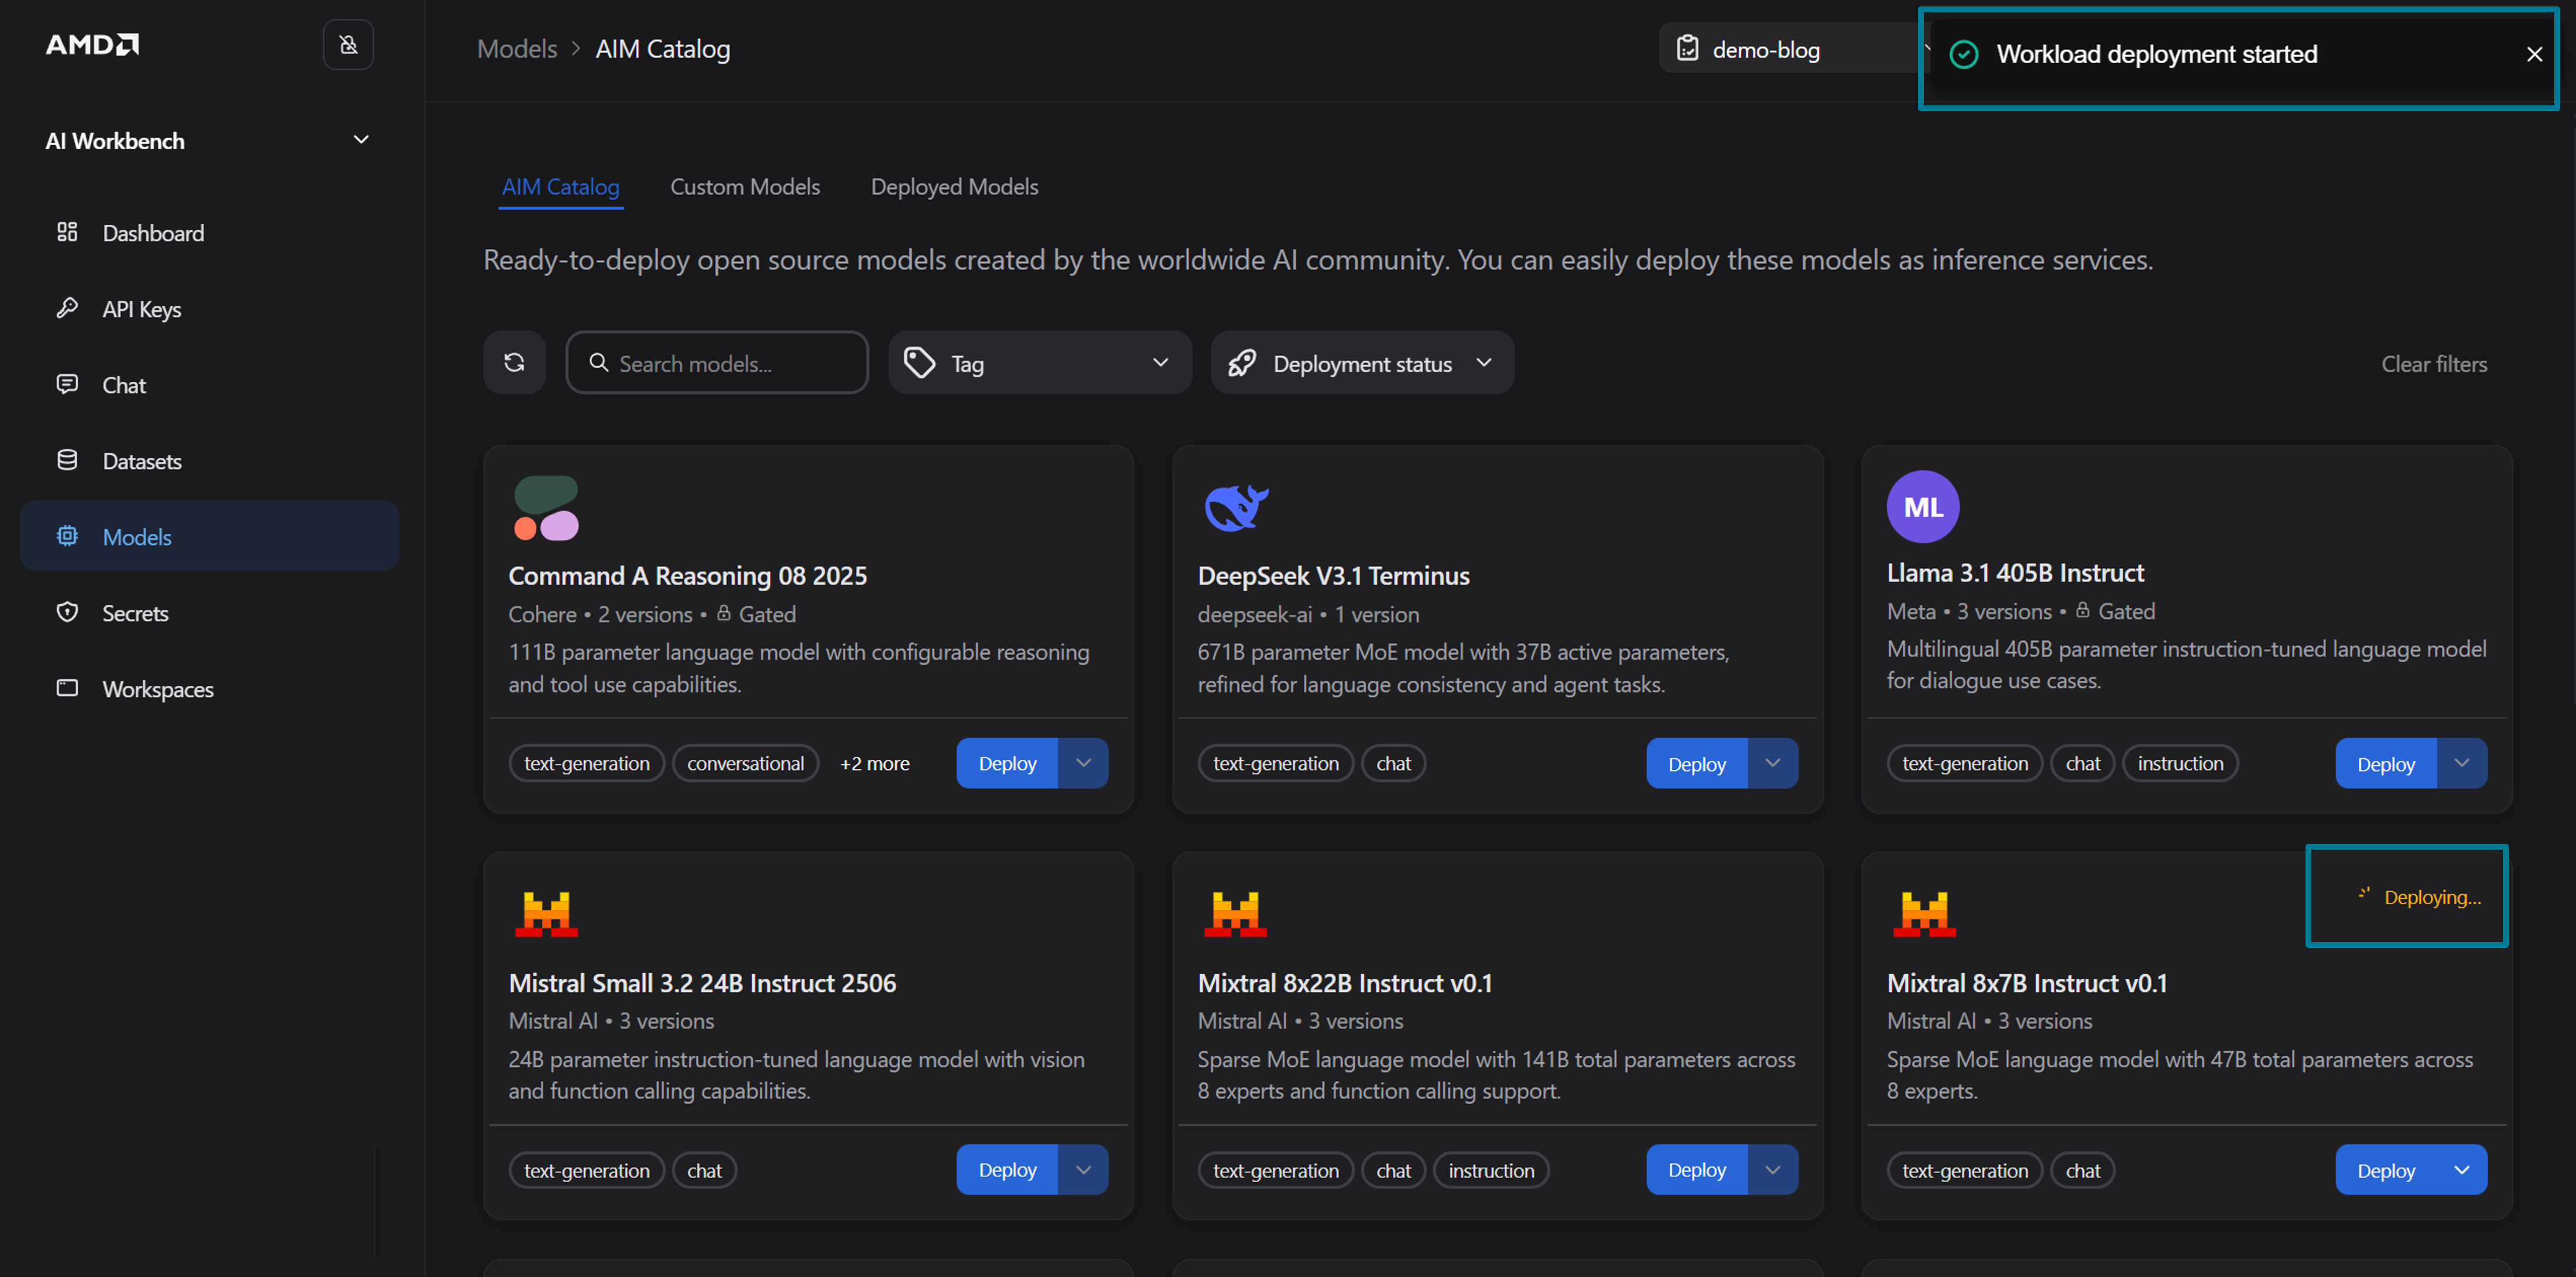
Figure 4: Deployment confirmation.
You will receive confirmation that the workload deployment has started (see Figure 4). Navigate to the Workload details page, as shown in Figure 5 below, and wait for the status to transition from Pending to Running
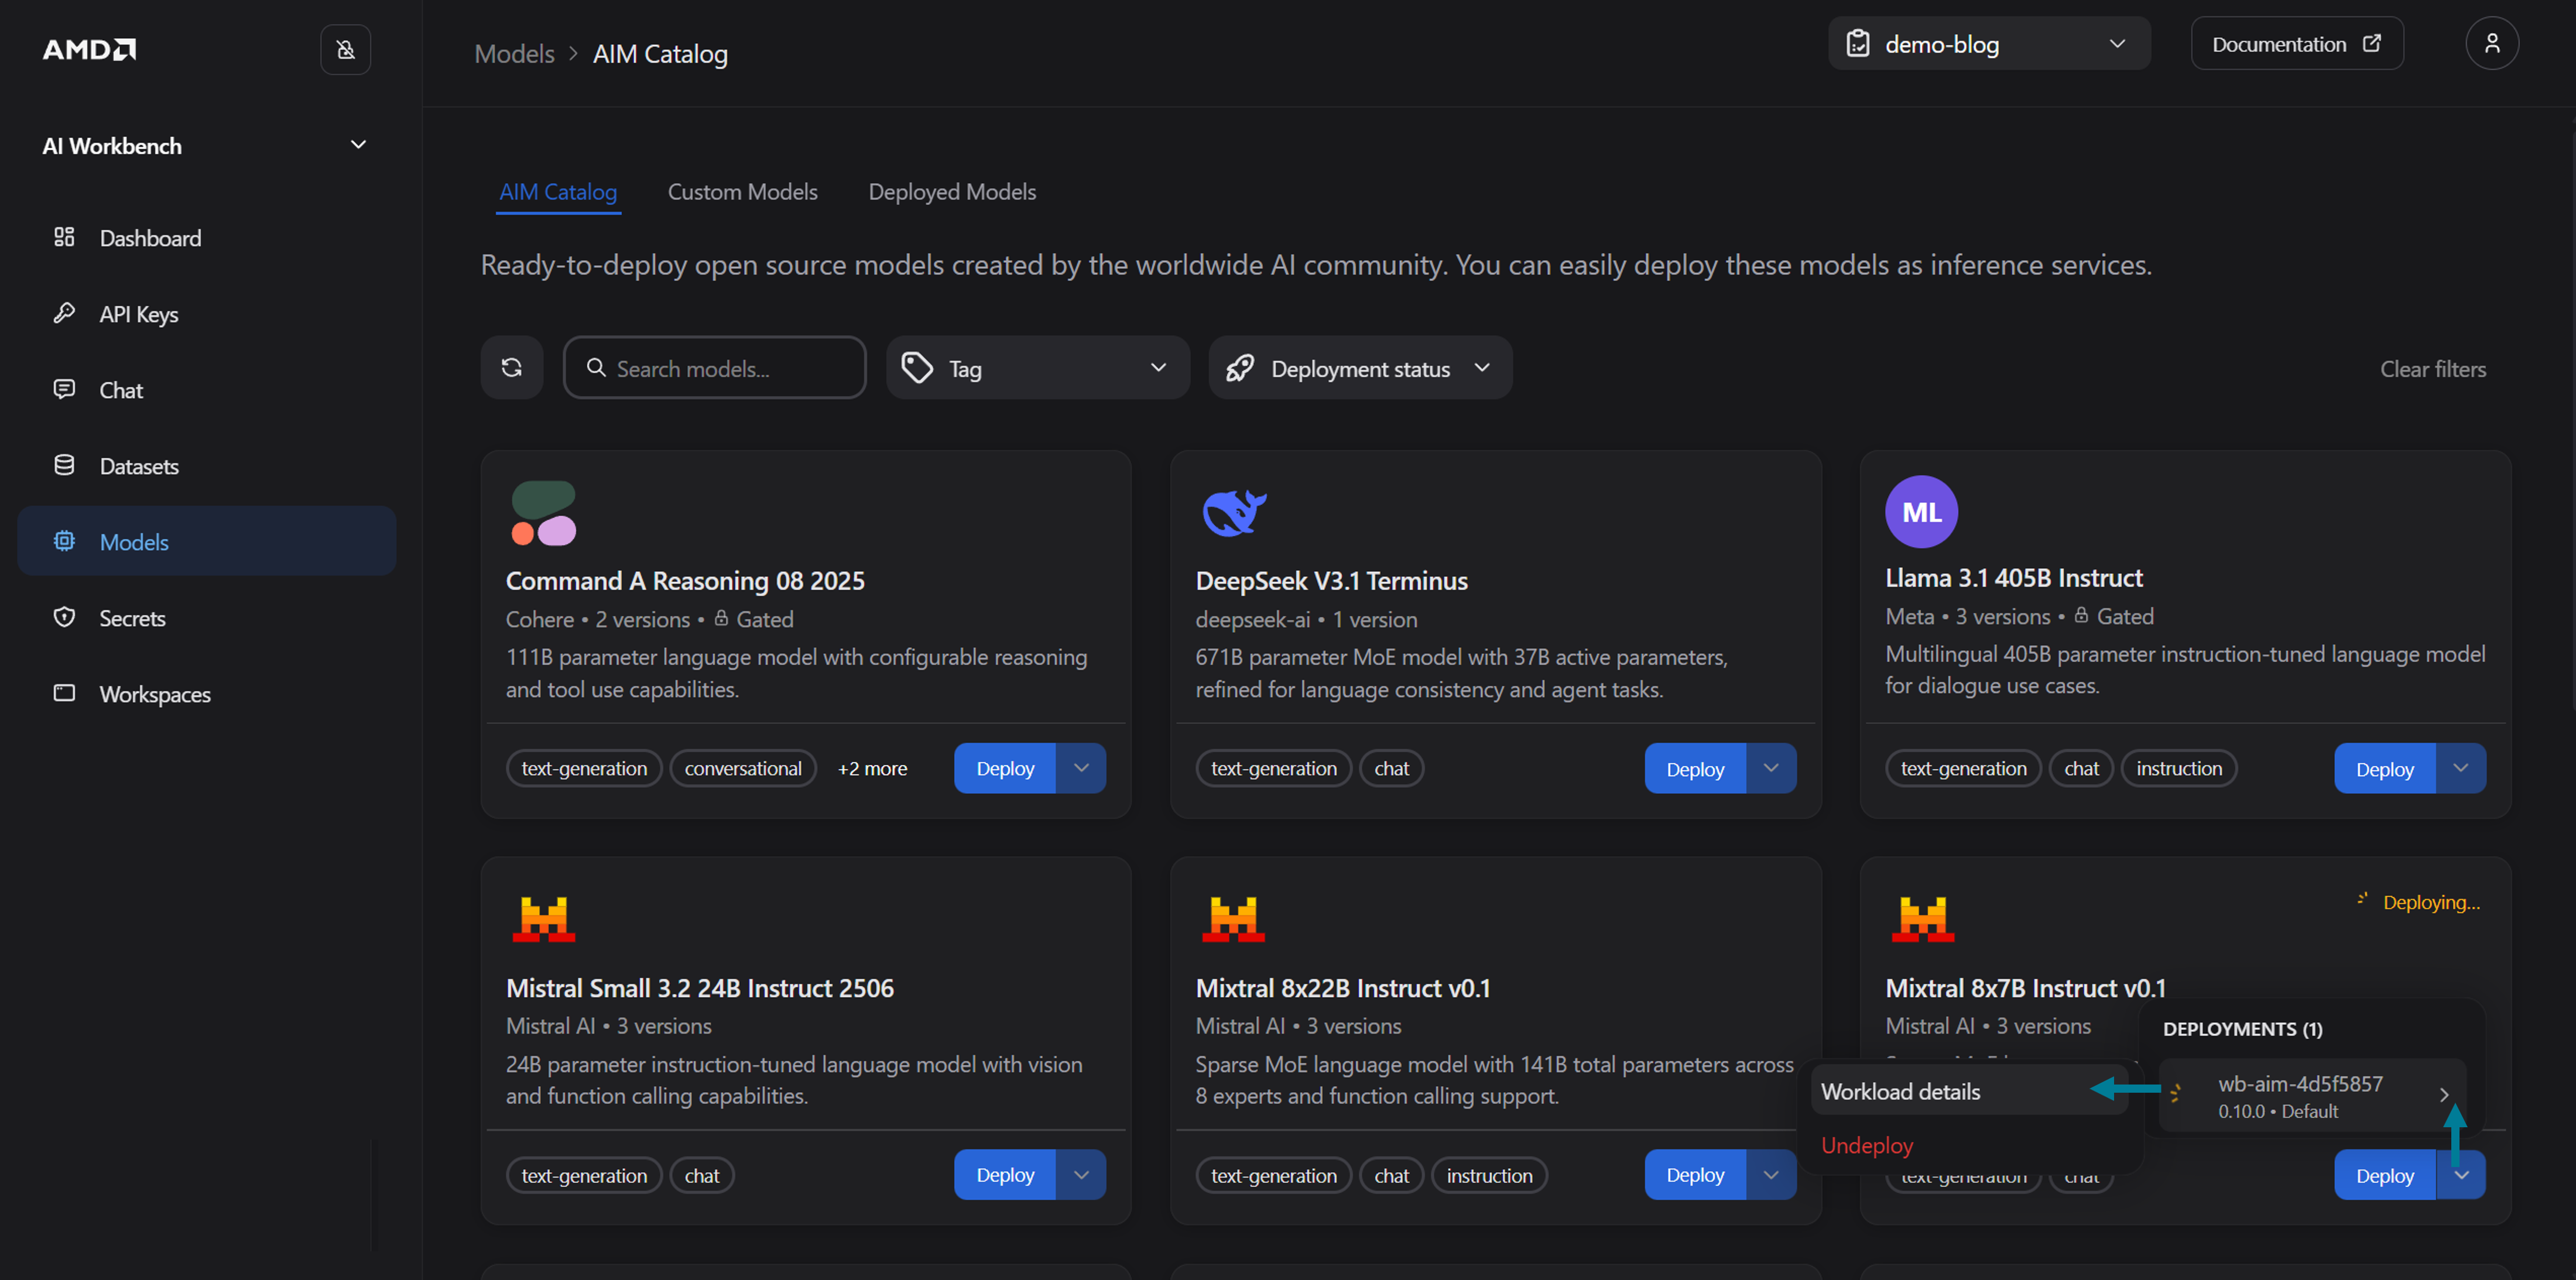
Figure 5: Navigate to the Workload details page.
Note
For example, with the default settings (running requests, average aggregation, absolute value, target 10), the system adds replicas when the total number of running requests across all pods exceeds 10.
Autoscaling in Action#
Once your AIM is deployed with autoscaling enabled, you can observe scaling behavior directly from the Workload details page. To view the autoscaling status:
Navigate to the Deployed Models tab (on the Models page) and click on your deployed AIM to open the Workload detail page
Locate the Scaling card, which displays the current number of replicas, the active metric, and the target value (see Figure 6)
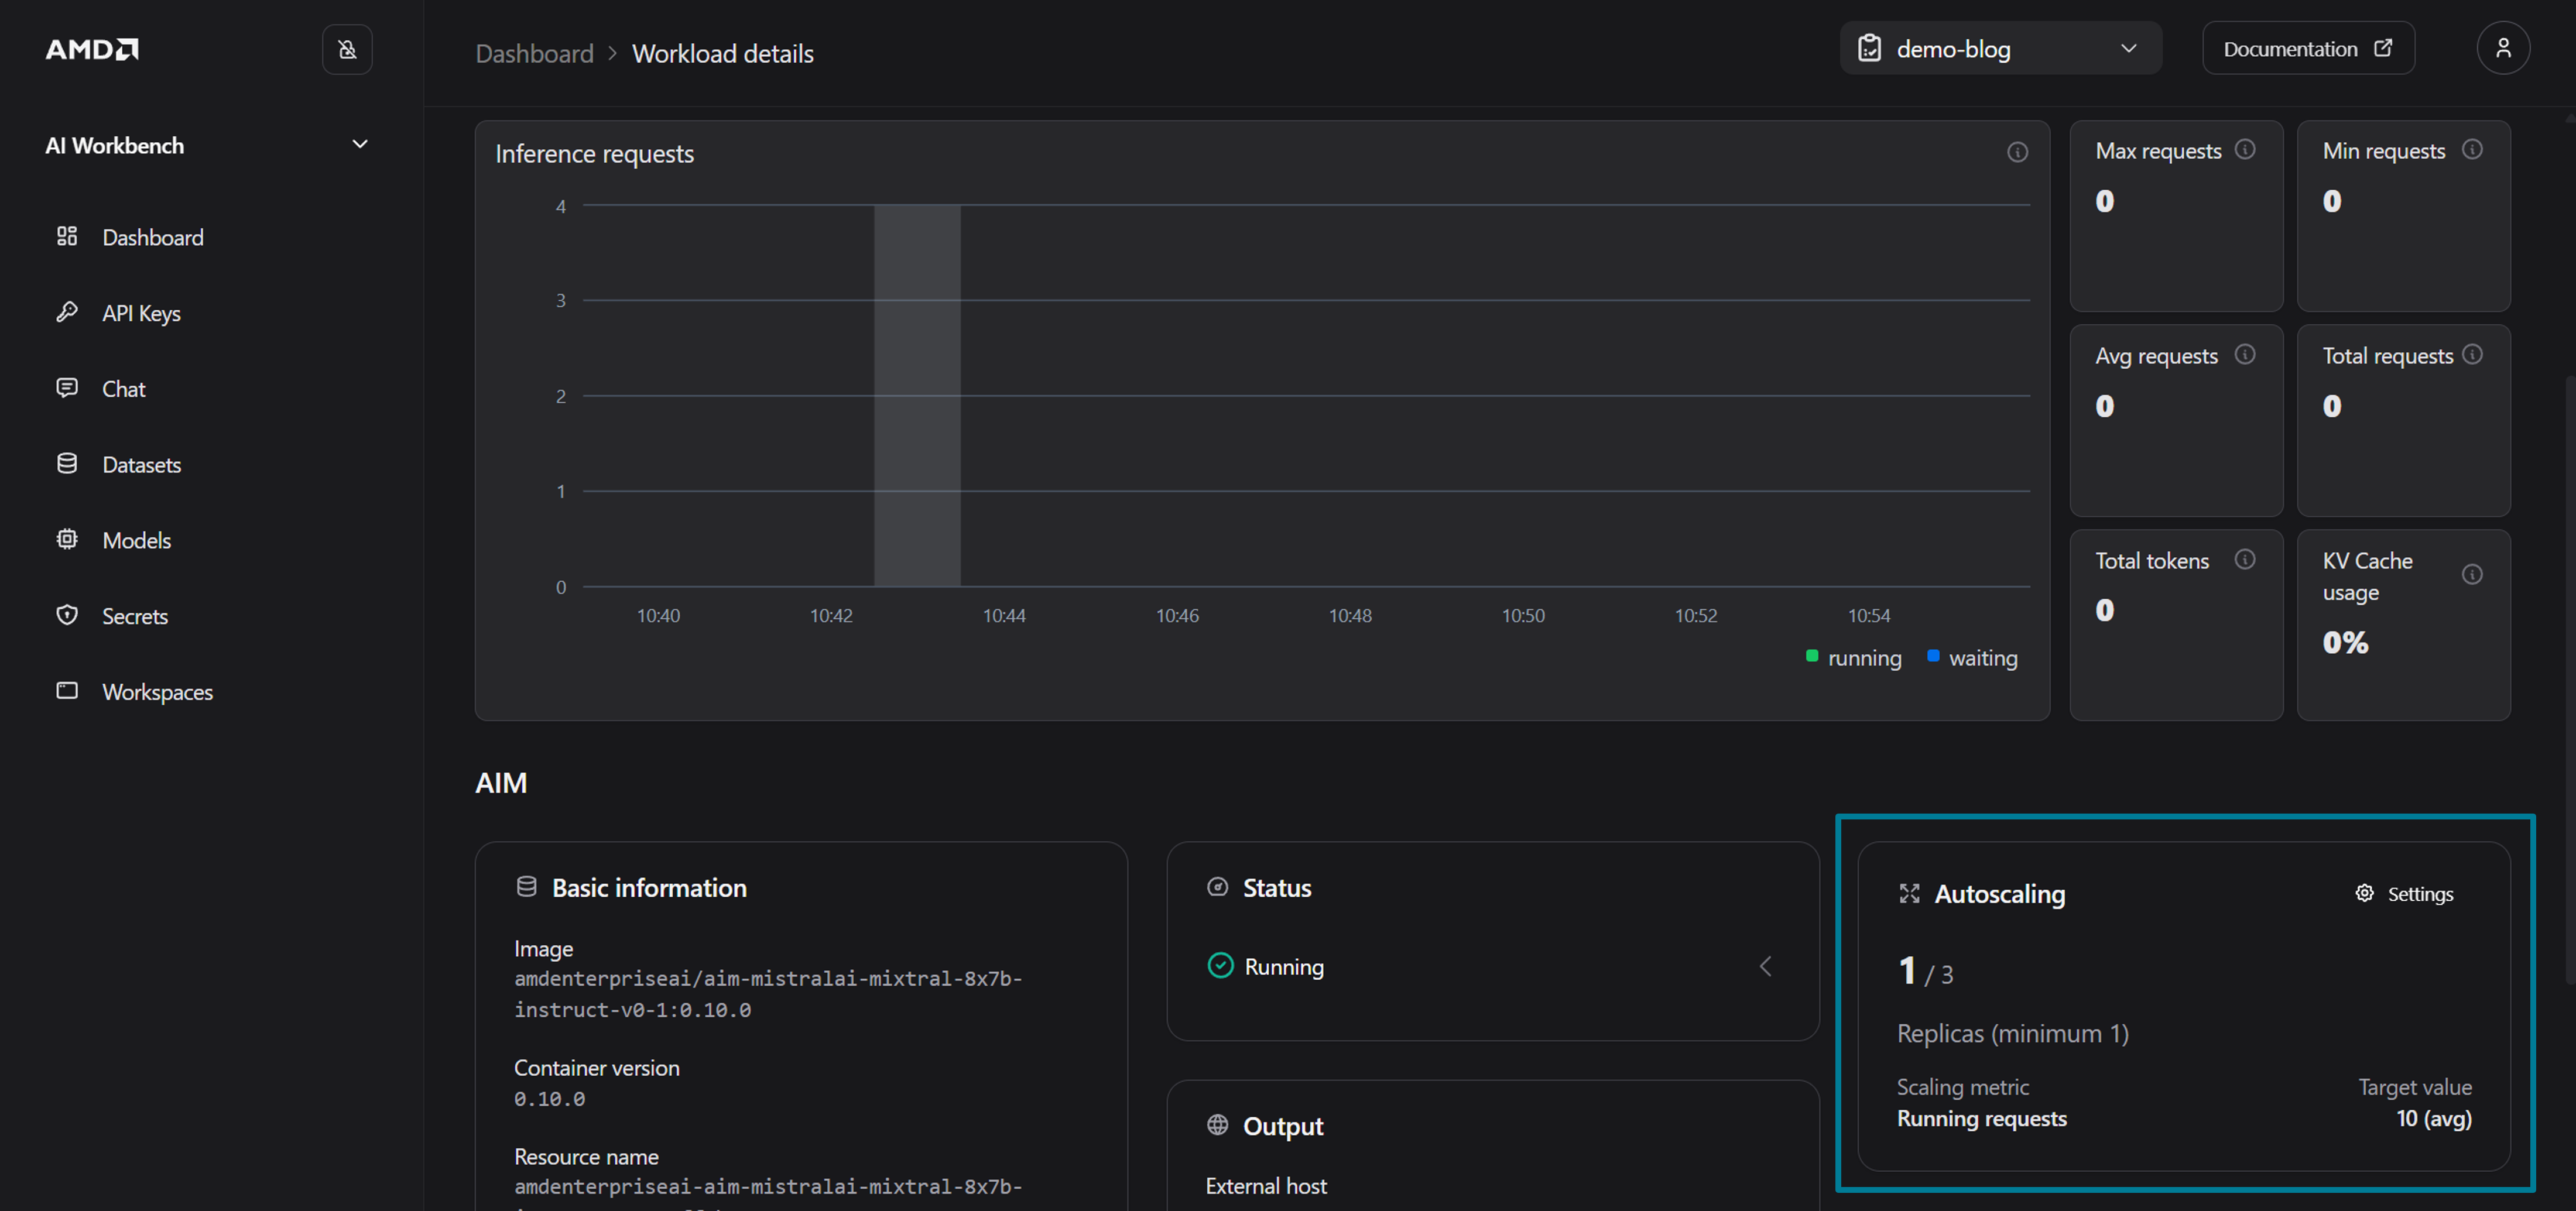
Figure 6: The Workload details page showing the Autoscaling card.
To demonstrate autoscaling, we will lower the autoscaling thresholds and generate concurrent load through the Chat interface. Click Settings on the Scaling card to open the Deployment Settings Drawer (See Figure 6)
Update the autoscaling settings to the following values:
Replica range: 1 – 3
Scaling metric: Running requests
Aggregation: Maximum
Target value: 1
Open the Chat page by clicking Chat with model at the top of the page
On the chat page, select the Compare mode and pick your deployed model from both the left and right drop-down menus. Each message in Compare mode generates two simultaneous requests against the chosen deployment, which is an easy way to simulate concurrent load and trigger the autoscaling without needing external tools (See Figure 7)
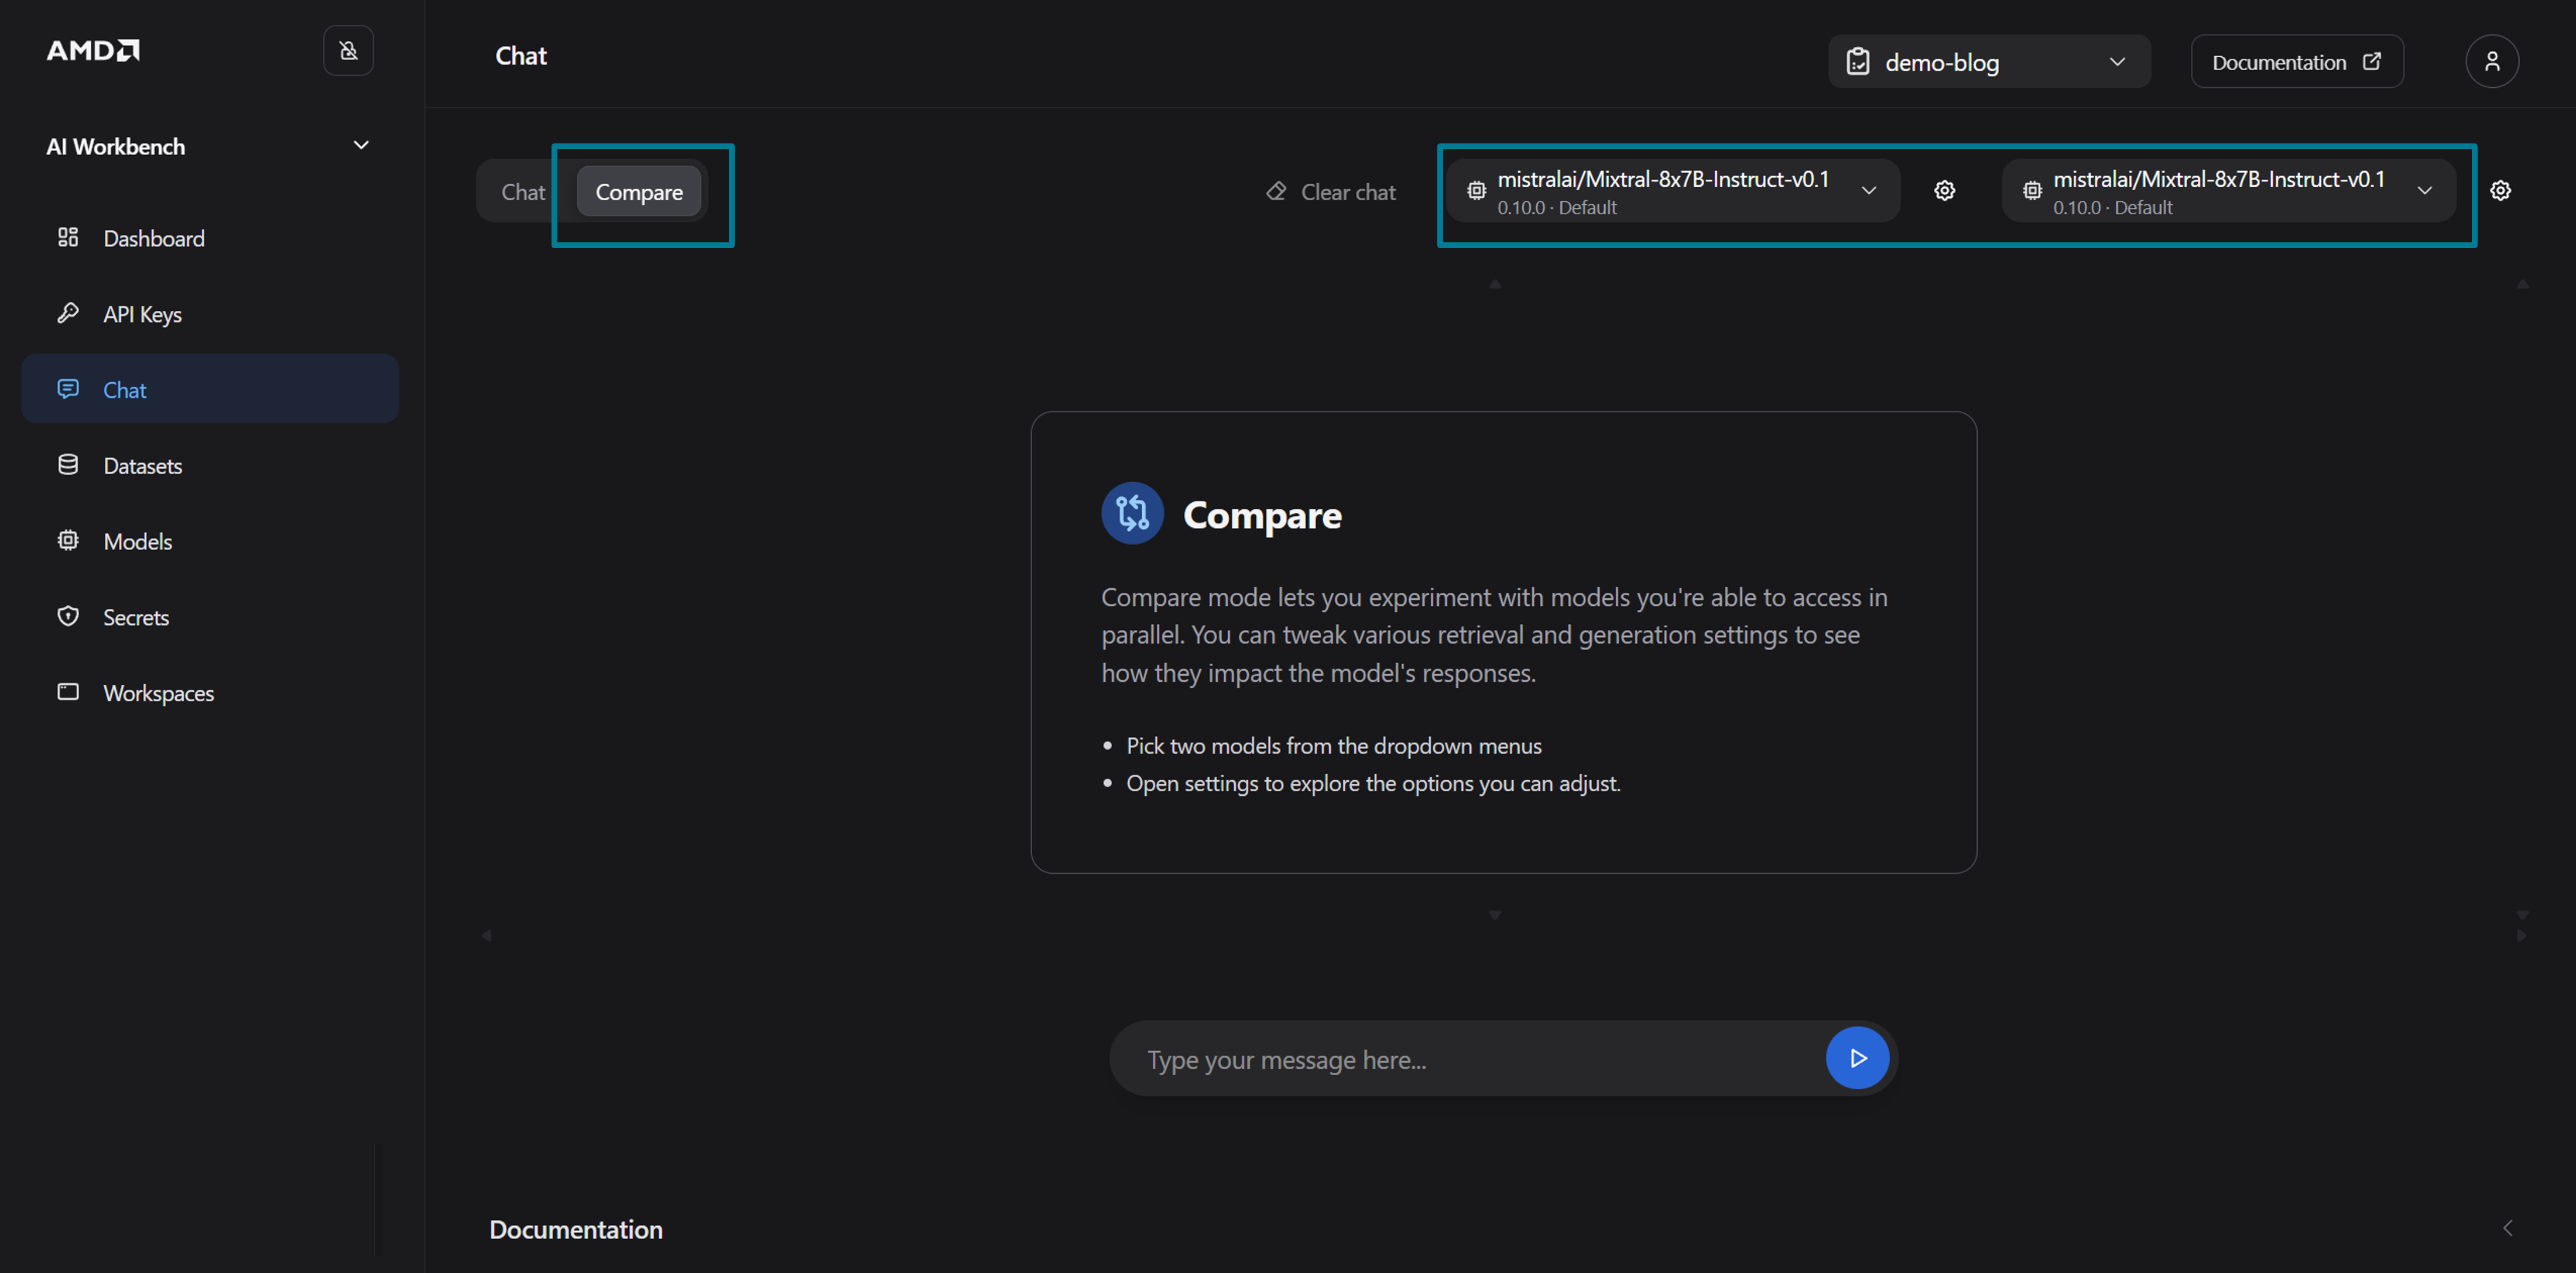
Figure 7: The chat page.
Type “Write a comprehensive history of every programming language ever created when by whom and what they are used for” and submit it
With Maximum aggregation, the autoscaling evaluates the highest request count on any single pod. Two concurrent requests exceed the target of 1, so within approximately 30 seconds the autoscaling detects the spike and begins scaling from 1 to 2 replicas (See Figure 8). You might need to refresh the page using the “Refresh” button in the top of the UI to update the Autoscaling card.
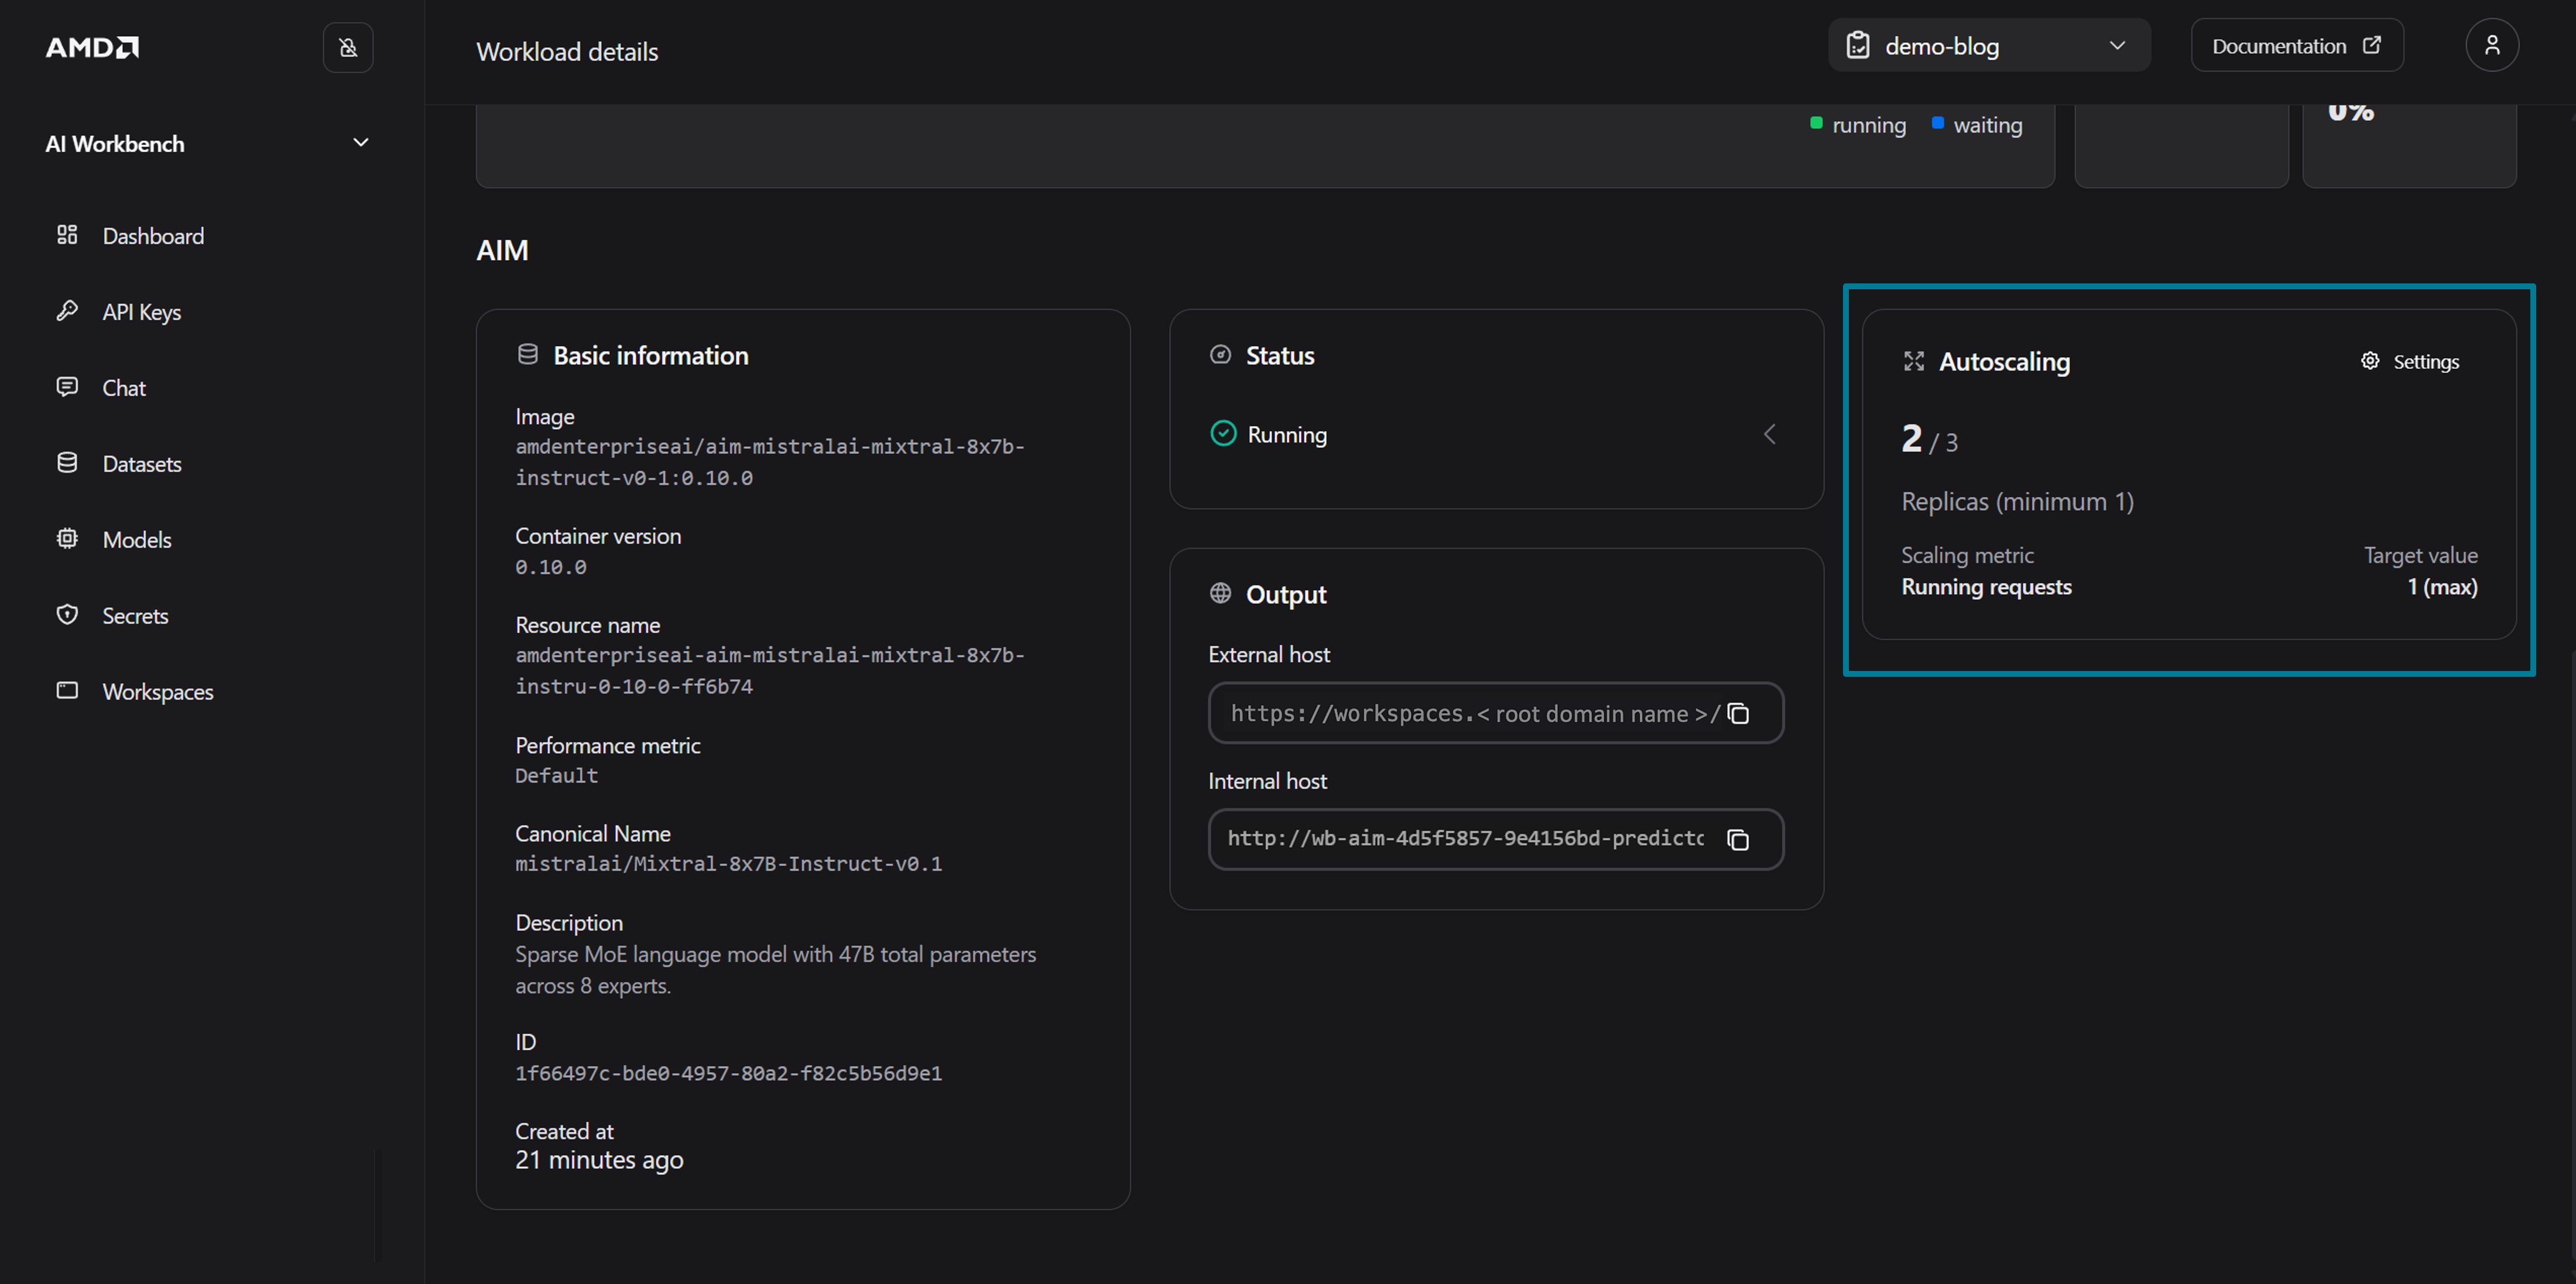
Figure 8: The autoscaling in action.
To observe the resources scale-down:
Close the chat
Wait for the running requests metric to drop below the target value
The autoscaling applies a 5-minute stabilization window for scale-downs, to prevent flapping (swift or erratic fluctuations in pod replicas or scaling), then gradually scales replicas back toward the minimum
Clean Up Environment#
To free up GPU resources when you are done, remove your deployed AIM:
Navigate to the workload details page for your deployed AIM
Click Undeploy to remove the AIMService. This terminates all replicas and releases the associated cluster resources
If you deployed multiple AIM services in your project, repeat these steps for each one.
AIM Engine#
Behind the AMD AI Workbench GUI sits the AIM Engine (AIM Engine Docs), an open-source Kubernetes operator that orchestrates the full lifecycle of AMD Inference Microservices on your cluster. Acting as a controller, it watches a set of Custom Resource Definitions (CRDs) - such as AIMService, AIMModel, and AIMServiceTemplate, and continuously ensures that the actual state of the cluster matches what you have declared. When you deploy an AIM through the Workbench interface, it is the AIM Engine that creates and manages the underlying KServe InferenceService, configures hardware-aware scheduling, handles model caching, and wires up observability and autoscaling on your behalf.
While the AMD AI Workbench GUI provides a convenient low-code deployment and autoscaling capability, deploying an AIM can also be done directly through kubectl, using the AIM Engine’s CRDs. This enables platform teams and advanced users full control over the deployment configuration, scaling policies, and runtime behavior. In the following sections, we will walk you through how to define an AIMService resource with autoscaling enabled, deploy it to the cluster, and observe KEDA-driven scaling in action, all from the command line.
Prerequisites for CLI Usage#
Project Membership: Membership to a project. We will be using the “demo-blog” project created in the AMD Resource Manager
Tools: Ensure kubectl and kubelogin are installed on your local machine
Note
The AIM Engine can be installed and operated without the AI Workbench, and in that case project membership does not apply. In this blog, we have installed both.
Obtaining the kubeconfig.yaml for Your Cluster#
In the next section, we will deploy workloads using kubectl. To access the cluster using tools such as kubectl you must obtain the kubeconfig file for the cluster. For a guide on how to obtain the kubeconfig please see Getting started with AMD Resource Manager or refer to the documentation on Accessing the Cluster for more information.
Configuring an AIM through AIM Engine for Autoscaling#
Note
Resources deployed directly through kubectl may not be fully compatible with the AMD AI Workbench and may not be displayed in the GUI.
We will be deploying an AIM with autoscaling from the command line, by creating an AIMService manifest. The manifest provided below deploys the Qwen3 32B model and configures it to automatically scale between 2 and 3 replicas based on inference demand. The autoScaling section defines which metric to monitor, in this case, the average number of running requests, and the threshold at which to trigger scaling. AIM inference services expose the full set of vLLM metrics, with vllm:num_requests_running and vllm:num_requests_waiting commonly used for scaling. The AIM Engine handles the rest: it injects the necessary KEDA, OpenTelemetry, and Prometheus configurations into the underlying InferenceService automatically.
Note
Before continuing, ensure that you can connect to your cluster and have access to a project where you can deploy workloads. In this section we are referring to a project/namespace called “demo-blog” in the kubectl commands, modify these mentions to match your project/namespace.
Let’s start configuring our AIM with autoscaling. Running the code below creates the AIMService manifest and saves it in your current directory as “aimservice-autoscaling.yaml”.
# Create the AIMService manifest
cat <<'EOF' > aimservice-autoscaling.yaml
apiVersion: aim.eai.amd.com/v1alpha1
kind: AIMService
metadata:
  name: qwen3-32b-autoscale
spec:
  model:
    image: amdenterpriseai/aim-qwen-qwen3-32b:0.10.0
  minReplicas: 2
  maxReplicas: 3
  autoScaling:
    metrics:
      - type: PodMetric
        podmetric:
          metric:
            backend: "opentelemetry"
            metricNames:
              - vllm:num_requests_running
              - vllm:num_requests_waiting
            query: "vllm:num_requests_running"
            operationOverTime: "avg"
          target:
            type: Value
            value: "1"
EOF
Let’s apply the manifest to our namespace in the cluster:
kubectl apply -f aimservice-autoscaling.yaml -n demo-blog
Once applied, the AIM Engine will create the model’s service template, download and cache the model weights, and deploy the inference service with autoscaling enabled. You can monitor the status of the deployment by running:
kubectl get aimservice qwen3-32b-autoscale -n demo-blog
To see the deployed AIM in AMD AI Workbench, navigate to the Deployed Models tab (on the Models page) and click on your deployed AIM to open the workload detail page, as shown in Figure 9 below.
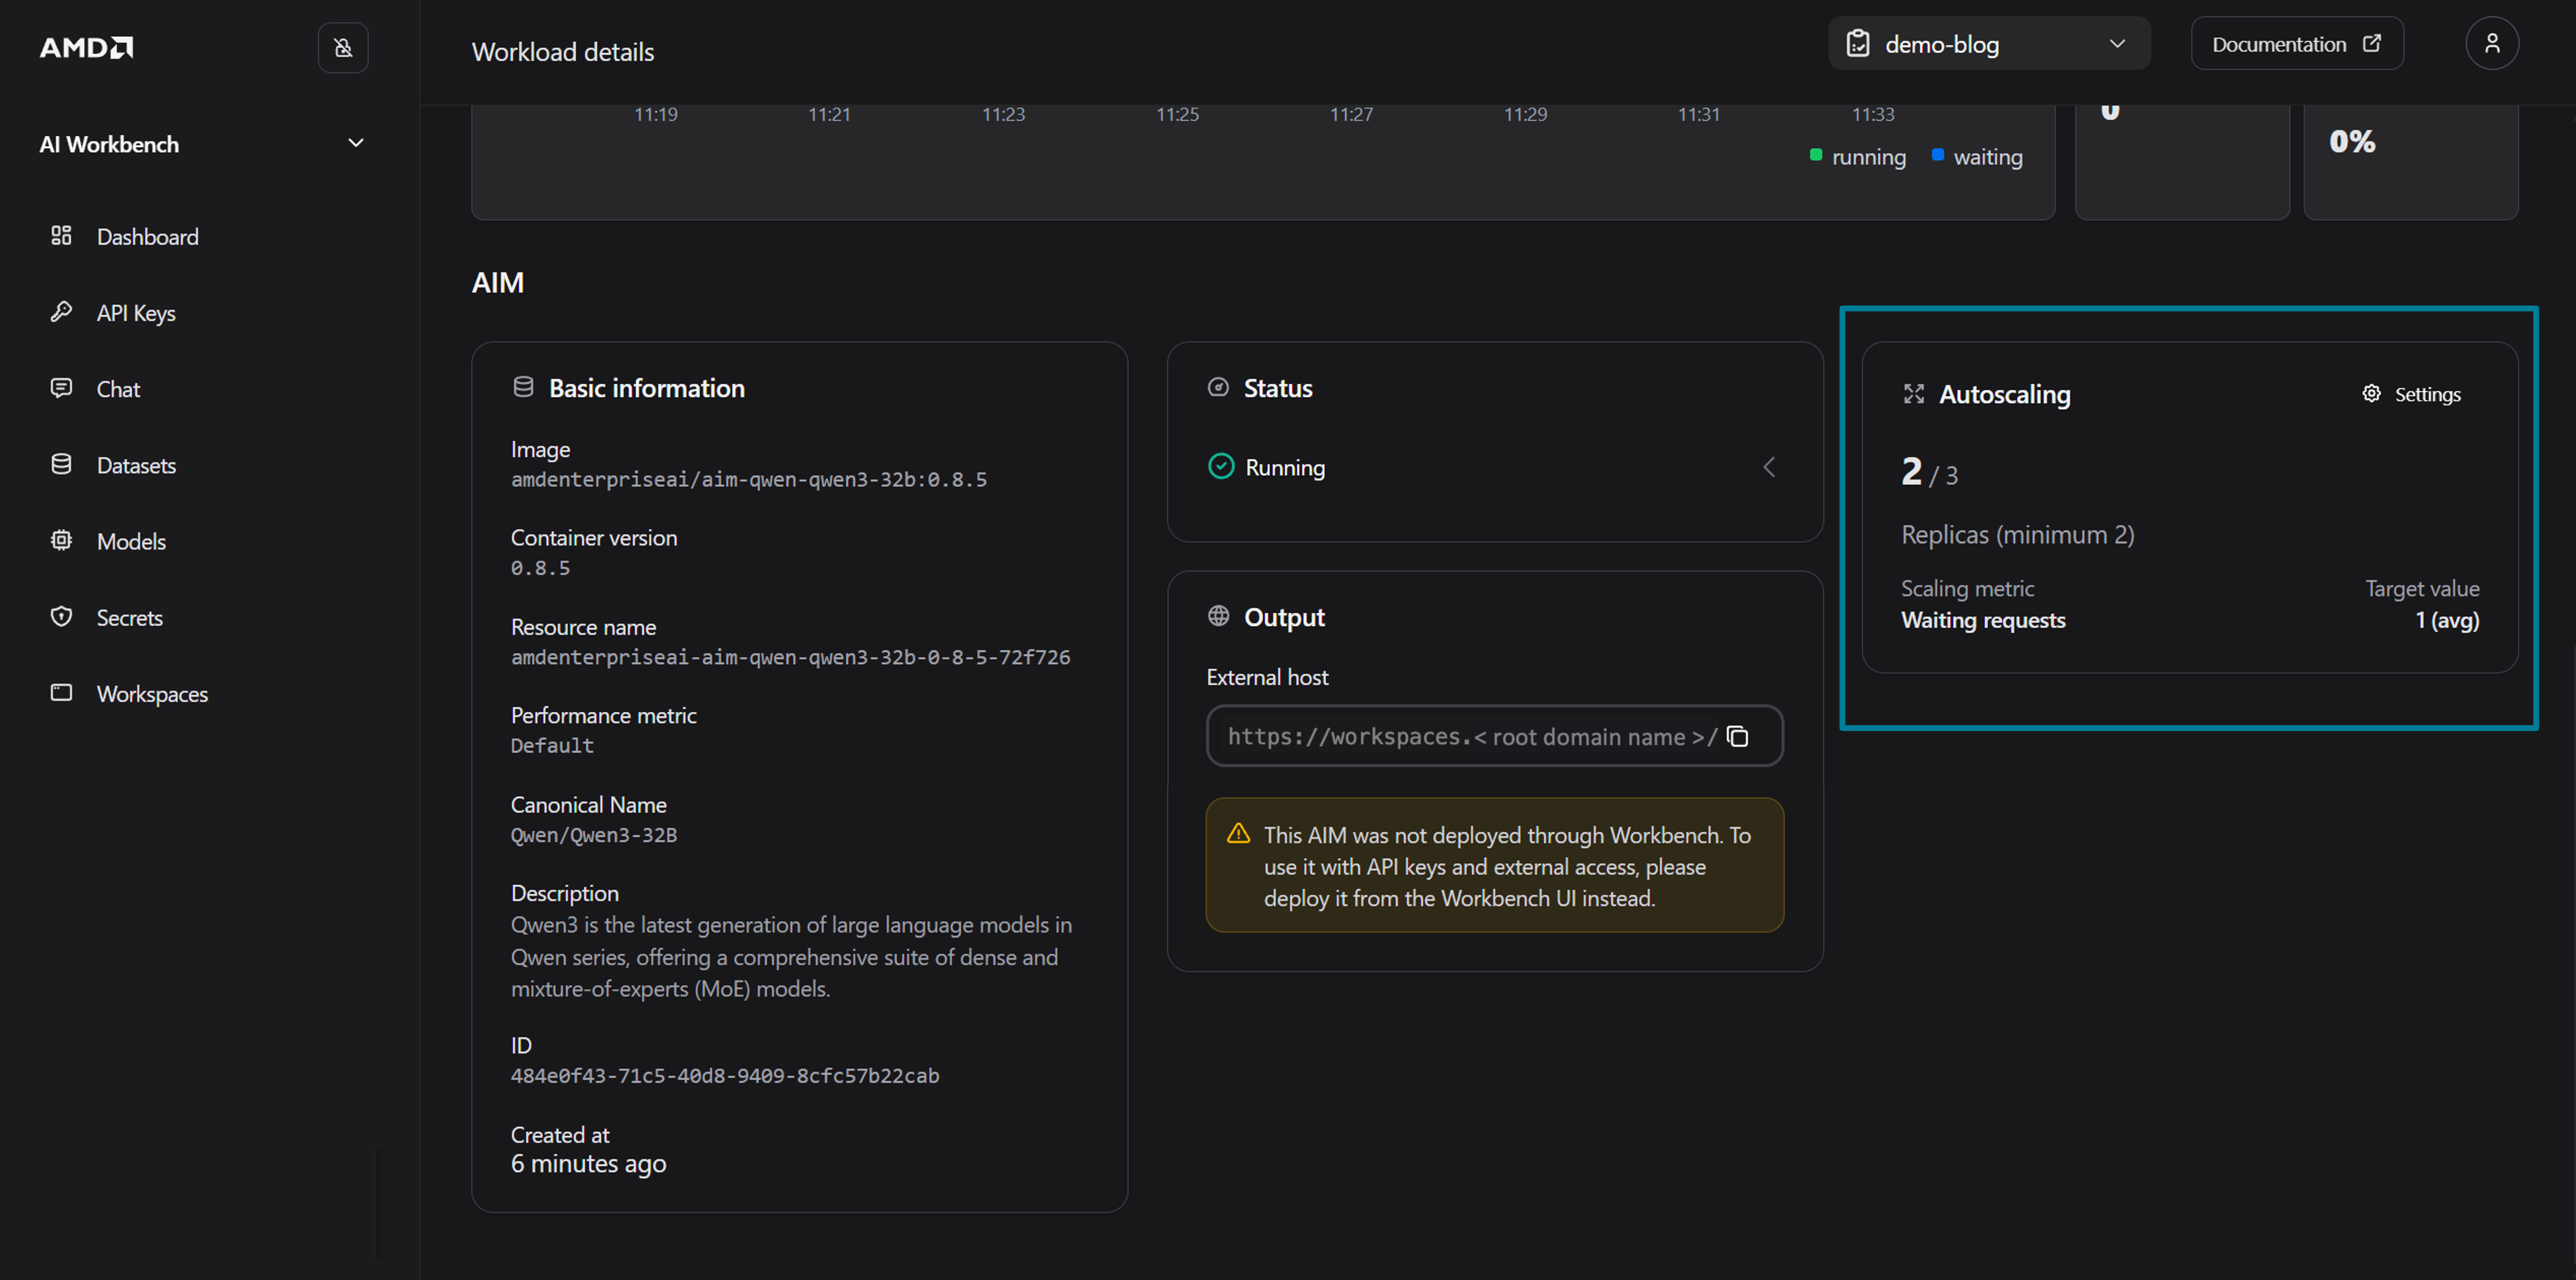
Figure 9: The details of the deployed Qwen3 32B model.
How Autoscaling Works Under the Hood#
When the AIMService is deployed with autoscaling enabled, the AIM Engine sets up a metrics pipeline behind the scenes. It annotates the inference pods with sidecar.opentelemetry.io/inject, which triggers the OpenTelemetry operator to inject a sidecar collector (otc-container) into each pod. This sidecar scrapes vLLM metrics from the inference container and exports them to the Kedify OpenTelemetry add-on scaler (otel-add-on-scaler).
KEDA then reads these metrics through a ScaledObject that it creates for the deployment. The ScaledObject defines the scaling target (which Deployment to scale), the replica bounds, and whether metrics are being received (READY) and whether there is active load (ACTIVE):
kubectl get scaledobject -n demo-blog
NAME                                     SCALETARGETKIND      SCALETARGETNAME                          MIN   MAX   READY   ACTIVE
qwen3-32b-autoscale-1080a608-predictor   apps/v1.Deployment   qwen3-32b-autoscale-1080a608-predictor   2     3     True    True
The ScaledObject feeds into a standard Kubernetes Horizontal Pod Autoscaler (HPA), which makes the actual scaling decisions. The TARGETS column shows the current metric value versus the target, here 500m/1 means the current average is 0.5 against a target of 1 (m is the Kubernetes “milli” suffix, 500m = 0.5), so no scale up is needed yet:
kubectl get hpa -n demo-blog
NAME                                              REFERENCE                                           TARGETS        MINPODS   MAXPODS   REPLICAS
keda-hpa-qwen3-32b-autoscale-1080a608-predictor   Deployment/qwen3-32b-autoscale-1080a608-predictor   500m/1 (avg)   2         3         2
Scaling in Action#
With the service running at minReplicas: 2, both replicas are serving requests at baseline:
kubectl get pods -l serving.kserve.io/inferenceservice -n demo-blog
NAME                                                      READY   STATUS    RESTARTS   AGE
qwen3-32b-autoscale-1080a608-predictor-7d89bdc496-bfzzw   2/2     Running   0          4m
qwen3-32b-autoscale-1080a608-predictor-7d89bdc496-q6n2z   2/2     Running   0          4m
As users begin sending inference requests to the service, the vllm:num_requests_running metric rises. Once the average value exceeds the target of 1 as we defined in the AIMService manifest, KEDA signals the HPA to scale up, and a third replica is created automatically. When the traffic subsides and the metric drops back below the threshold, the HPA scales the deployment back down to the configured minimum of 2 replicas.
After sending a sustained batch of inference requests to the service, the HPA now shows 3334m/1, the average vllm:num_requests_waiting value of 3.334 far exceeds the target of 1, so it has scaled the deployment to the maximum of 3 replicas:
kubectl get hpa -n demo-blog
NAME                                              REFERENCE                                           TARGETS         MINPODS   MAXPODS   REPLICAS
keda-hpa-qwen3-32b-autoscale-1080a608-predictor   Deployment/qwen3-32b-autoscale-1080a608-predictor   3334m/1 (avg)   2         3         3
A third pod has been created to handle the increased demand, notice the younger AGE of the newly scaled pod compared to the original two:
kubectl get pods -l serving.kserve.io/inferenceservice -n demo-blog
NAME                                                      READY   STATUS    RESTARTS   AGE
qwen3-32b-autoscale-1080a608-predictor-7d89bdc496-568d6   2/2     Running   0          10m
qwen3-32b-autoscale-1080a608-predictor-7d89bdc496-k42s9   2/2     Running   0          10m
qwen3-32b-autoscale-1080a608-predictor-7d89bdc496-wnqvs   2/2     Running   0          2m52s
The AIMService status also reflects the scale up, showing 3/3 (2-3) — 3 current replicas out of 3 desired, within the configured 2–3 range:
kubectl get aimservice -n demo-blog
NAME                  STATUS    MODEL                               TEMPLATE                                                         REPLICAS    AGE
qwen3-32b-autoscale   Running   aim-qwen-qwen3-32b-0-10-0-c7fdcd12   amdenterpriseai-aim-qwen-qwen3-32b-0-10-1x-mi300x-lat-fp16-a3b2   3/3 (2-3)   11m
Once the traffic subsides and the metric drops back below the threshold, the HPA scales the deployment back down to the configured minimum of 2 replicas.
Clean up Environment#
To remove the inference service and all resources created by the AIM Engine, simply delete the AIMService:
kubectl delete aimservice qwen3-32b-autoscale -n demo-blog
This will clean up the underlying InferenceService, ScaledObject, HPA, and any associated caches.
Summary#
In this blog, we covered the basics of autoscaling and how to apply it to your workloads in both AMD AI Workbench and through the AIM Engine using CLI. The autoscaling was illustrated by deploying an AIM and scaling it up to multiple replicas by increasing the number of running requests above the selected scaling metric. When traffic was decreased the AIM replicas scaled down again to not use more compute resources than necessary.
Disclaimers#
Third-party content is licensed to you directly by the third party that owns the content and is not licensed to you by AMD. ALL LINKED THIRD-PARTY CONTENT IS PROVIDED “AS IS” WITHOUT A WARRANTY OF ANY KIND. USE OF SUCH THIRD-PARTY CONTENT IS DONE AT YOUR SOLE DISCRETION AND UNDER NO CIRCUMSTANCES WILL AMD BE LIABLE TO YOU FOR ANY THIRD-PARTY CONTENT. YOU ASSUME ALL RISK AND ARE SOLELY RESPONSIBLE FOR ANY DAMAGES THAT MAY ARISE FROM YOUR USE OF THIRD-PARTY CONTENT.
Updated on 08 May 2026
Updated the blog to clarify usage of AMD enterprise AI reference stack components.