Getting Started with AMD Resource Manager: Efficient Sharing of AMD Instinct™ GPUs for R&D Teams and AI Practitioners#

In this blog, you will learn how to use AMD Resource Manager and its components for centralized AI infrastructure governance. It’s part of the AMD Enterprise AI Suite, a full-stack solution for developing, deploying and running AI workloads on a Kubernetes platform designed to support AMD compute. The AMD Resource Manager provides a user-friendly graphical user interface (GUI) and Command Line Interface (CLI) with a unified control plane that simplifies tasks such as managing compute clusters, user access, monitoring resource utilization, and allocating the right compute quotas to the right projects.
This blog covers:
AMD Resource Manager:
An introduction to its main components
How to set up a project with GPU/compute quotas where you can deploy workloads
How to retrieve the
kubeconfig.yamlfile for your cluster
Monitor workloads and resource utilization:
How to launch workloads using
kubectland monitor them in AMD Resource Manager
GPU resource sharing and pre-emption functionality:
An introduction to pre-emption and its benefits for GPU sharing
A practical example demonstrating pre-emption in action
Prerequisites#
This blog utilizes the AMD Enterprise AI Suite. Before proceeding, please ensure the following prerequisites are met:
Access to AMD Enterprise AI Suite: You must have access to an installed instance of the AMD Enterprise AI Suite. Refer to the Supported Environments documentation for installation details
An overview of the AMD Enterprise AI Suite and AMD AI Workbench is recommended
Technical Proficiency: A working knowledge of command-line or terminal usage and tools such as kubectl and k9s (or similar tools for monitoring the cluster state) is recommended for the latter part of the blog
AMD Resource Manager#
Begin by logging into the AMD Enterprise AI Suite as a Platform Admin user and navigating to the AMD Resource Manager (Figure 1). Before configuring your first project, review the Resource Manager components and their capabilities below:
Dashboard: Provides a high-level overview of your clusters, resource allocations, and basic utilization statistics
Clusters: Use to monitor the status and health of your clusters while providing an overview of the resource utilization
Projects: Create and manage projects, which organize and isolate work within your system. Project settings include user membership, secrets, storage, and quotas
Secrets: Manage external secrets for the cluster
Storage: Manage S3 buckets for the cluster
Users: Manage users, their roles, and their project membership
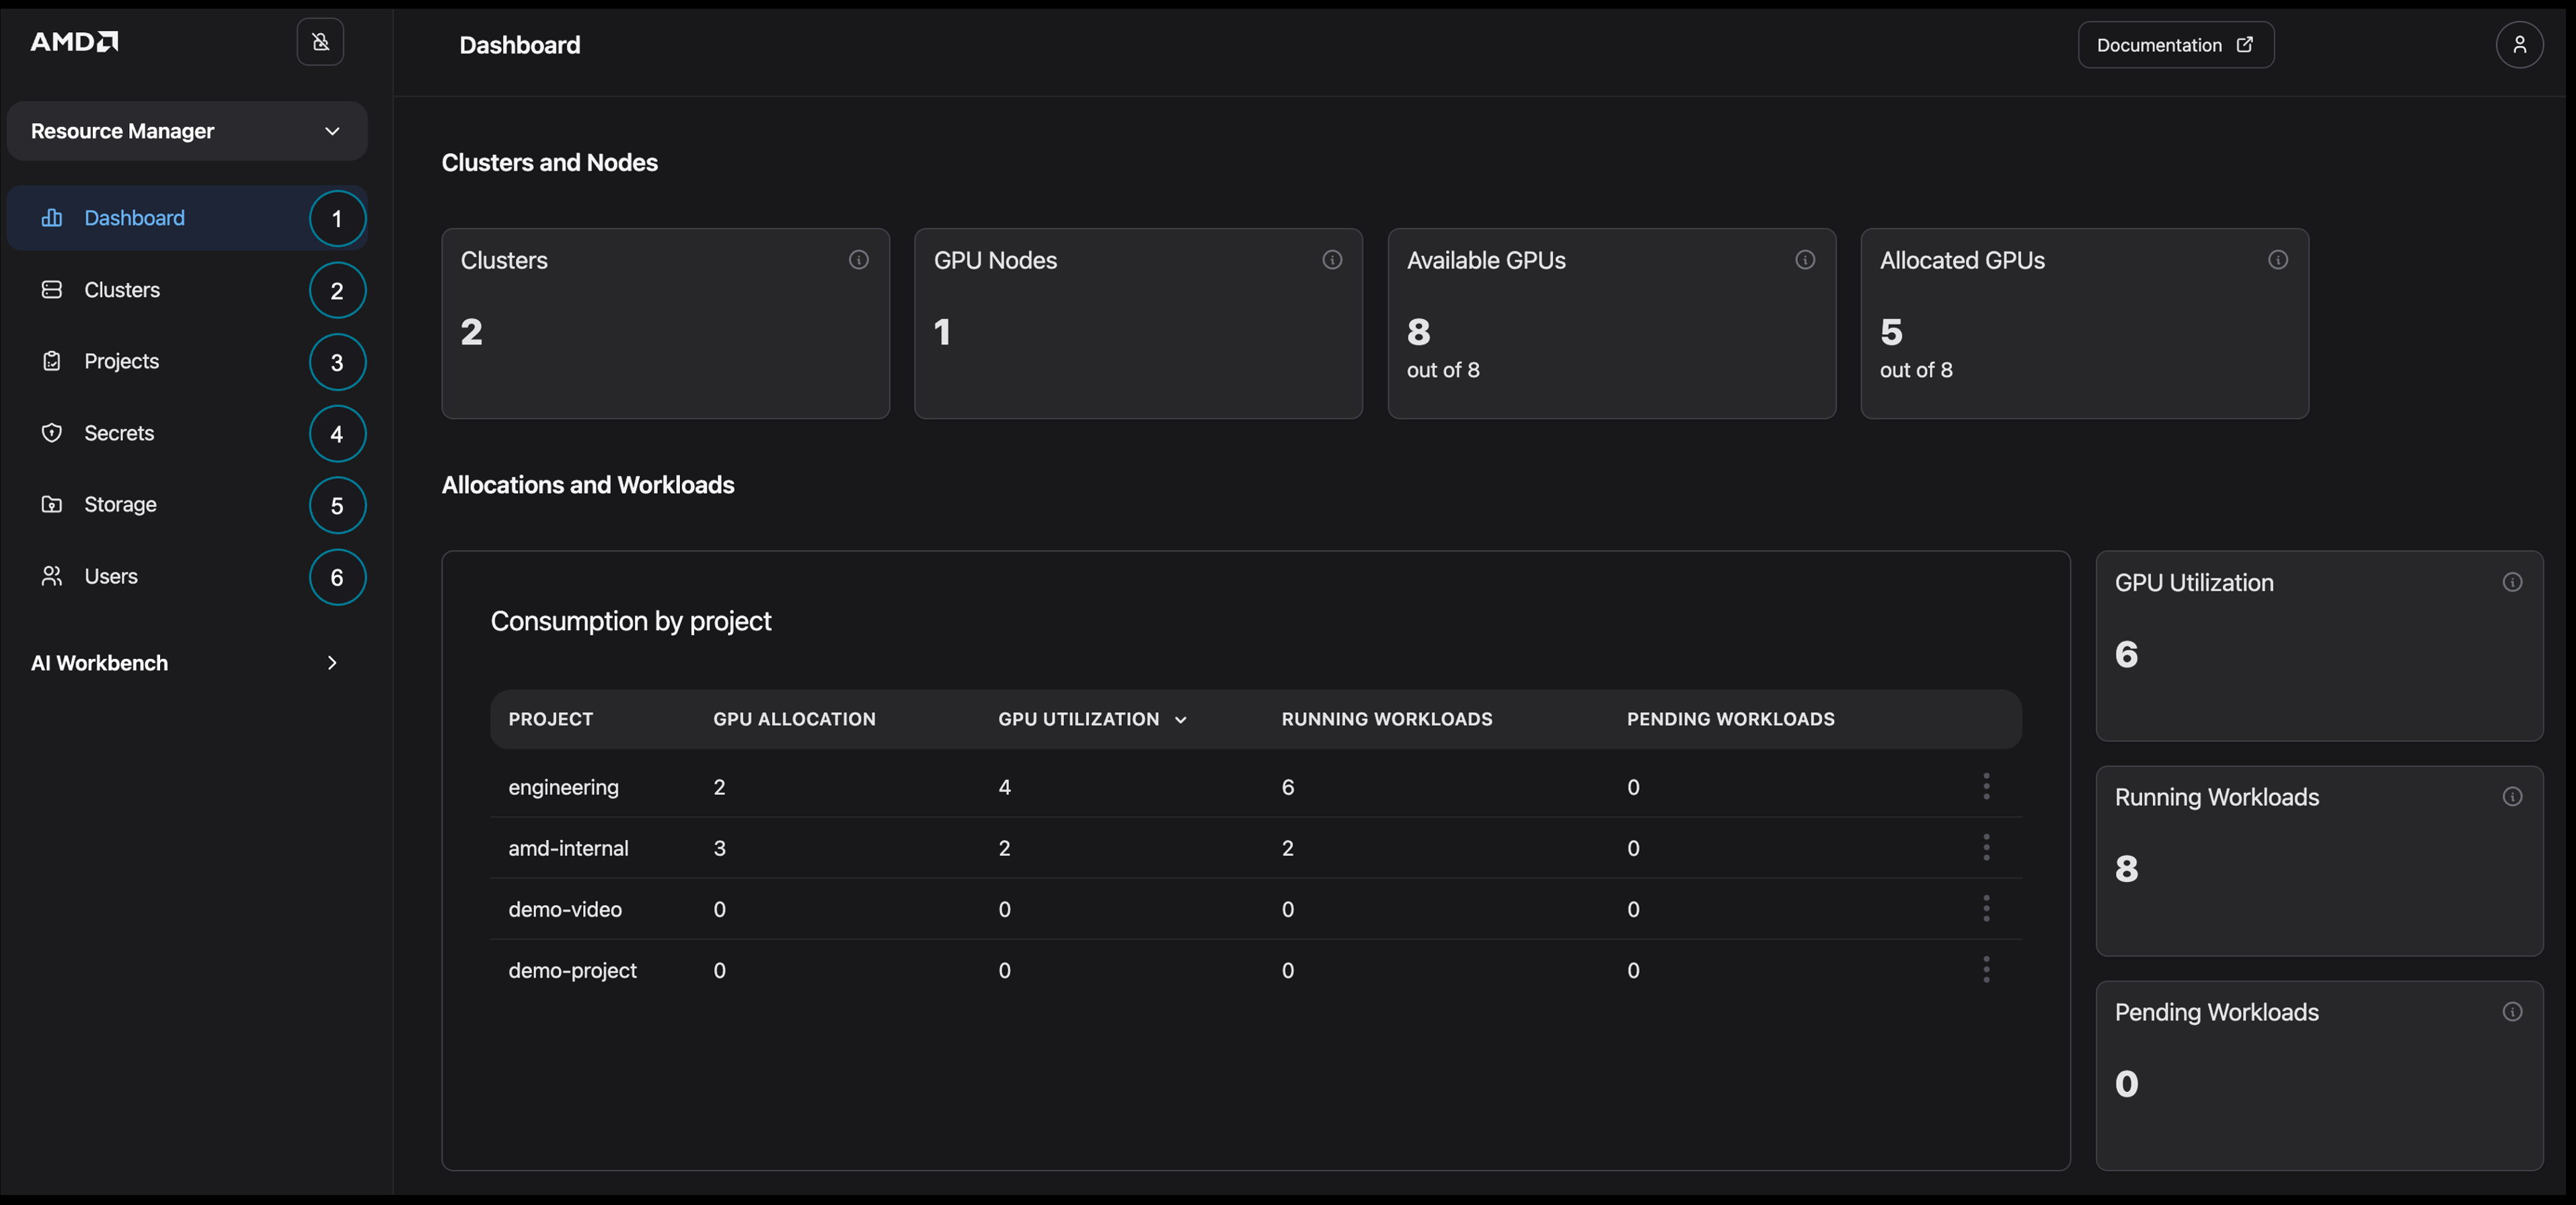
Figure 1: Overview of AMD Resource Manager.
Creating a Project with a Quota#
We’ll begin by setting up and managing a project within AMD Resource Manager. Projects enable you to organize your work on the platform, and each one is kept separate - resources, workloads, and secrets from one project can’t be accessed by another. This separation maintains security and keeps each project clearly defined. You can also assign quotas to each project, ensuring users have the necessary resources to run their workloads successfully in shared clusters. A quota defines the ensured amount of resources, such as GPUs, CPUs, and memory, that can be used by workloads within the project. Note that a project can consume additional resources if there are unused resources available.
In this section, we will walk through the process of setting up a new project, configuring basic storage, and adding users.
Setting up the Project#
First, create a new project with the minimum configuration required to begin deploying workloads.
To create your project:
Navigate to the Projects page
Click on the Create project button
Enter the project name (“demo-blog-project”), a description, and then select your cluster (see Figure 2 for final details)
Click on Create project
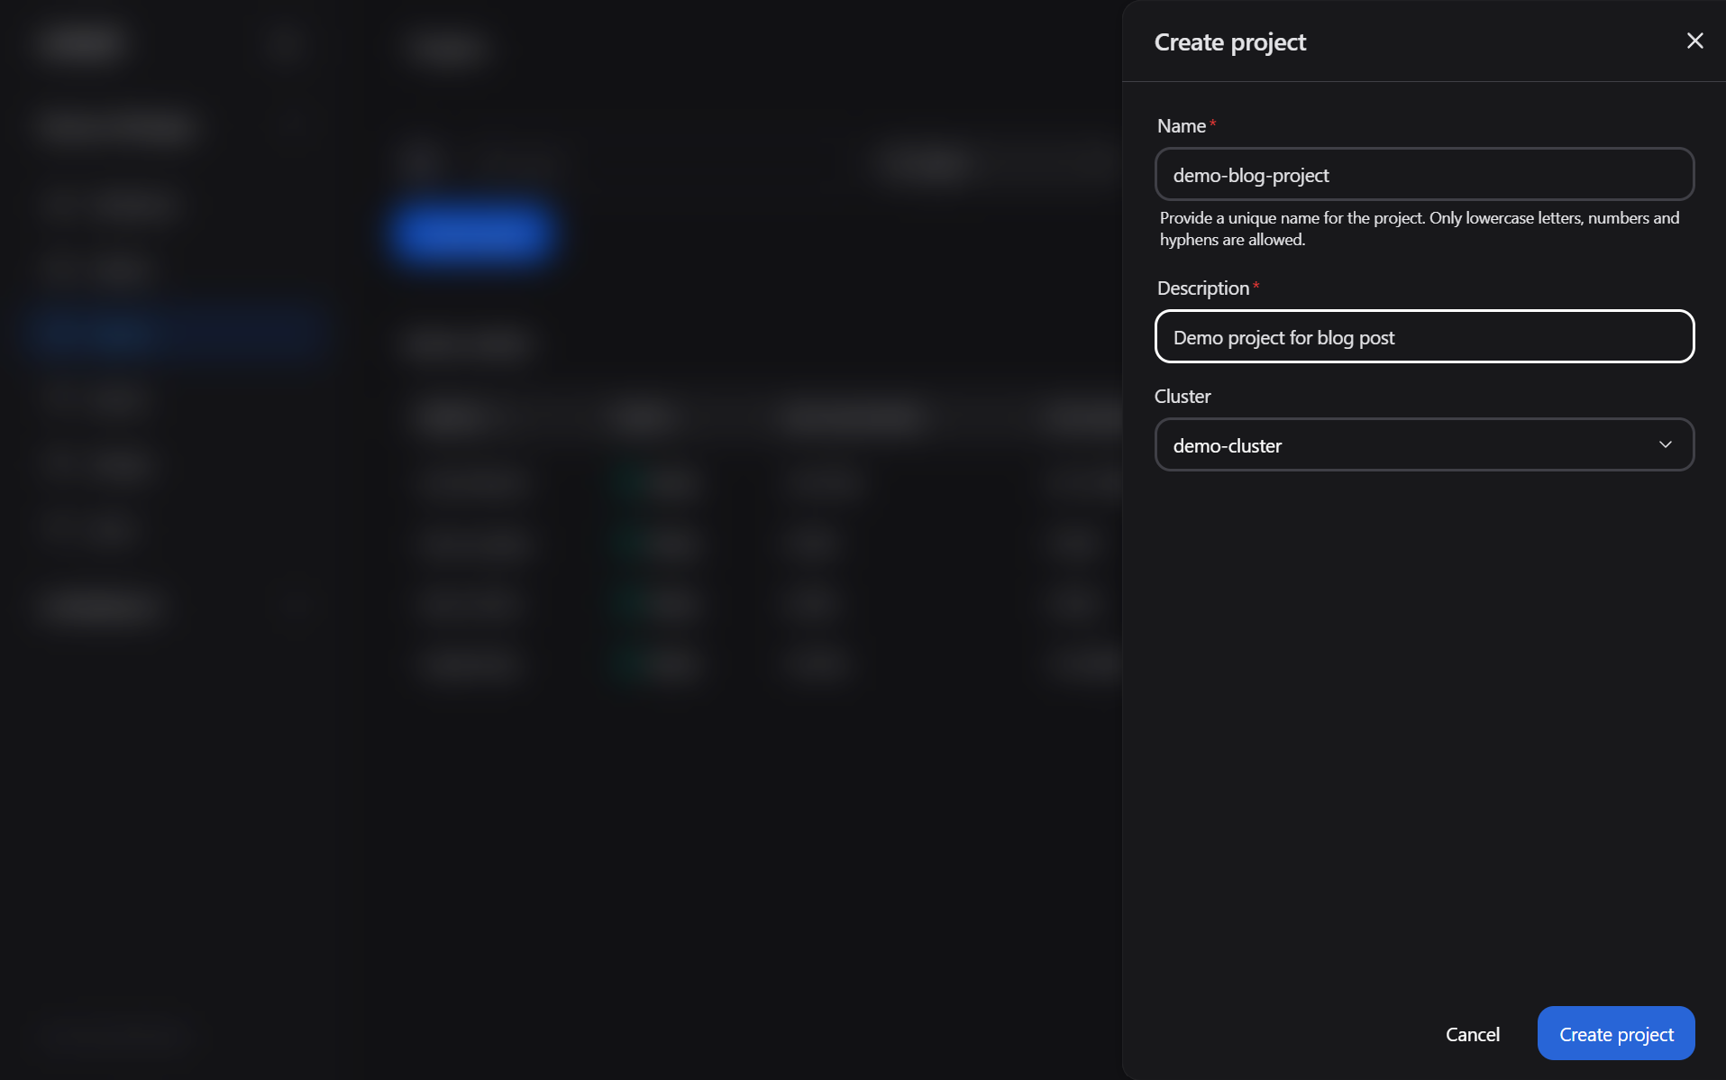
Figure 2: The “Create project” dialog box.
You should receive a confirmation that the project was created successfully and be automatically redirected to the Project settings: Quota page.
On this page, you can define the quota for the project. As we will adjust these settings in a later section, you may leave the default values unchanged for now.
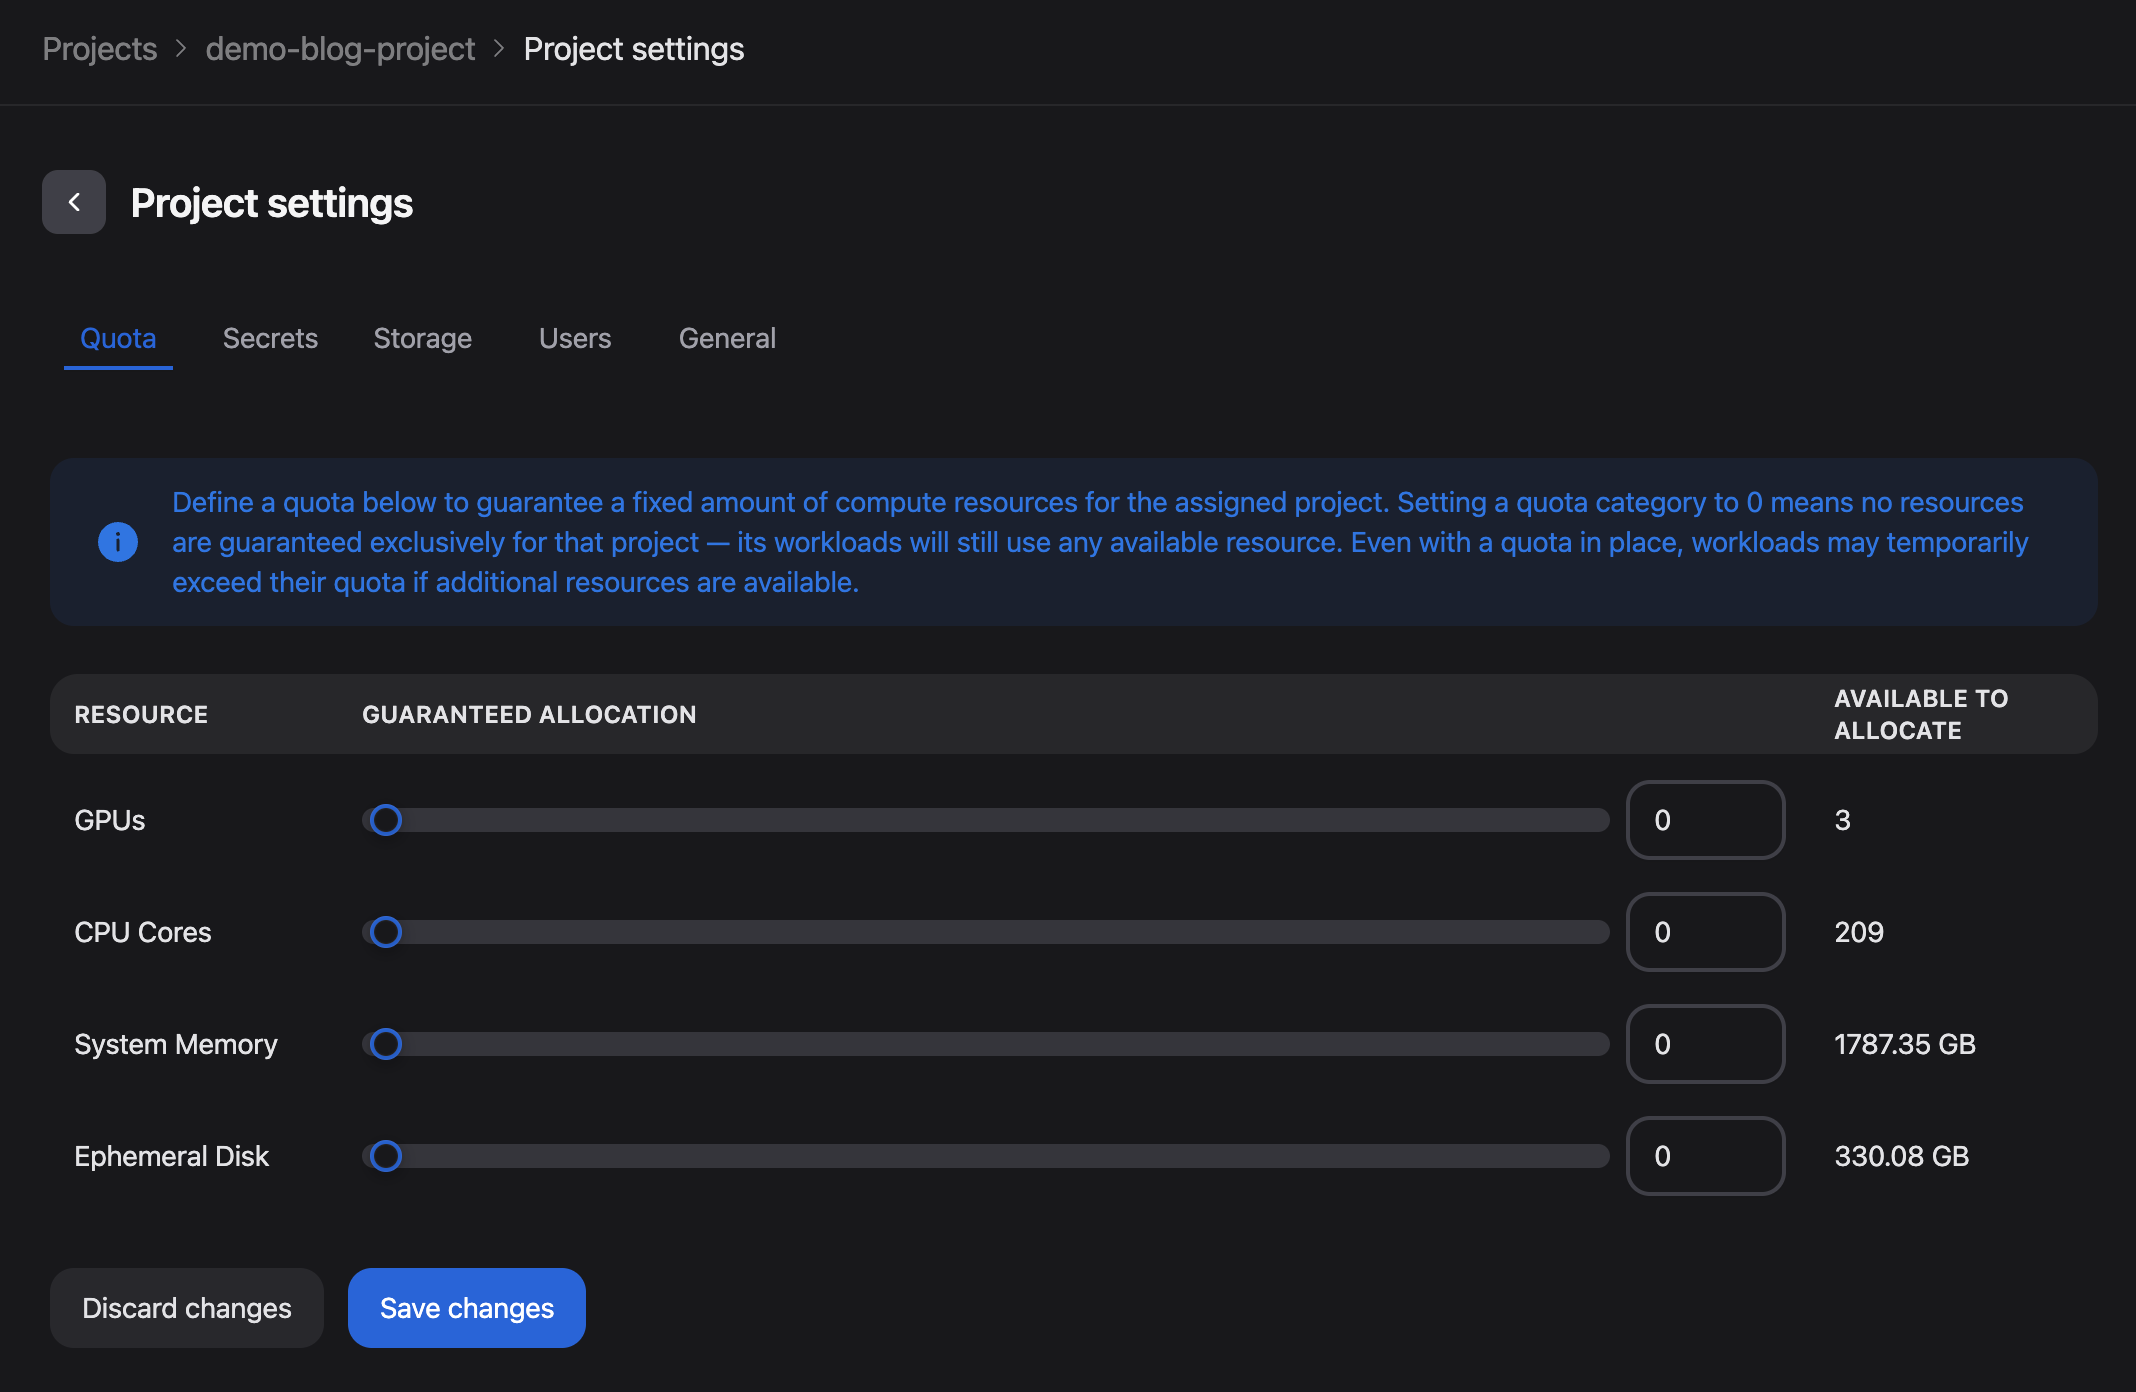
Figure 3: The Project settings page following successful project creation.
To ensure storage is configured for your work on the platform, we will now configure access to the default storage in the cluster:
Navigate to the Secrets tab in the project settings (located next to “Quota”, see Figure 3)
Click on the Add project secret button and then select Assign existing secret
Select the minio-credentials-fetcher secret from the Secret drop-down menu (Figure 4)
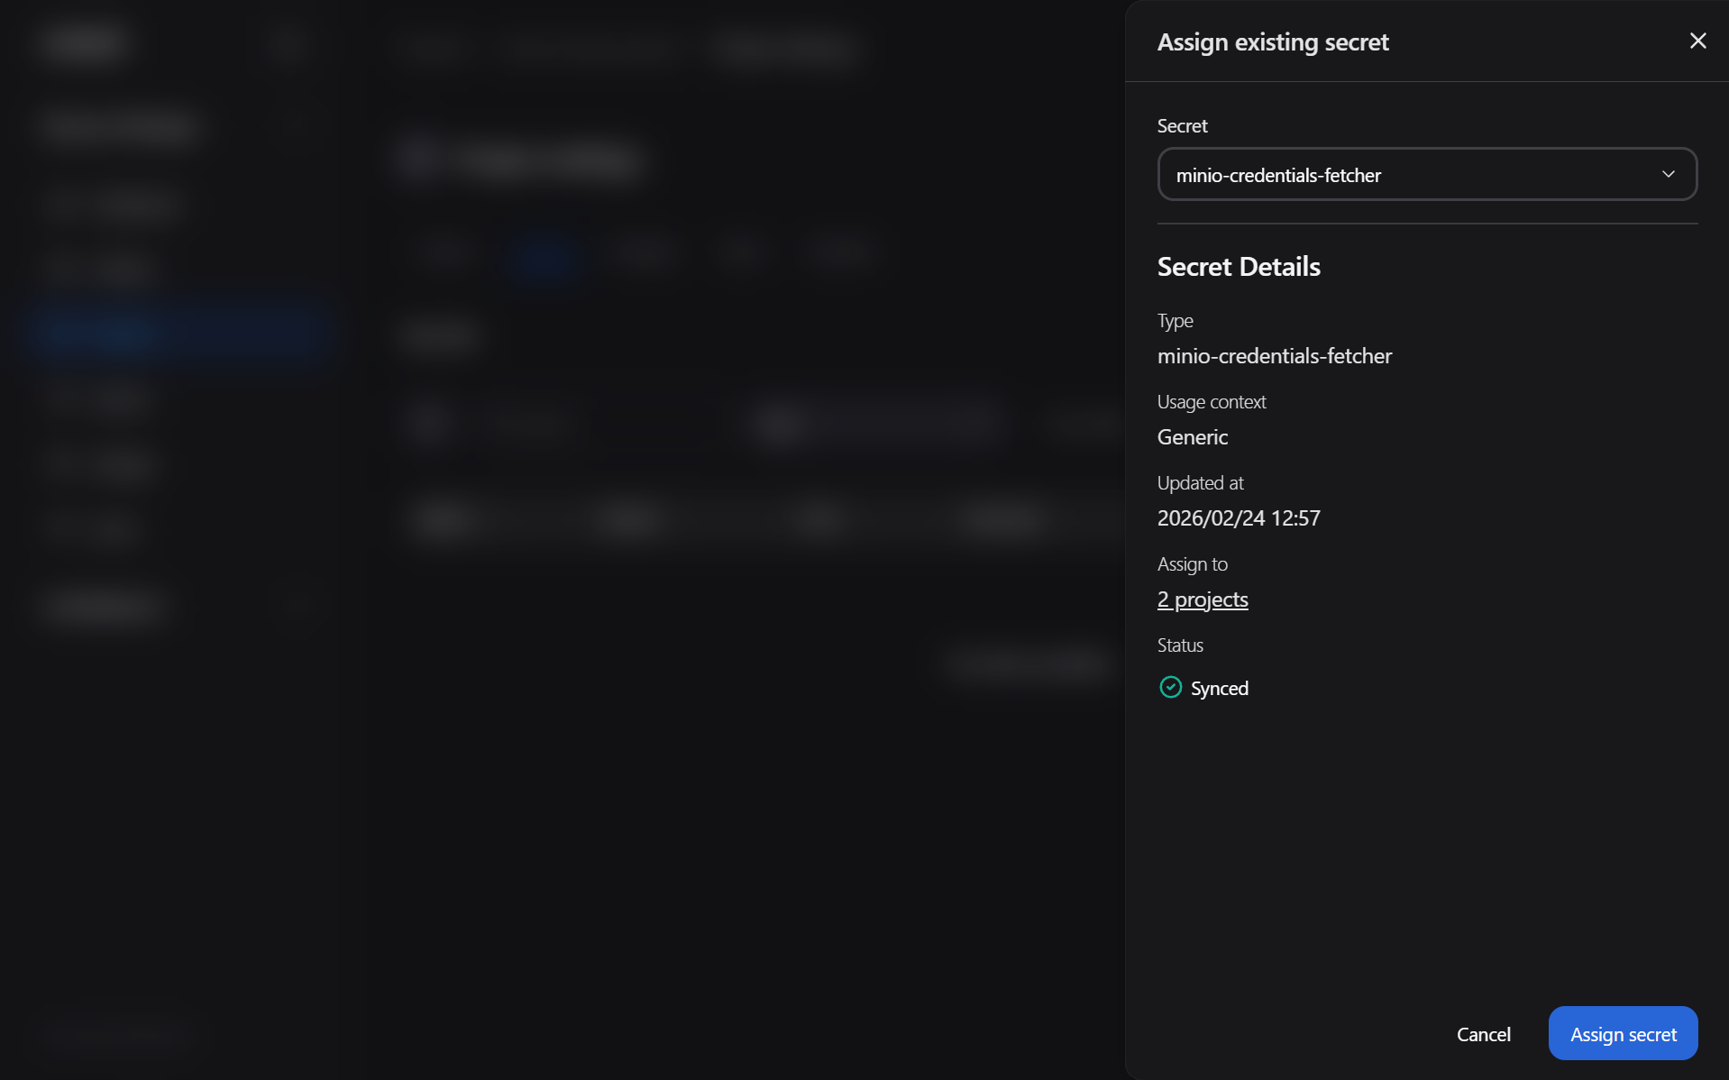
Figure 4: The “Assign existing secret” project dialog box.
Click Assign secret. You should now see the secret added to the project (Figure 5)
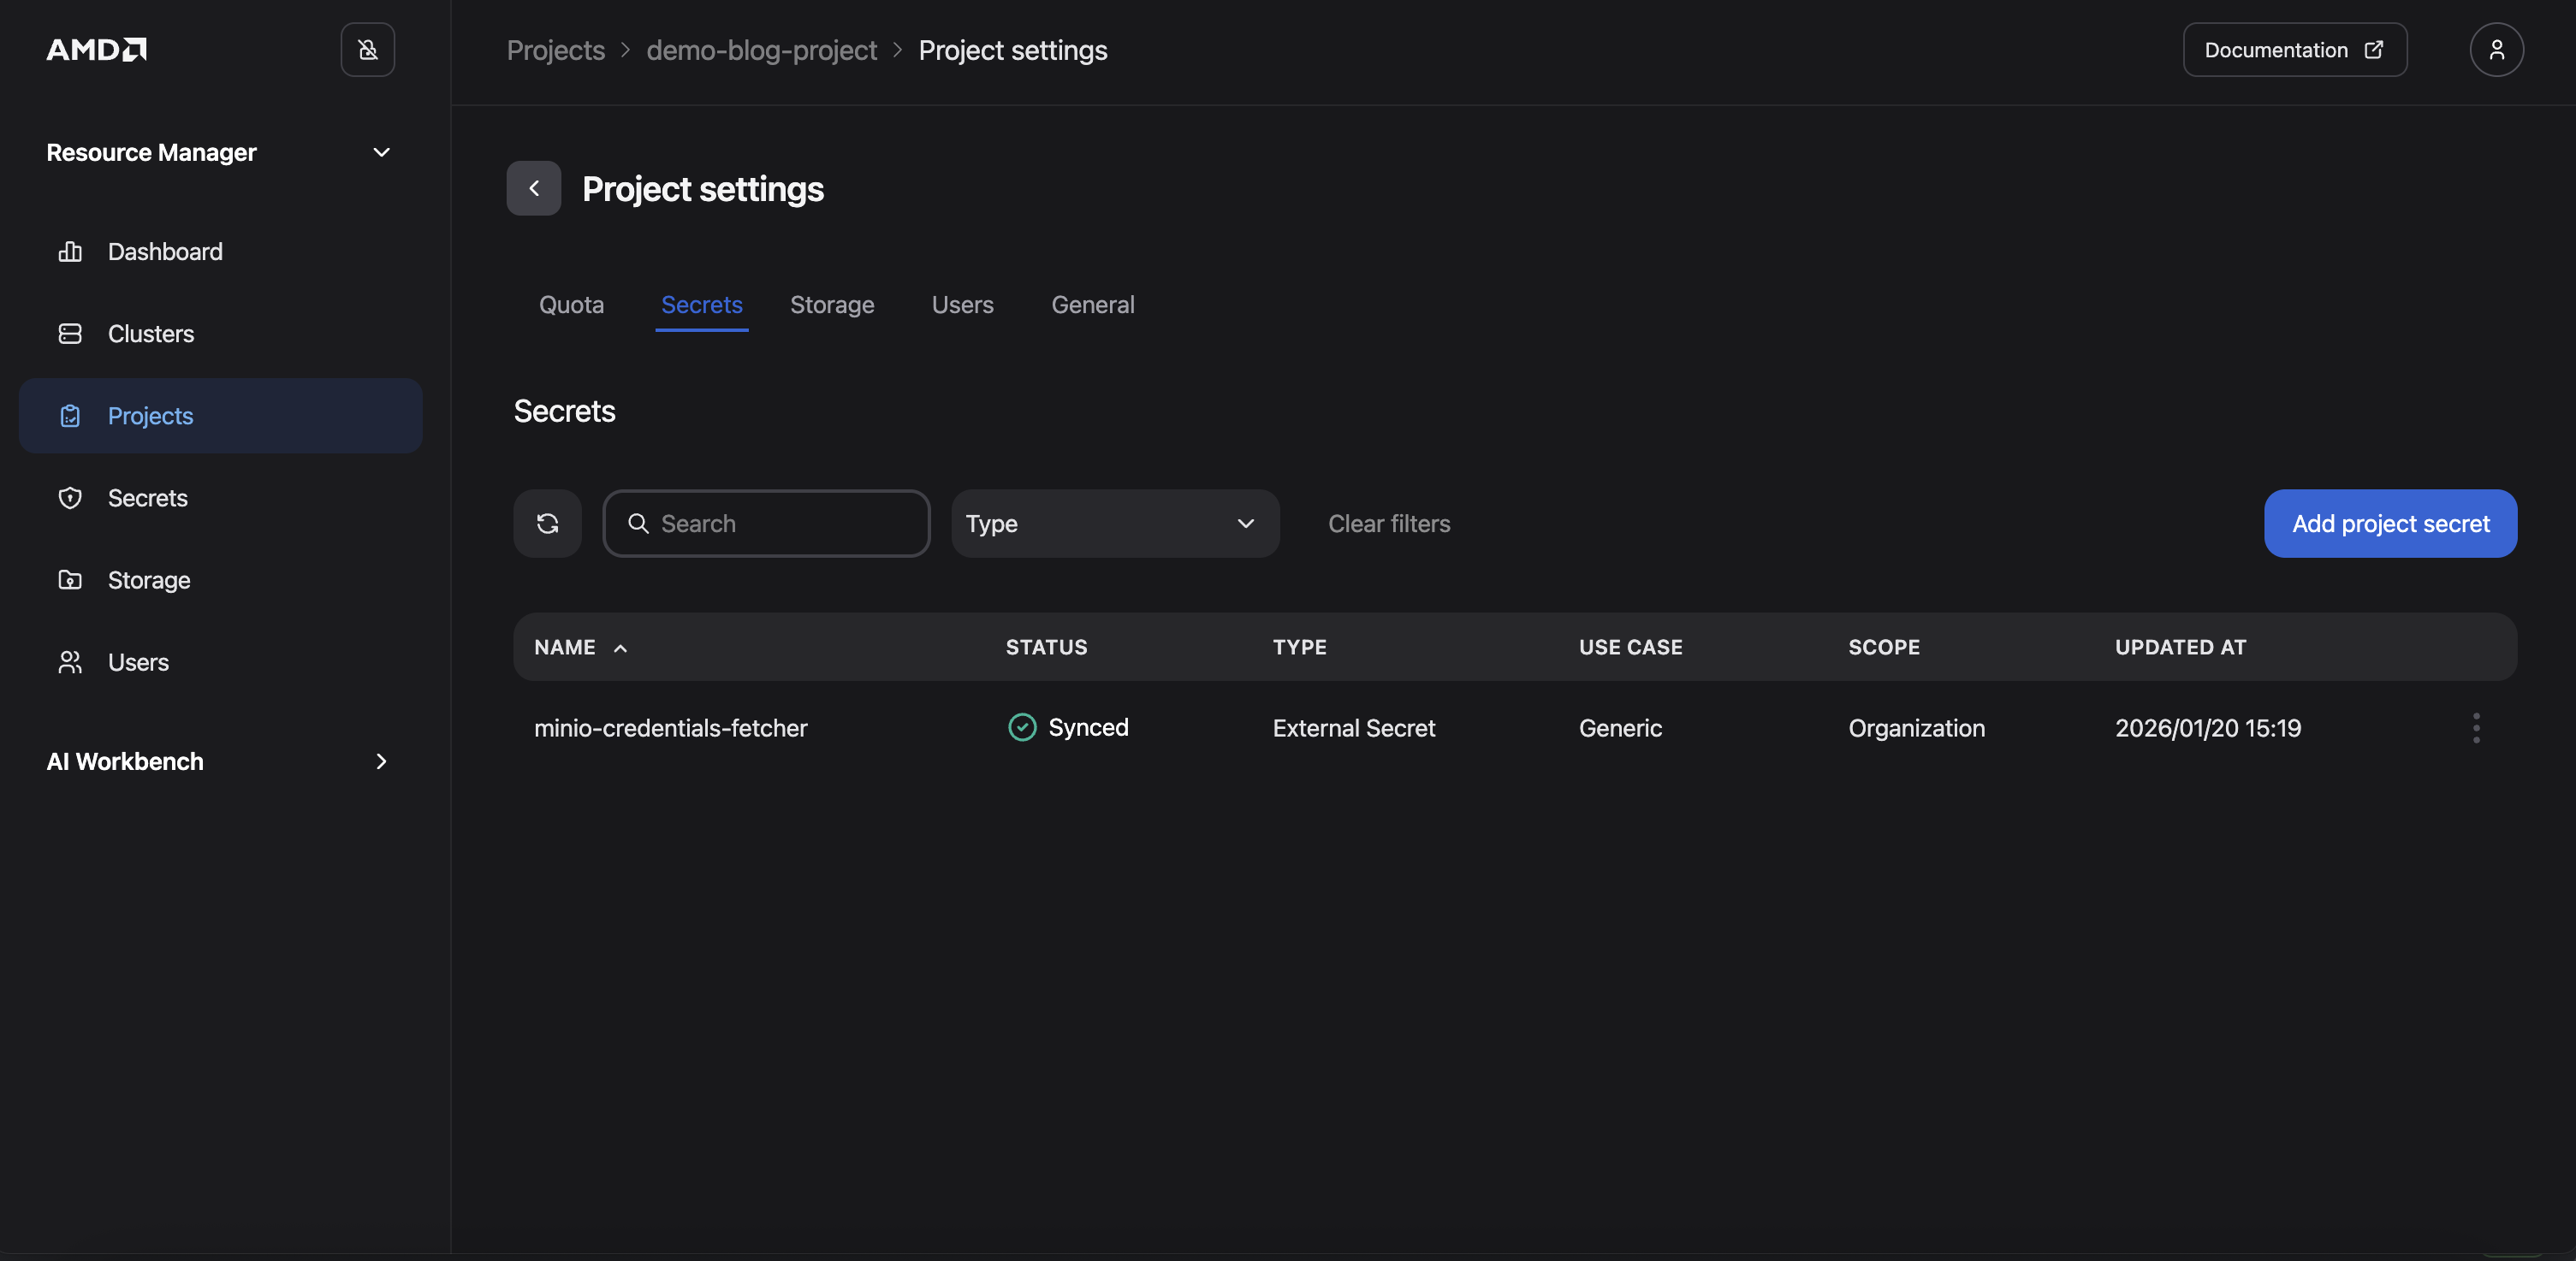
Figure 5: The Project settings “Secrets” page following the addition of the secret.
Lastly, add existing users to the project:
In the project settings, click on the Users tab (located next to “Storage”, see Figure 5)
Click the Add Member button
Select yourself (and any other desired users) from the Users drop-down menu
Click Add to project
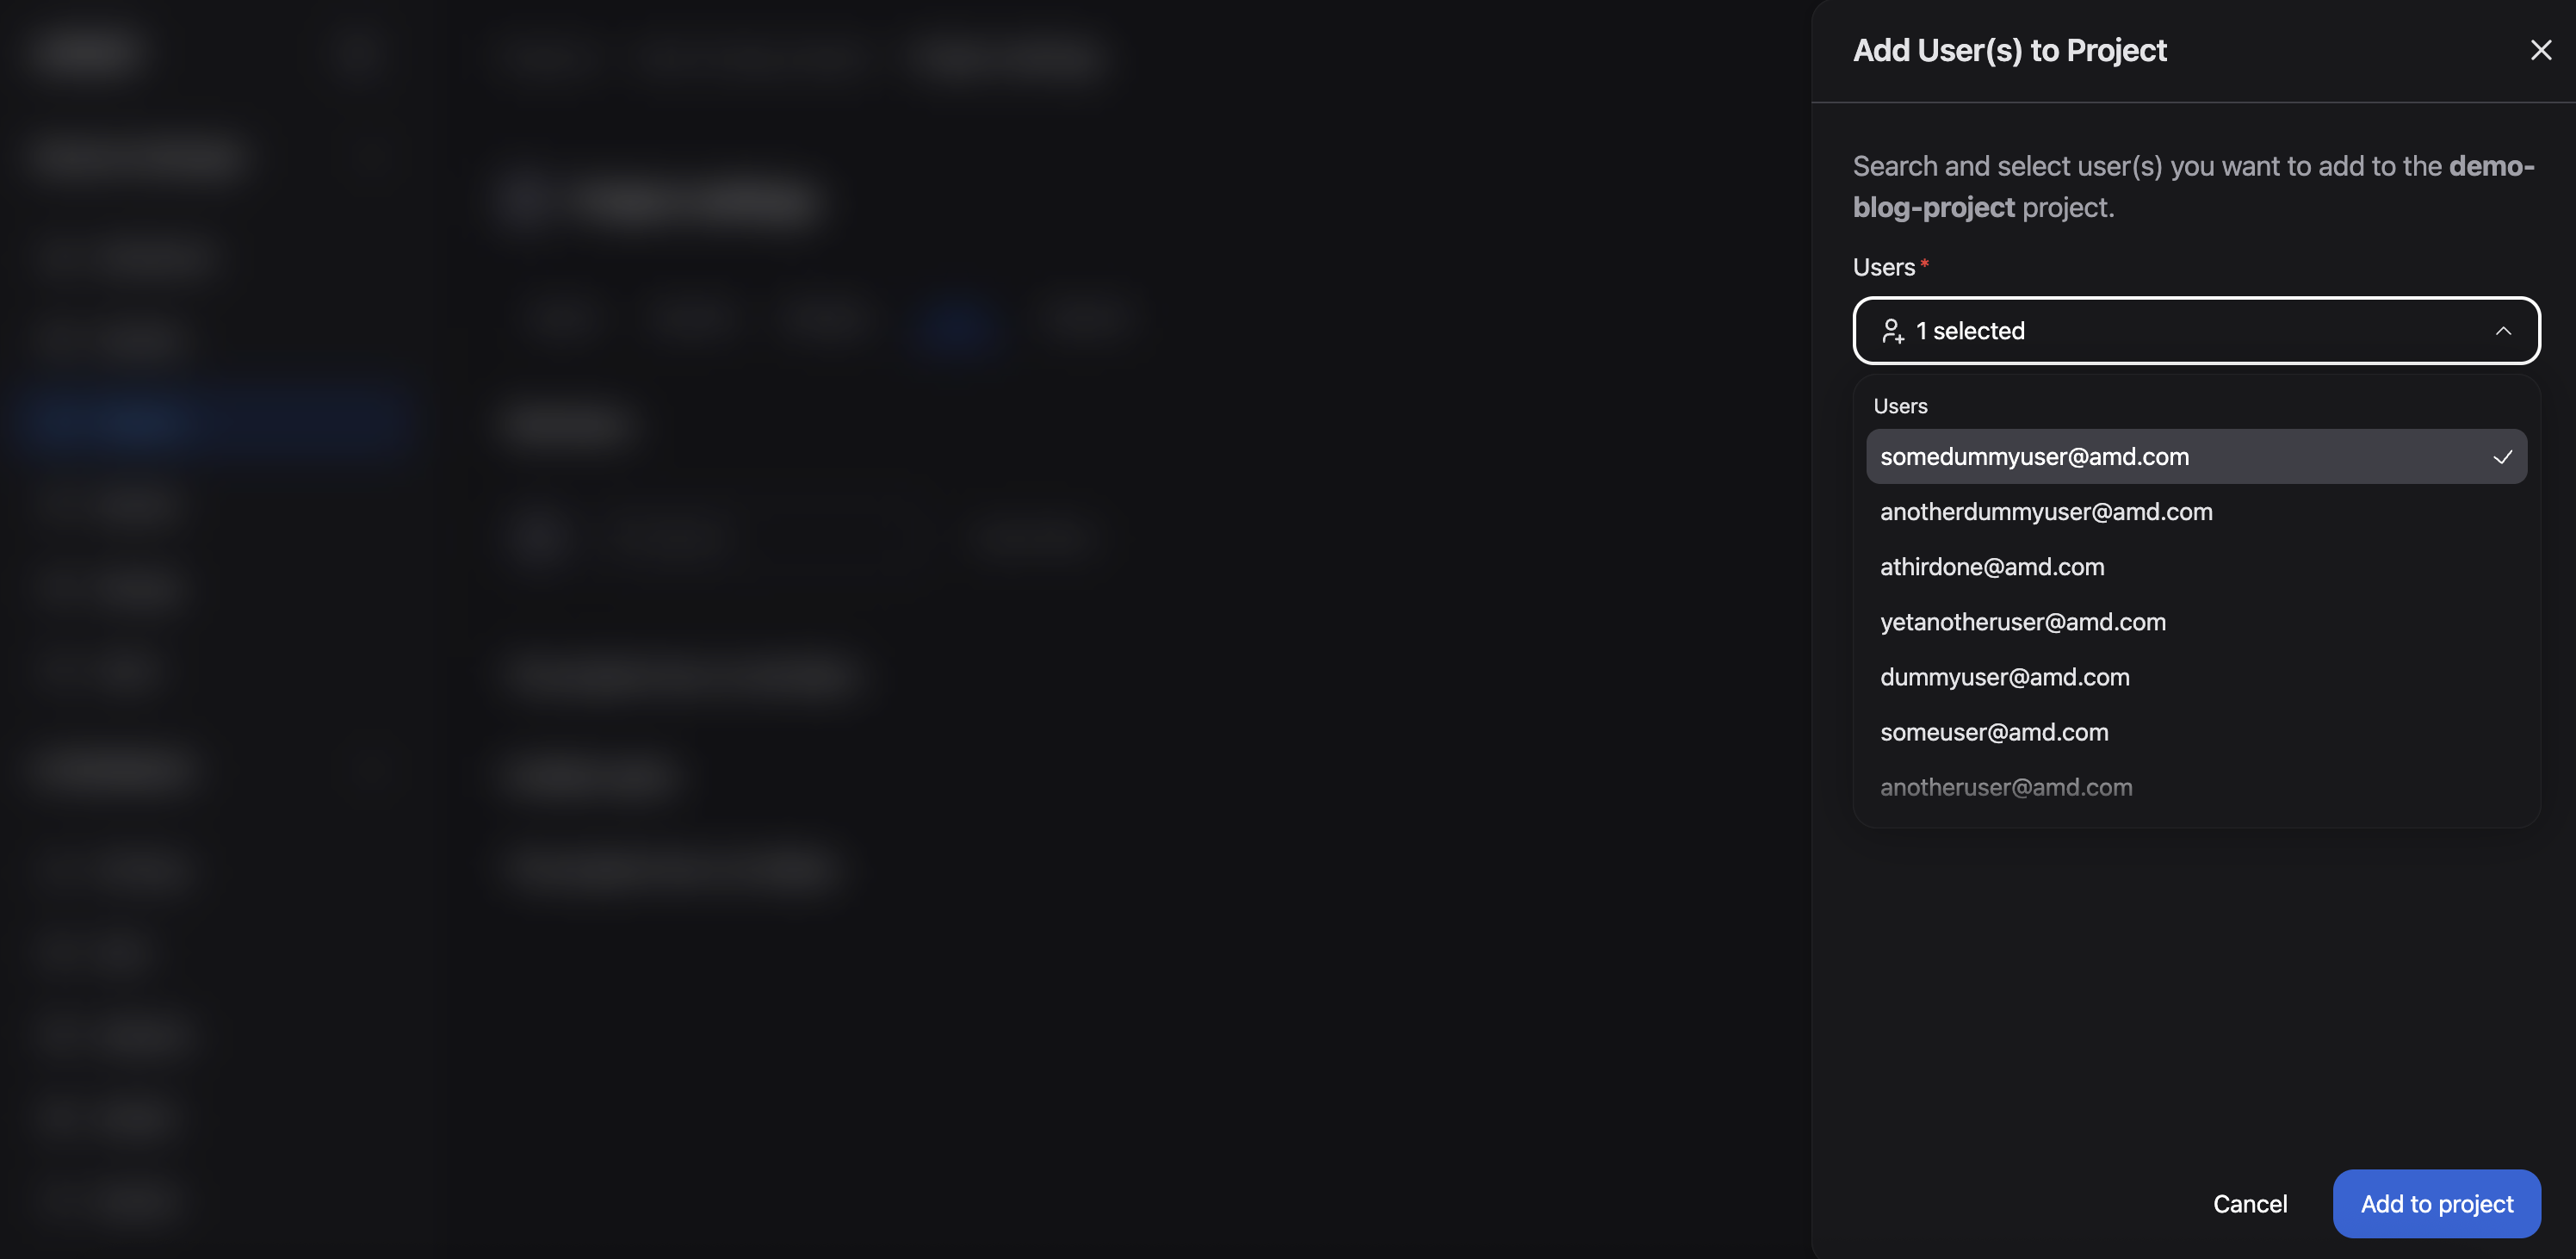
Figure 6: The "Add User(s) to Project" dialog box.
The project is now configured, allowing authorized users to deploy workloads within it.
Configuring the Project’s Quota#
Resource limits (quotas) can optionally be configured for each project to ensure that project members have access to the resources required for their workloads.
Note
Projects can consume more than their ensured quota if there are unused resources available. If a workload is submitted to a project that is already consuming its full quota, the system will attempt to borrow resources for it, if available. When a workload is borrowing resources, it will be suspended if another workload is submitted in a project that has unused quota and there are no other available resources, i.e. the project with unused quota has higher priority for the use of those resources.
To configure a project’s quota: If you are still within the project settings, you can simply return to the Quota tab. However, to illustrate how to view all available projects and their allocations, the following steps demonstrate an alternative path using the sidebar menu:
Navigate to the Projects page (see Figure 1). Here you can see all the projects
Click on the project (“demo-blog-project”)
Click on Project Settings (upper right corner). The Quota fields will be displayed, as shown in Figure 3
Specify the quotas: GPUs = 3, CPU Cores = 97, System Memory = 800GB, and Ephemeral Disk = 150GB. (These quotas will be used later in this blog when demonstrating pre-emption.)
Click Save changes
Obtaining the kubeconfig.yaml for your Cluster#
In the next section, we will deploy workloads using kubectl. To access the cluster using tools such as kubectl you must obtain the kubeconfig file for the cluster. Follow these steps to retrieve the kubeconfig information from the Clusters page:
Navigate to the Clusters page
Click on your cluster
Click on the View config button (upper right corner)
Copy the kubeconfig file (Figure 7)
Store the file in a secure location on your local machine and set the KUBECONFIG environment variable to point to this file
Install and setup the OIDC plugin kubelogin using your kubeconfig file
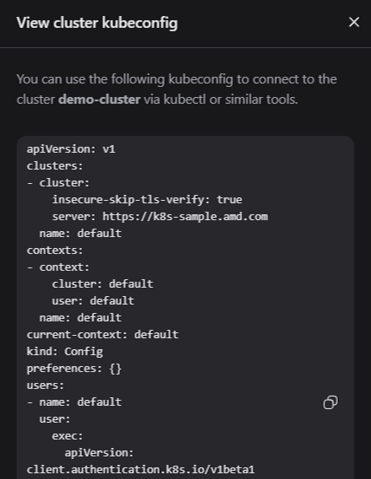
Figure 7: The “View config” dialog box.
You should now be able to access your cluster using kubelogin. Let’s move on to the next section.
Note
Refer to the documentation on Accessing the Cluster for more information.
Monitoring Workloads and Resource Utilization#
The AMD Resource Manager allows you to monitor all workloads and resources running within your projects. This includes workloads that you may be managing using a variety of tools such as kubectl, Flyte, Kubeflow, and others. To ensure you receive the full benefits of the AMD Resource Manager - including quota enforcement, access control, and monitoring - workloads are tracked and monitored regardless of how they are submitted to the cluster. This means that workloads submitted via tools, such as kubectl, must adhere to the quotas defined for your project, and you can consistently track and monitor GPU usage and runtime for these workloads.
This tracking and enforcement also apply to Custom Resources that may be created by other operators running within the cluster.
To demonstrate this functionality, we will deploy a workload to the demo-blog-project via kubectl.
Prerequisites for Monitoring Workloads and Resource Utilization#
Deployment and Monitoring#
The deployment process can be seen below:
Navigate to the Project’s Details page by selecting your project, “demo-blog-project”, from the Projects page. From this page, we will be able to monitor our soon to be deployed workload (see Figure 8)
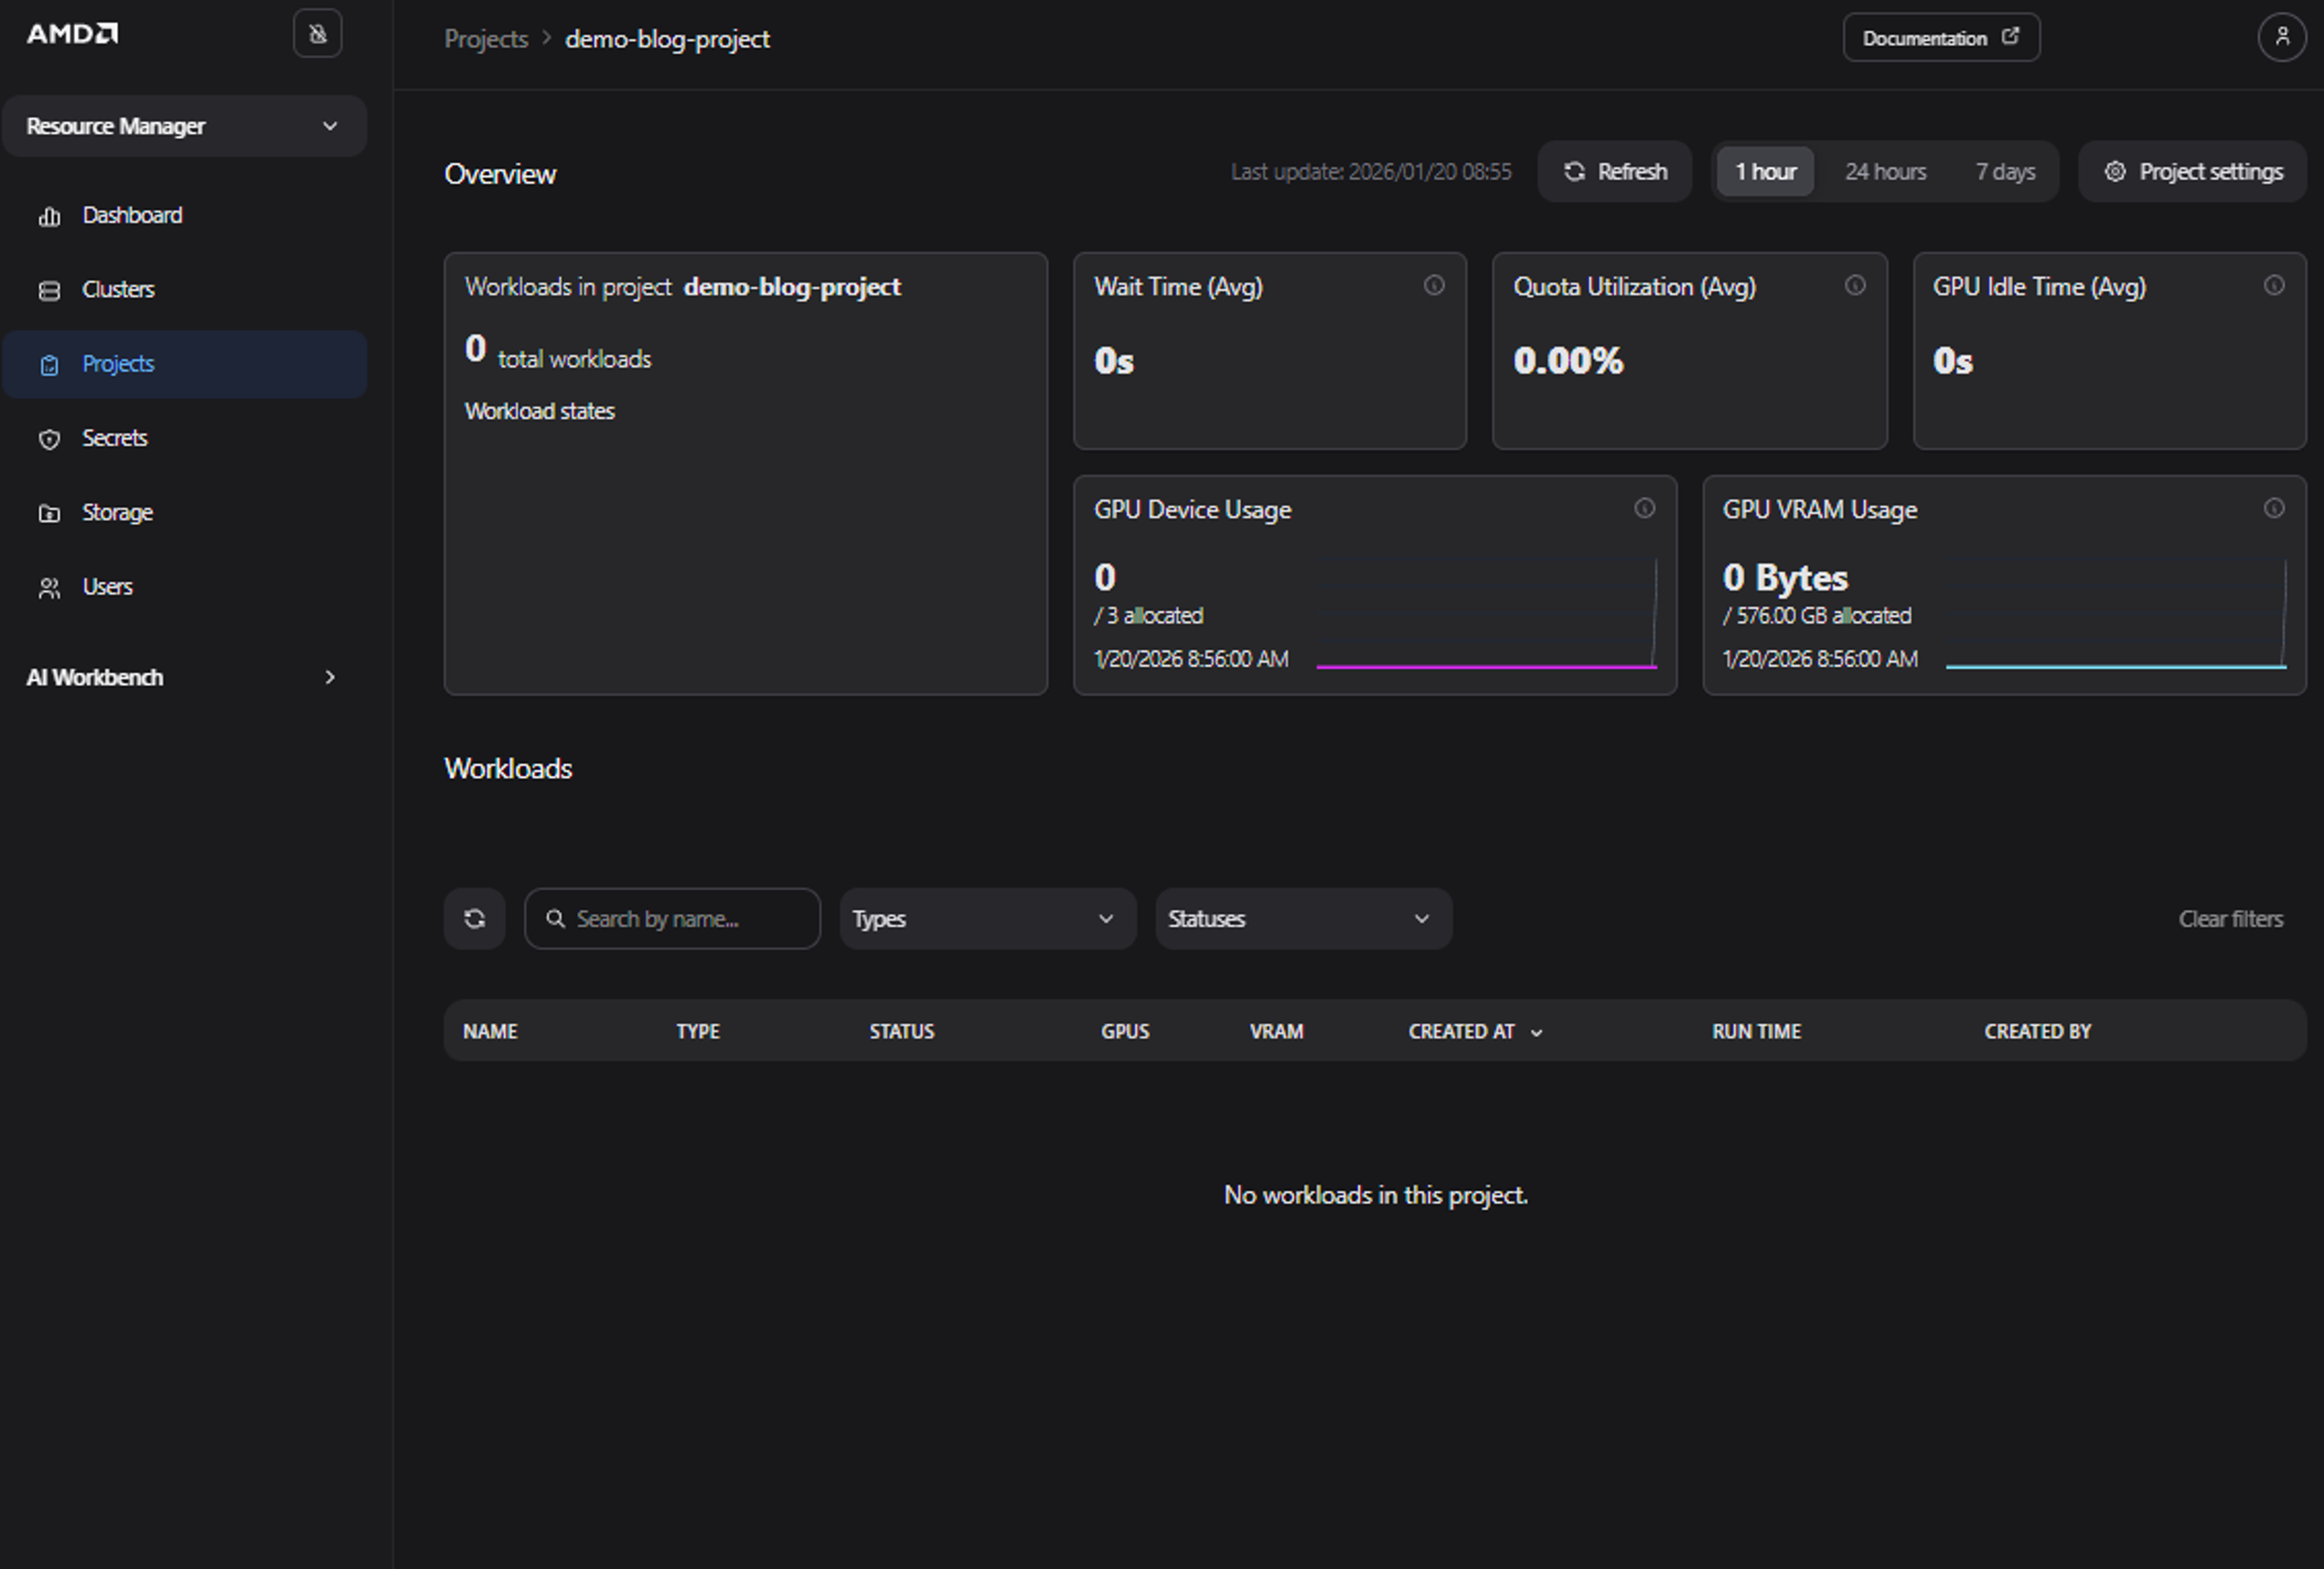
Figure 8: The “Project Details” page with no active workloads.
Use the provided Kubernetes manifest below and save it as a file named sample_aims.yaml. While this example utilizes an AMD Inference Microservice (AIM), you may adjust the manifest or replace it with a different workload of your choice. Please note that this manifest will deploy a “meta-llama-llama-3-1-8b-instruct” model
apiVersion: aim.silogen.ai/v1alpha1
kind: AIMService
metadata:
  name: sample-aim
spec:
  cacheModel: true
  model:
    ref: amdenterpriseai-aim-meta-llama-llama-3-1-8b-instru-0.8.4-590b84
  replicas: 1
  runtimeConfigName: amd-aim-cluster-runtime-config
Note
AIMs provide standardized, portable inference microservices for serving AI models on AMD Instinct™ GPUs. They are distributed as Docker images, leverage the ROCm™ software stack and run natively on AMD Instinct™ GPUs, ensuring predictable performance and portability across AMD hardware platforms. Read more in the AIMs Overview.
Submit the workload via kubectl to the namespace matching the name of the project, using the code snippet below:
kubectl apply -f sample_aims.yaml -n demo-blog-project
Return to the project details view; the submitted AIM should now be displayed on the dashboard (see Figure 9)
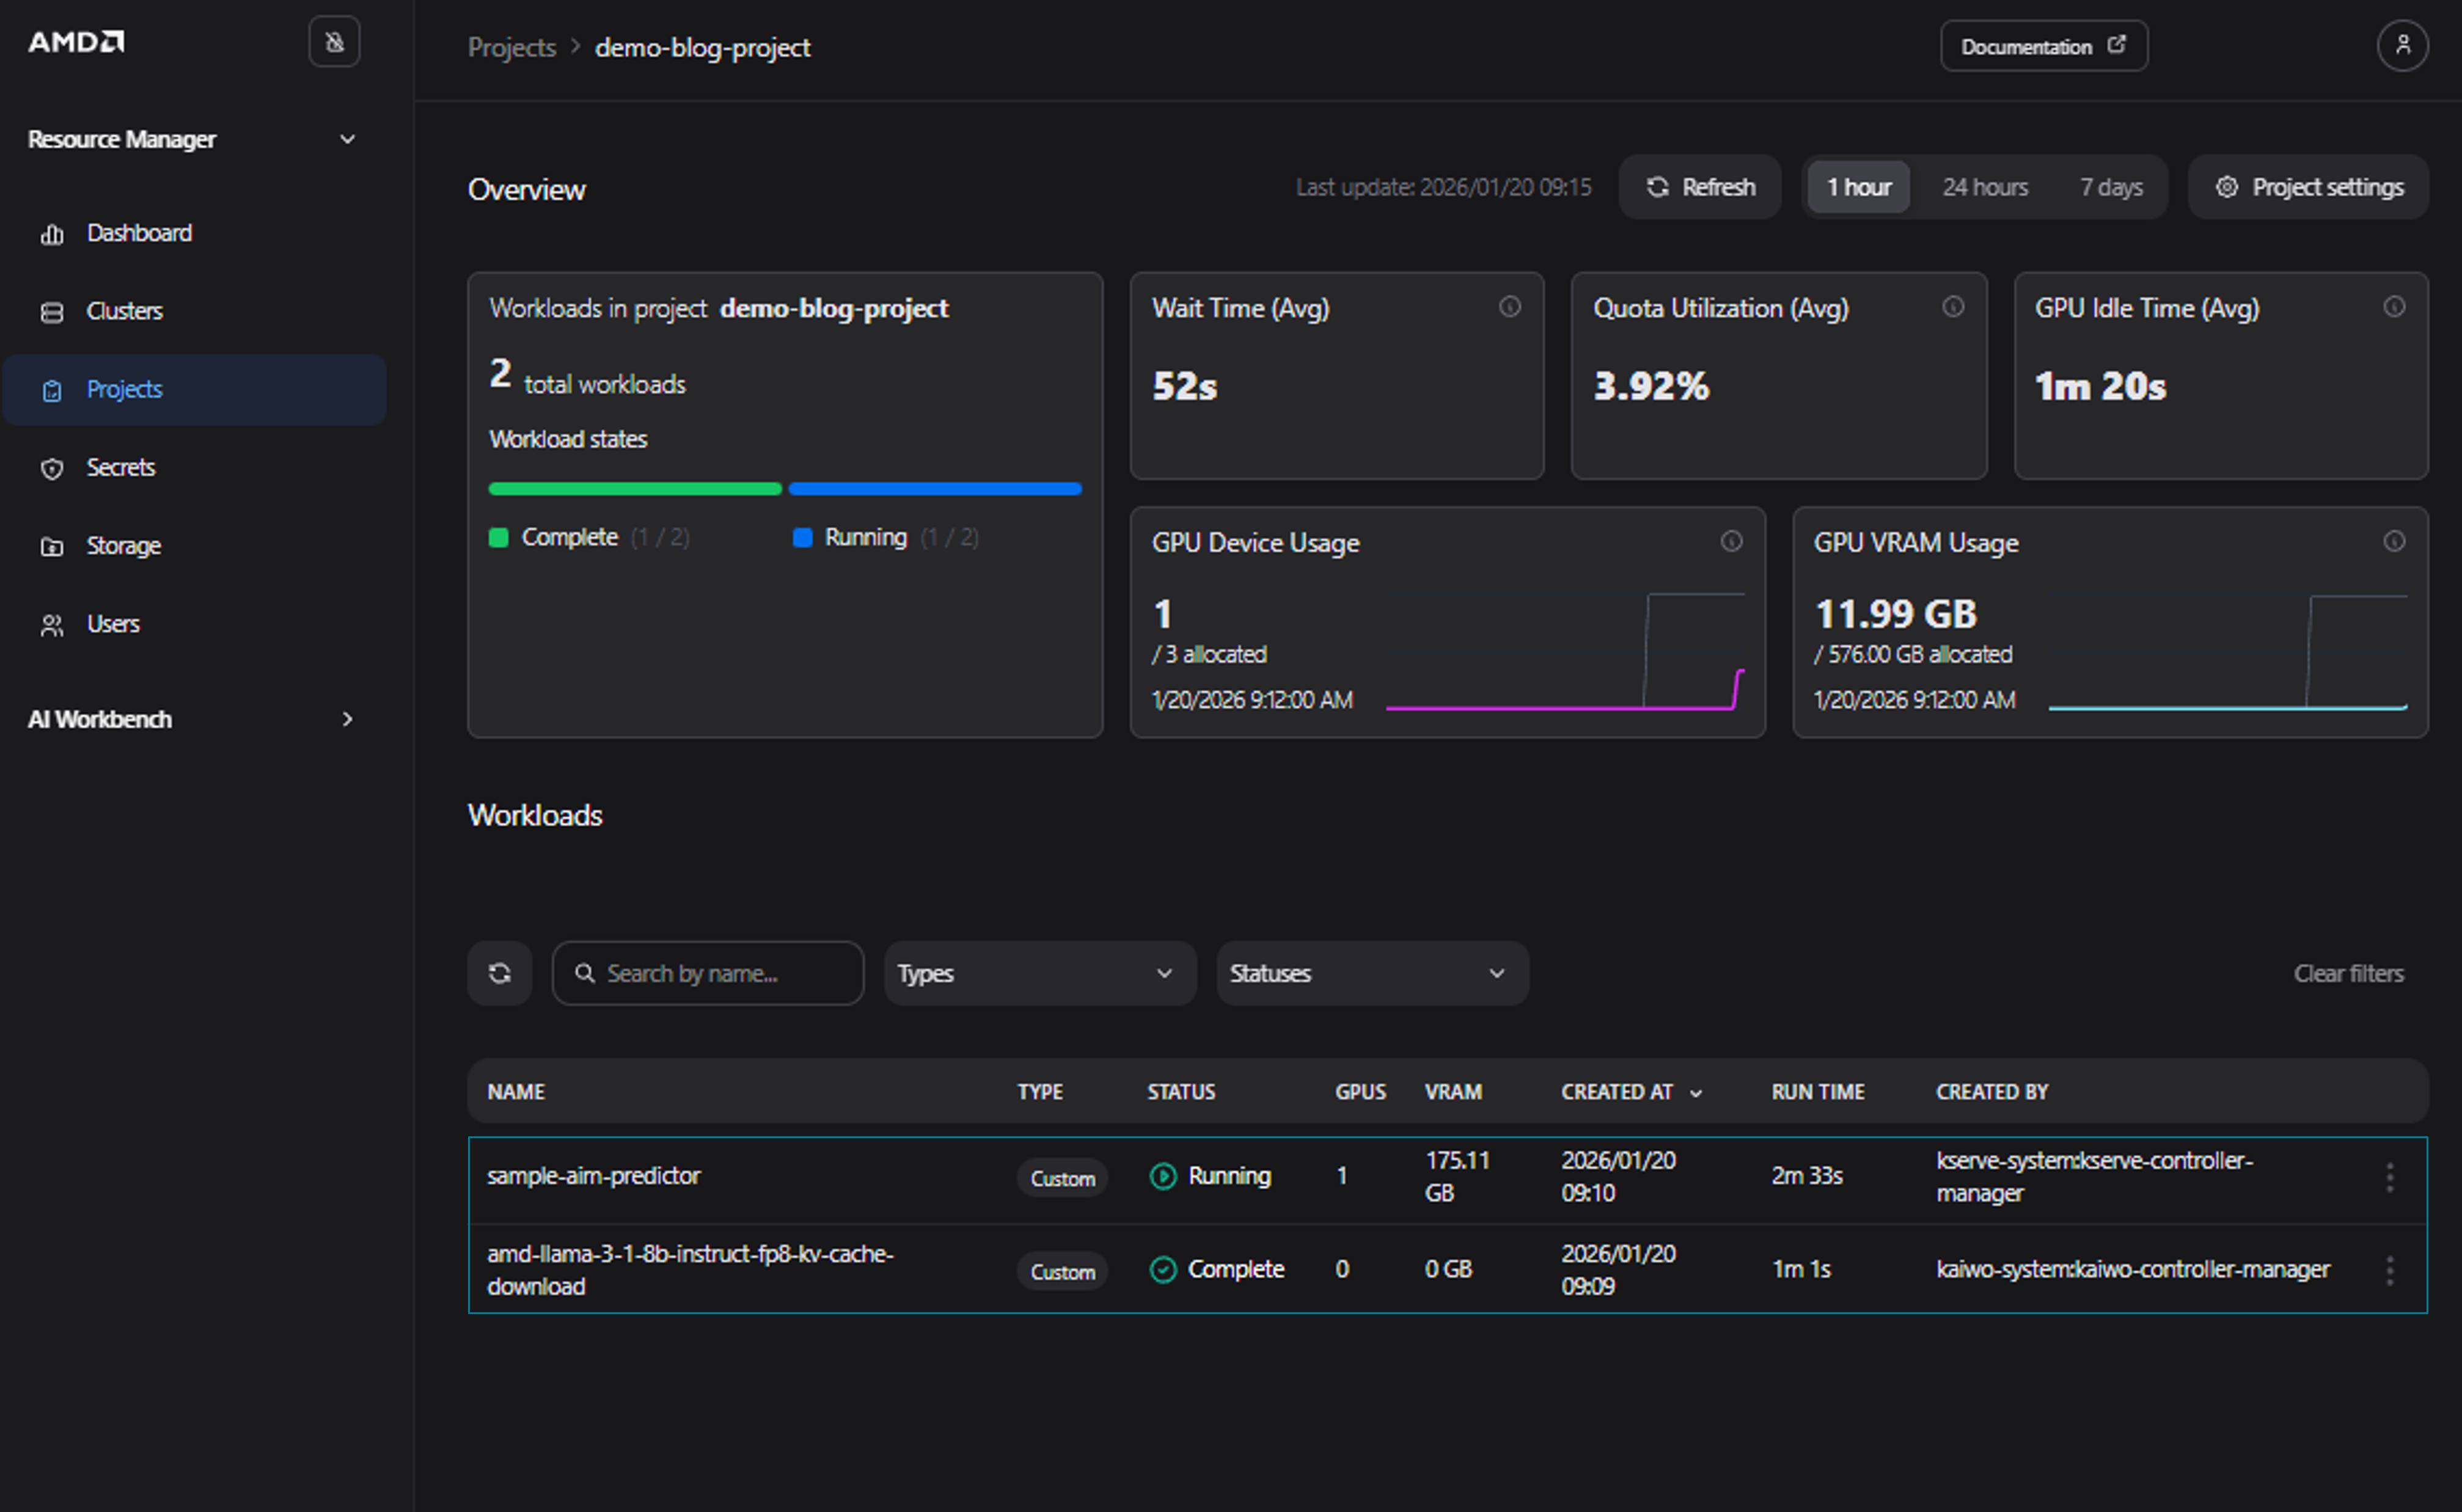
Figure 9: The “Project Details” page with the automatically tracked workload.
To view the resource allocation across the entire cluster rather than just a single project, you can monitor workload utilization for all clusters on the Clusters page (Figure 10). As you can see, in our case there are now 6 running workloads in total. Please note, that this depends on the actual resource usage, and you may see a different amount of running workloads.
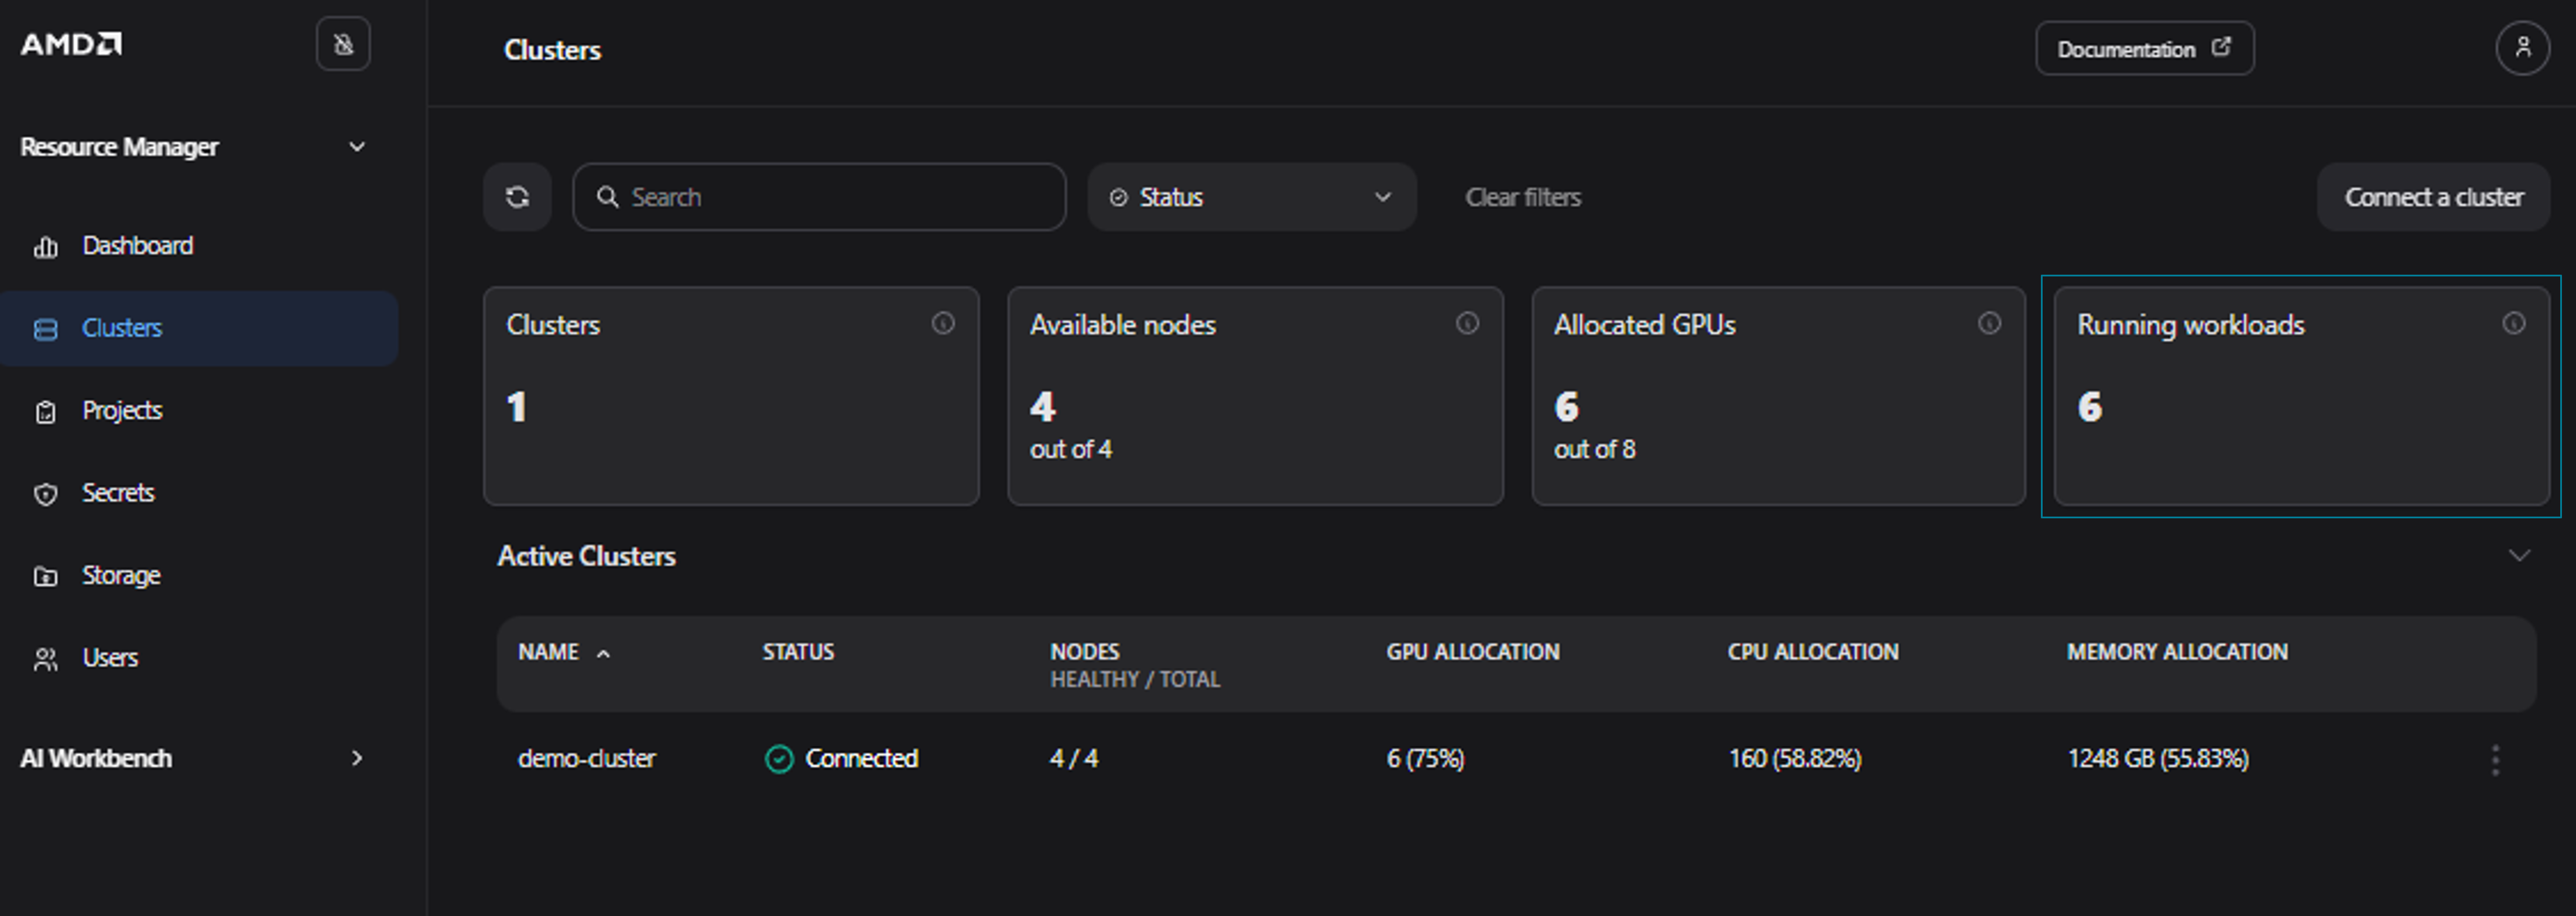
Figure 10: The “Clusters” page showing 6 workloads running in the cluster.
Clicking on a specific cluster, such as the demo-cluster, displays the Cluster Details page. This page provides quota and utilization information for the entire cluster and all associated projects (see Figure 11).
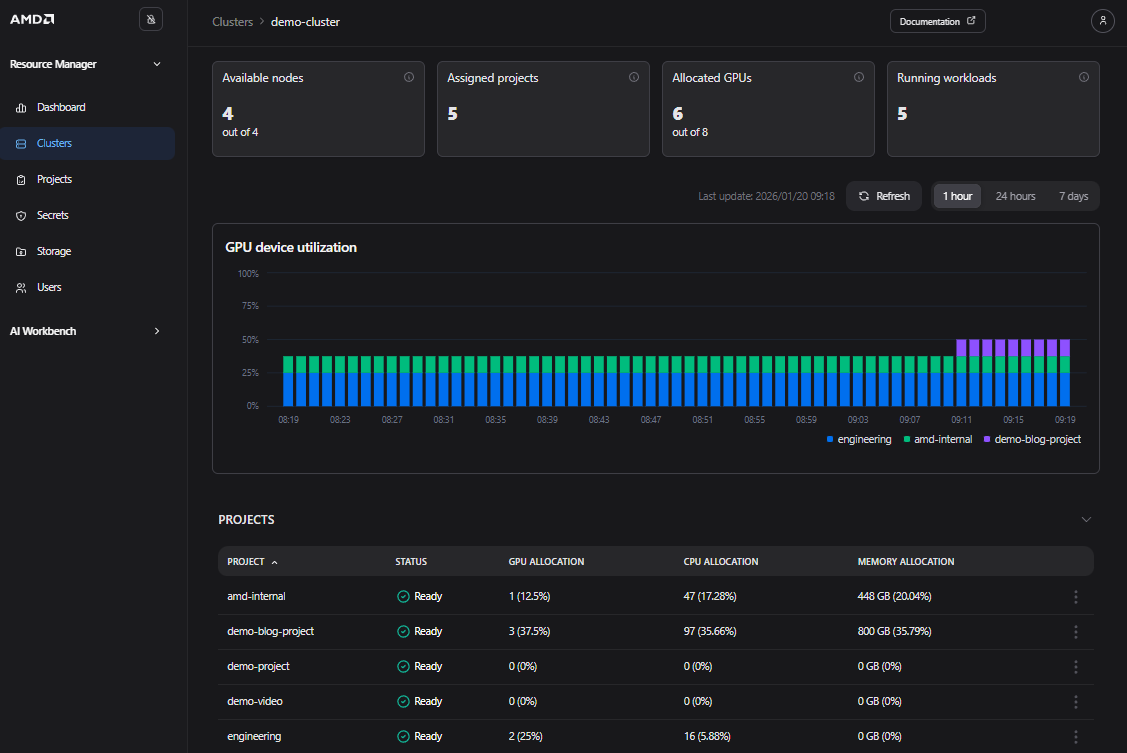
Figure 11: The “Cluster Details” page for the “demo-cluster”.
In addition, by navigating to the Dashboard page you can view high-level quota and utilization information for your projects across all clusters, along with live widgets displaying GPU utilization information (see Figure 12).
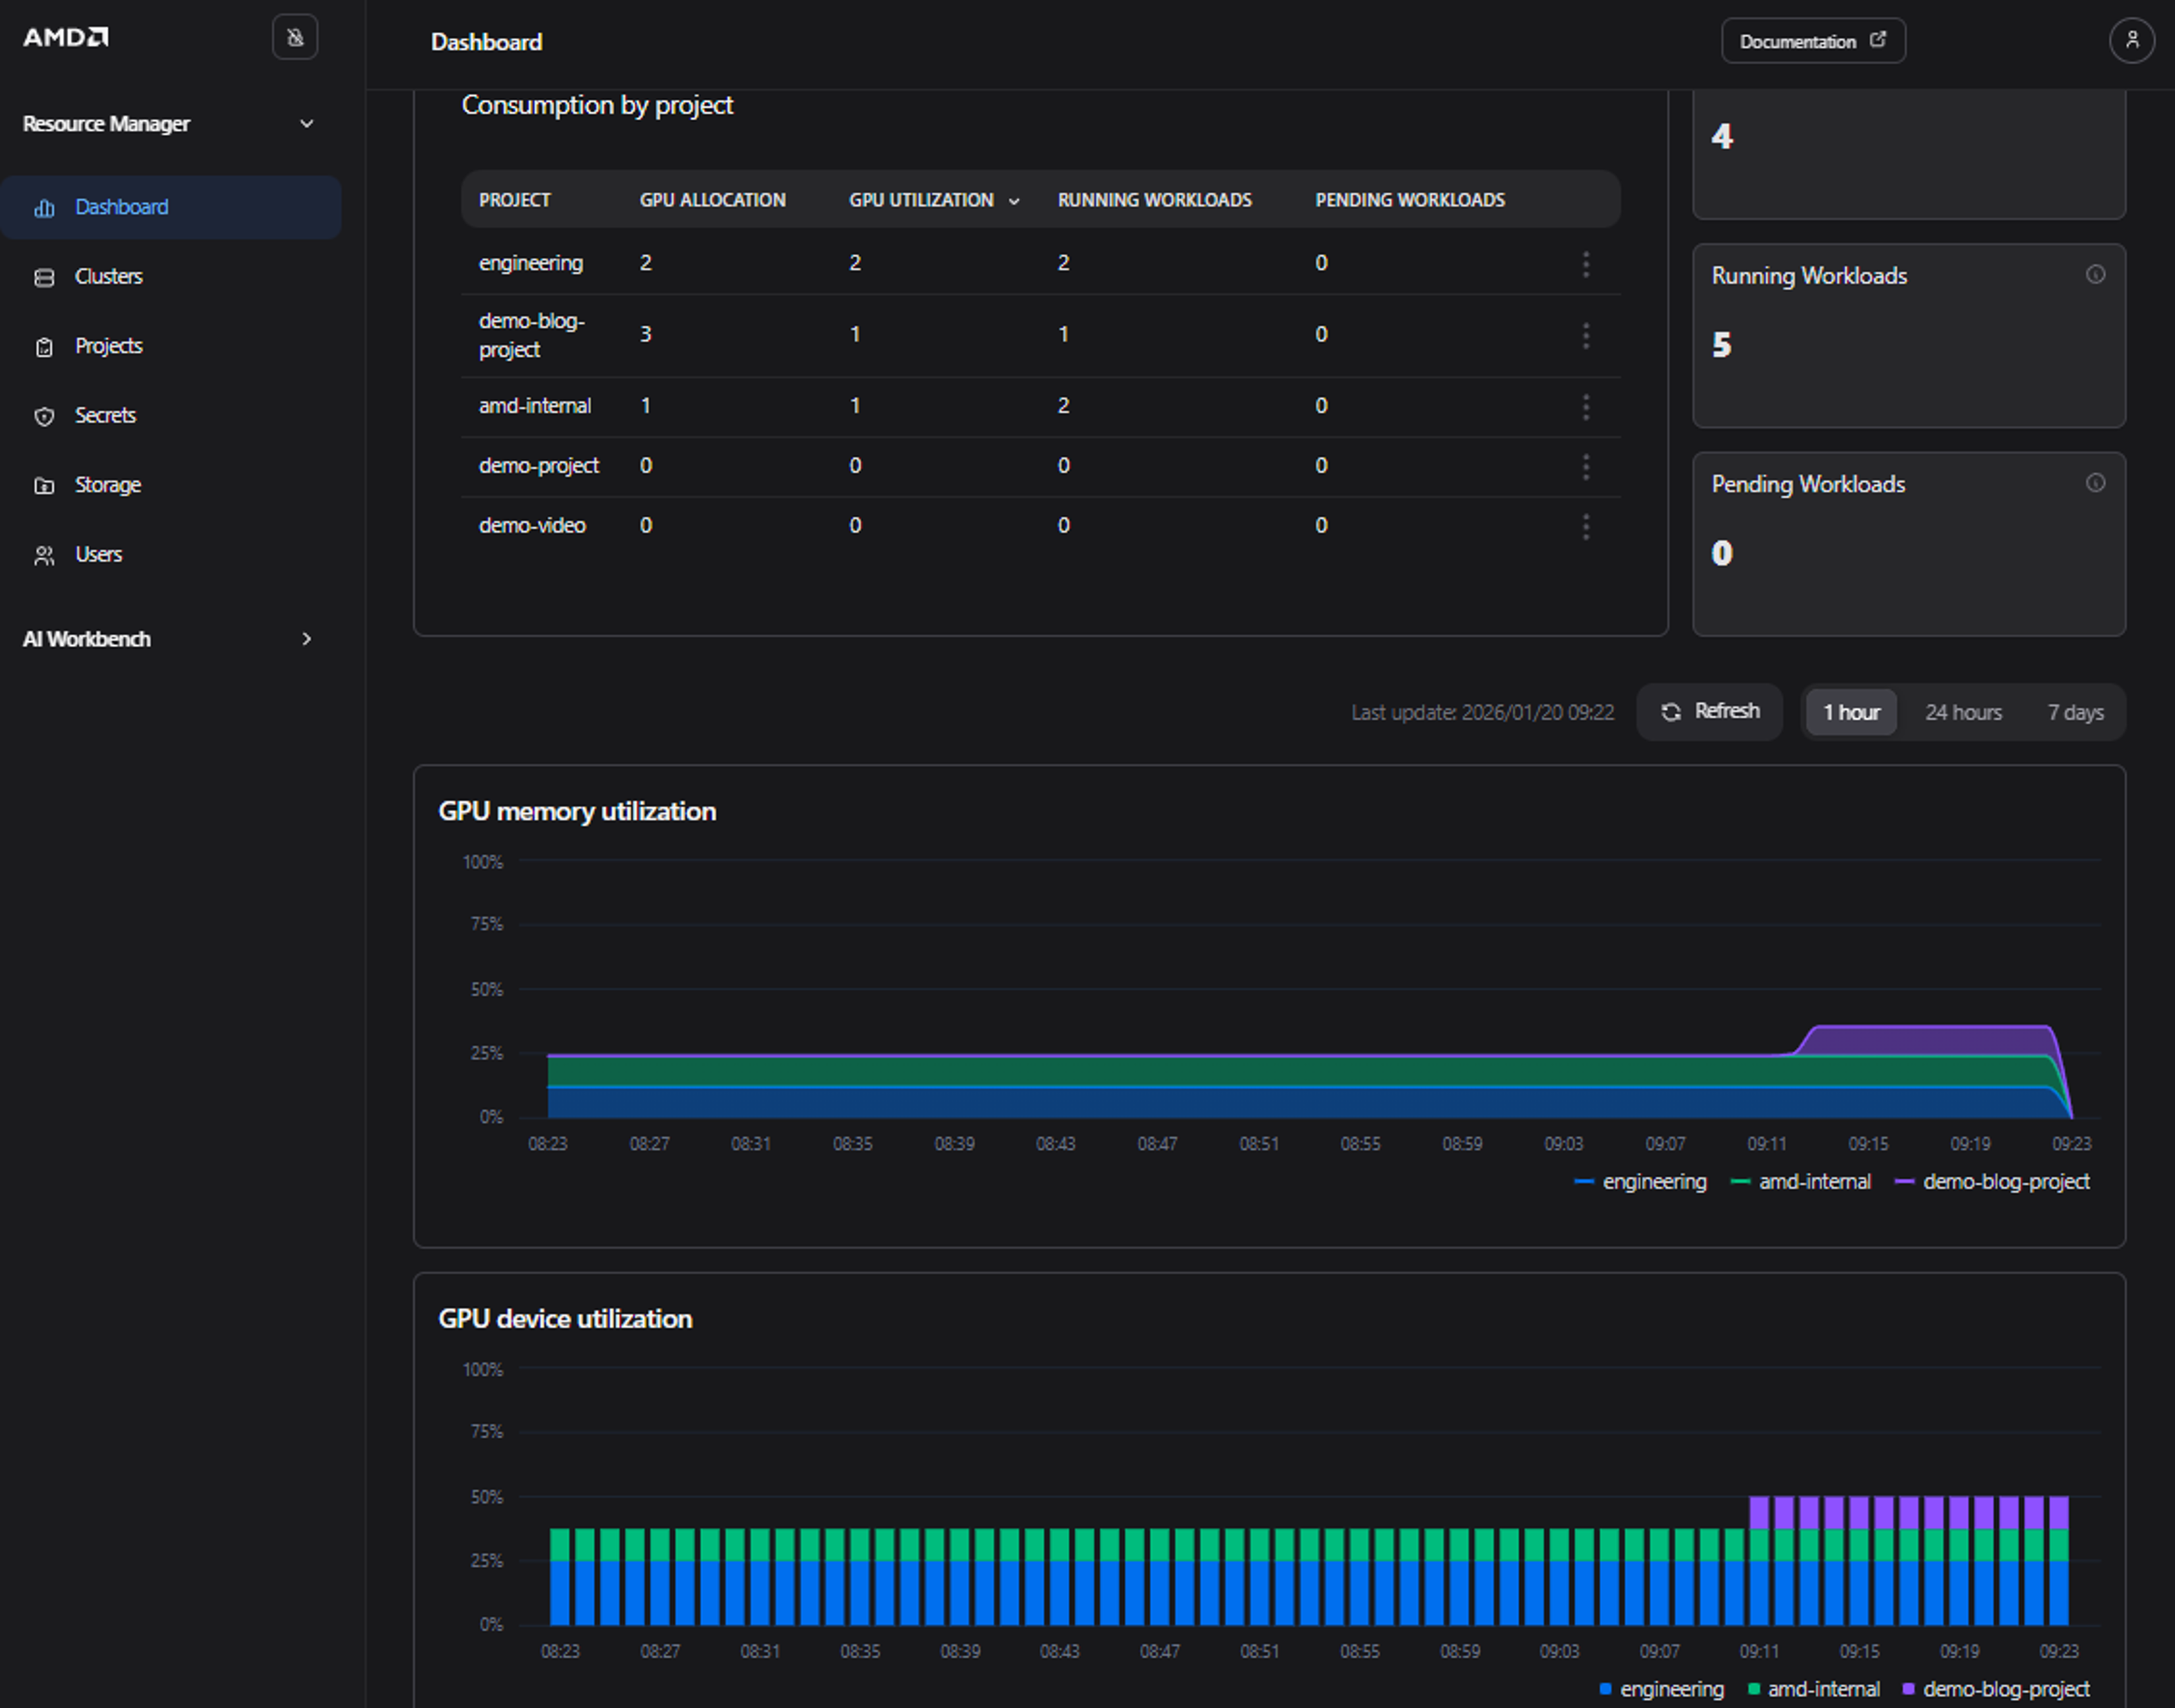
Figure 12: The “Dashboard” page showing quota and utilization information.
Lastly, delete the submitted workload using either kubectl or the AMD Resource Manager UI to clean up the project. To delete the workload via kubectl, use the following command:
kubectl delete -f sample_aims.yaml -n demo-blog-project
Your submitted workload should be deleted. Feel free to go to the Project Details page to confirm.
GPU Resource Sharing and Pre-emption Functionality#
Now that you have set up your project and deployed your first workload, we will demonstrate how the pre-emption or quota functionality works in AMD Resource Manager.
As noted previously, you can allocate a quota for a project by editing the quota in the project settings. Defining the quota ensures a fixed amount of compute resources for the assigned project. You can specify GPU, CPU, system memory, and ephemeral disk allocations for each of your projects.
Resource sharing is handled automatically when a workload is submitted. Consequently, if project A has an ensured quota, those resources can be borrowed by another project, project B, if the ensured quota is not fully utilized by project A.
However, if project A then submits workloads that require the full quota, then project B’s workloads that are borrowing from project A get suspended, or pre-empted, and project A’s workloads can be deployed.
If resources subsequently become available on the cluster for project B, then the pre-empted workloads are automatically resumed. For long-running jobs, it is therefore important to have a checkpointing mechanism to avoid losing progress when running on shared resources.
This resource borrowing and pre-emption can be useful in day-to-day work when several teams and types of workloads try to maximize the benefits of limited resources, especially GPUs. For example, by not assigning a quota to CI-jobs, users can submit these jobs at any time, but the jobs will wait in a queue and only run when higher-priority projects are not actively using their allocated resource quota, e.g., during off-peak hours. This approach ensures that computing resources are efficiently utilized while maintaining priority access for high-priority projects.
Note
For a workload to pre-empt another workload from a different project, all the resources of the new workload must fit within the quota of the project, this includes GPU, CPU, memory and ephemeral disk (if applicable). If the workload needs to borrow one or more of the resources from other projects to facilitate pre-emption, it will not be scheduled.
Prerequisites for GPU Resource Sharing and Pre-emption Functionality#
New project: Create a new project named low-prio. Do not assign any quotas to this project
Quota settings: Ensure the demo-blog-project has the following quota settings:
GPUs: 3
CPU Cores: 97
System Memory: 770 GB
Ephemeral Disk: 195 GB
Practical Illustration of Resource Sharing and Pre-emption#
To demonstrate pre-emption and sharing, we will use the following simple workload, which deploys three replicas, each requesting one GPU:
apiVersion: apps/v1
kind: Deployment
metadata:
  name: sample-deployment
spec:
  replicas: 3
  selector:
    matchLabels:
      app: sample-deployment
  template:
    metadata:
      labels:
        app: sample-deployment
    spec:
      containers:
      - env:
        - name: AIM_CACHE_PATH
          value: /workspace/model-cache
        image: amdenterpriseai/aim-meta-llama-llama-3-1-8b-instruct:0.8.5
        imagePullPolicy: IfNotPresent
        name: inference-container
        ports:
        - containerPort: 8000
          name: http
          protocol: TCP
        readinessProbe:
          failureThreshold: 3
          periodSeconds: 10
          successThreshold: 1
          tcpSocket:
            port: 8000
          timeoutSeconds: 1
        resources:
          limits:
            amd.com/gpu: "1"
            memory: 48Gi
          requests:
            amd.com/gpu: "1"
            cpu: "4"
            memory: 32Gi
Save the Kubernetes manifest above as “sample_deployment.yaml”. Submit the sample deployment to the newly created low-prio project:
kubectl apply -f sample_deployment.yaml -n low-prio
To verify the deployment, open k9s and navigate to the pods view for the low-prio namespace (see Figure 13). The deployment is also visible in the AMD Resource Manager where, as shown in Figure 14, three GPUs are currently in use.

Figure 13: k9s - Sample workload running in the low-prio project.
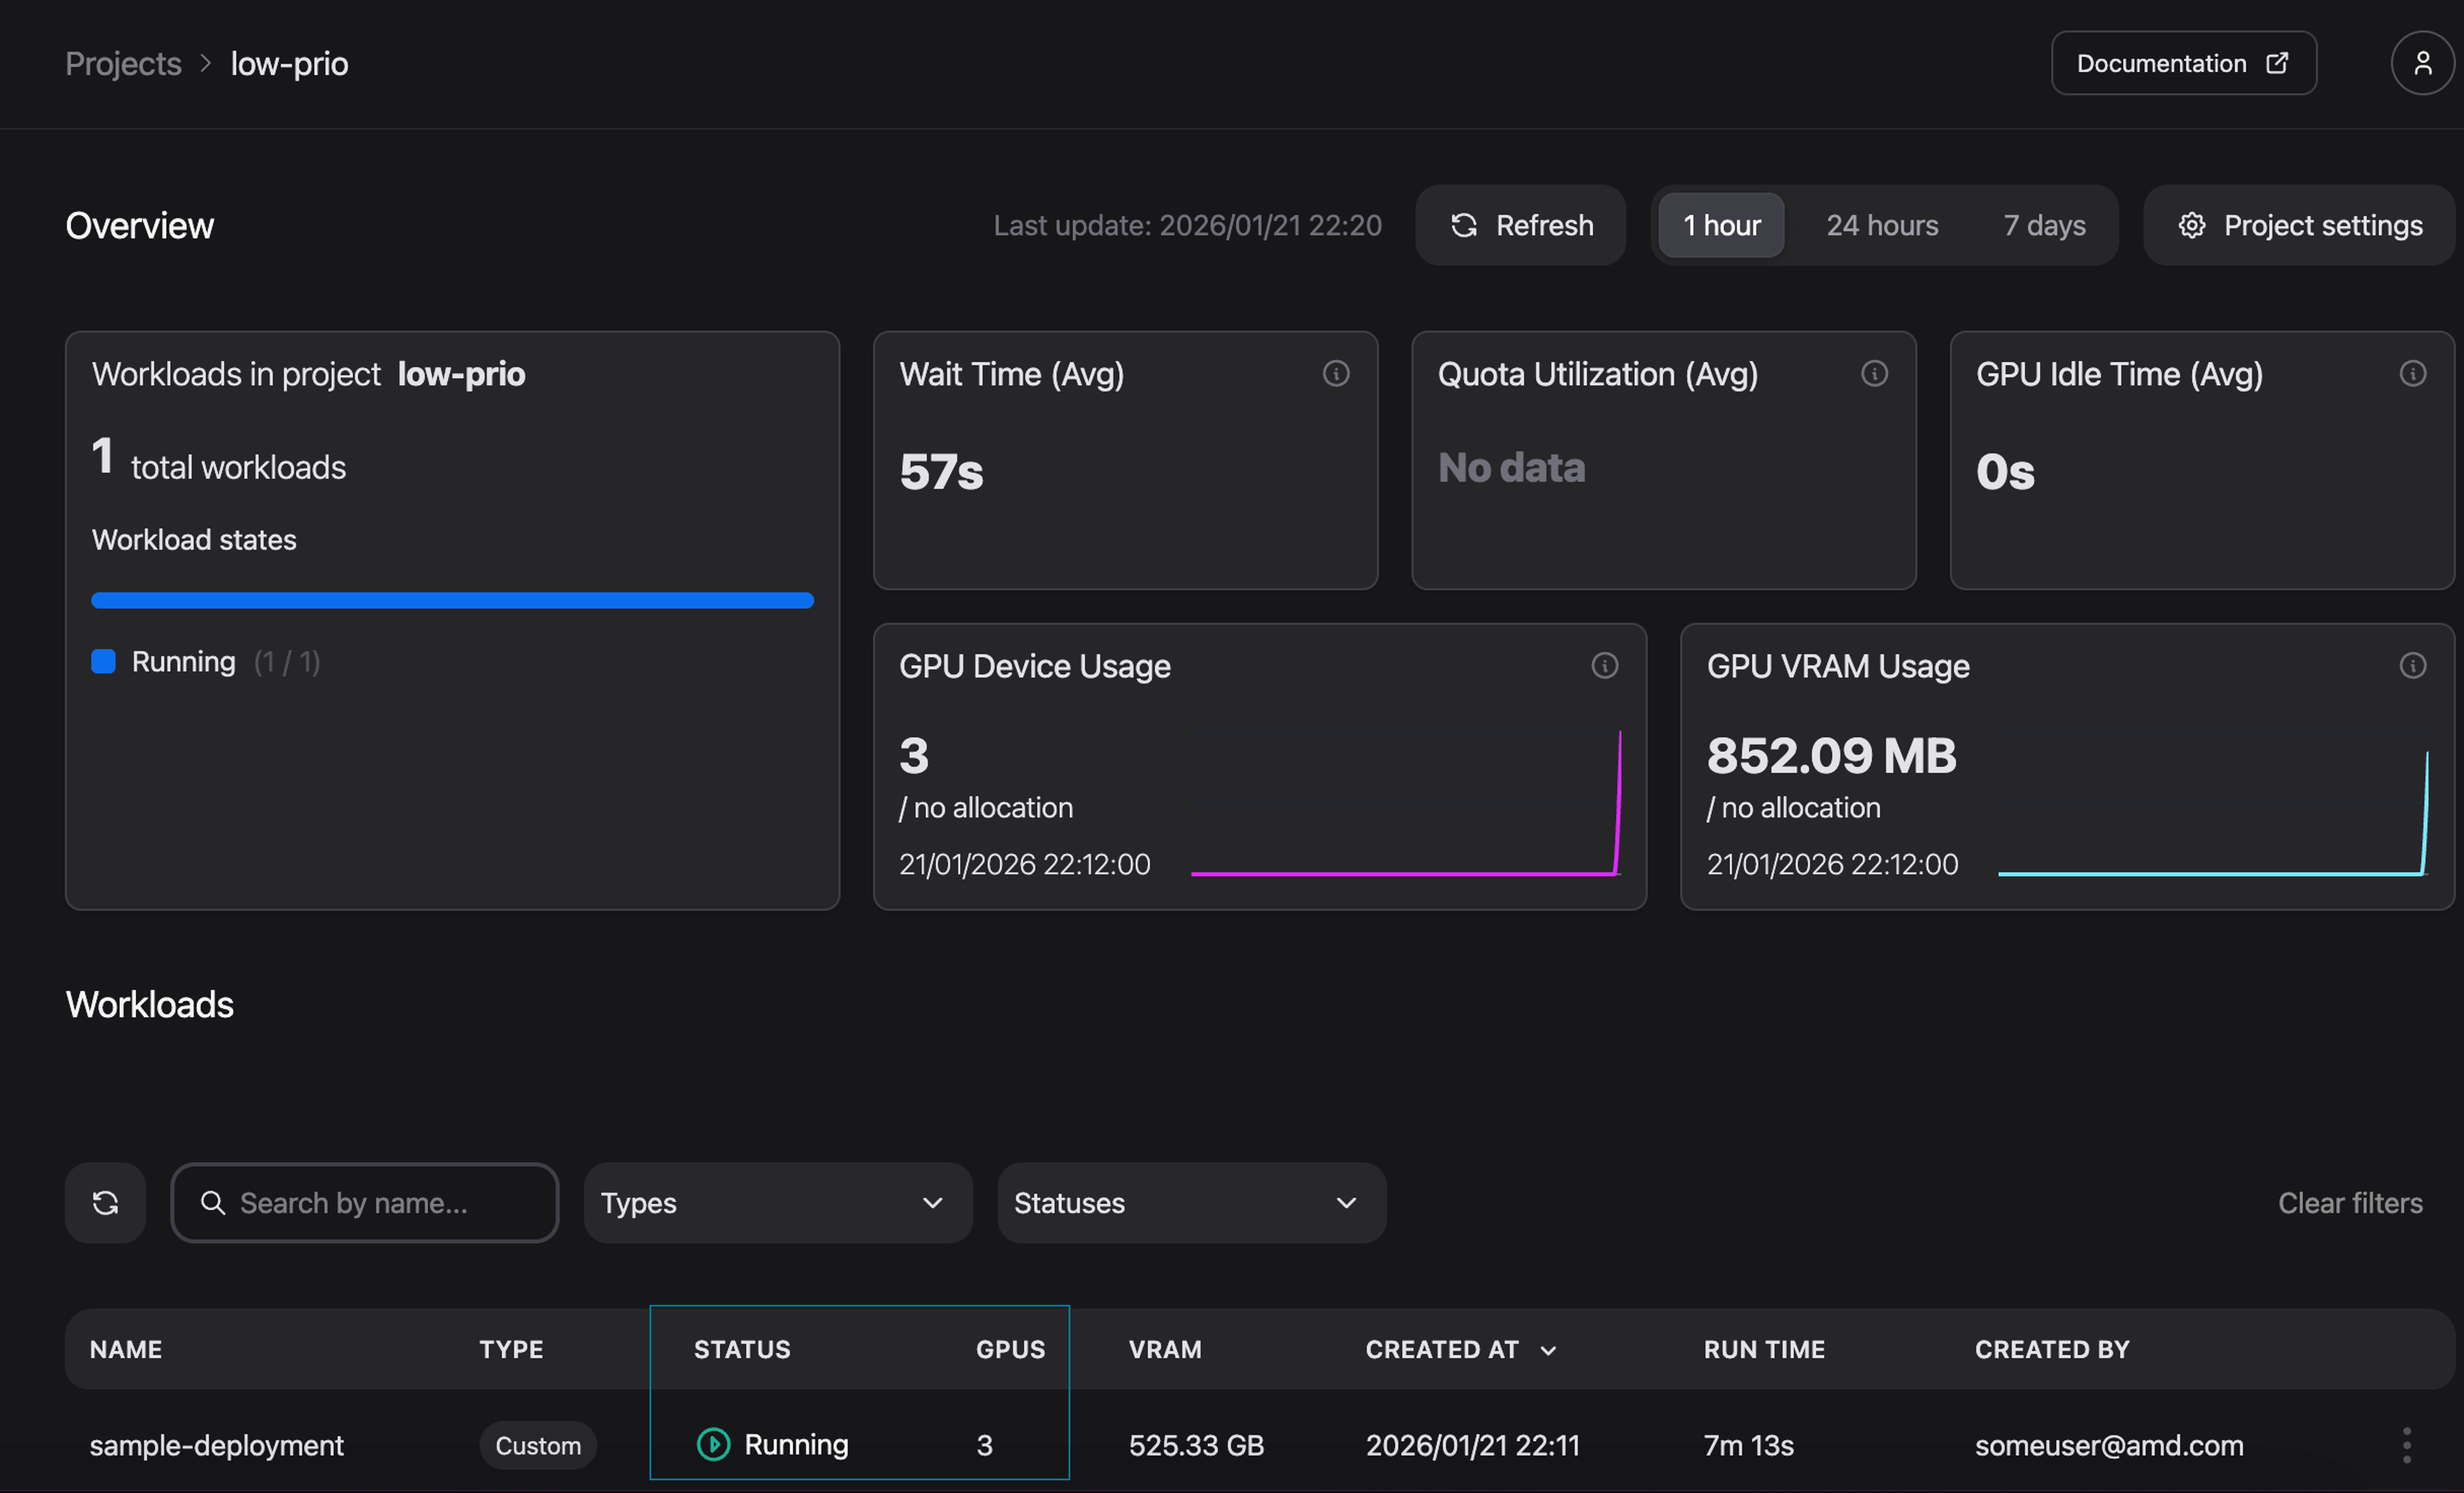
Figure 14: Workload status as reported in the AMD Resource Manager.
Now, submit the workload to the original demo-blog-project, which has an ensured quota of three GPUs:
kubectl apply -f sample_deployment.yaml -n demo-blog-project
By monitoring the cluster via k9s, we can observe that the workload in the low-prio project enters a Pending state (Figure 15). We can also observe the same in the AMD Resource Manager (Figure 16).

Figure 15: k9s - Low-priority workload gets pre-empted.
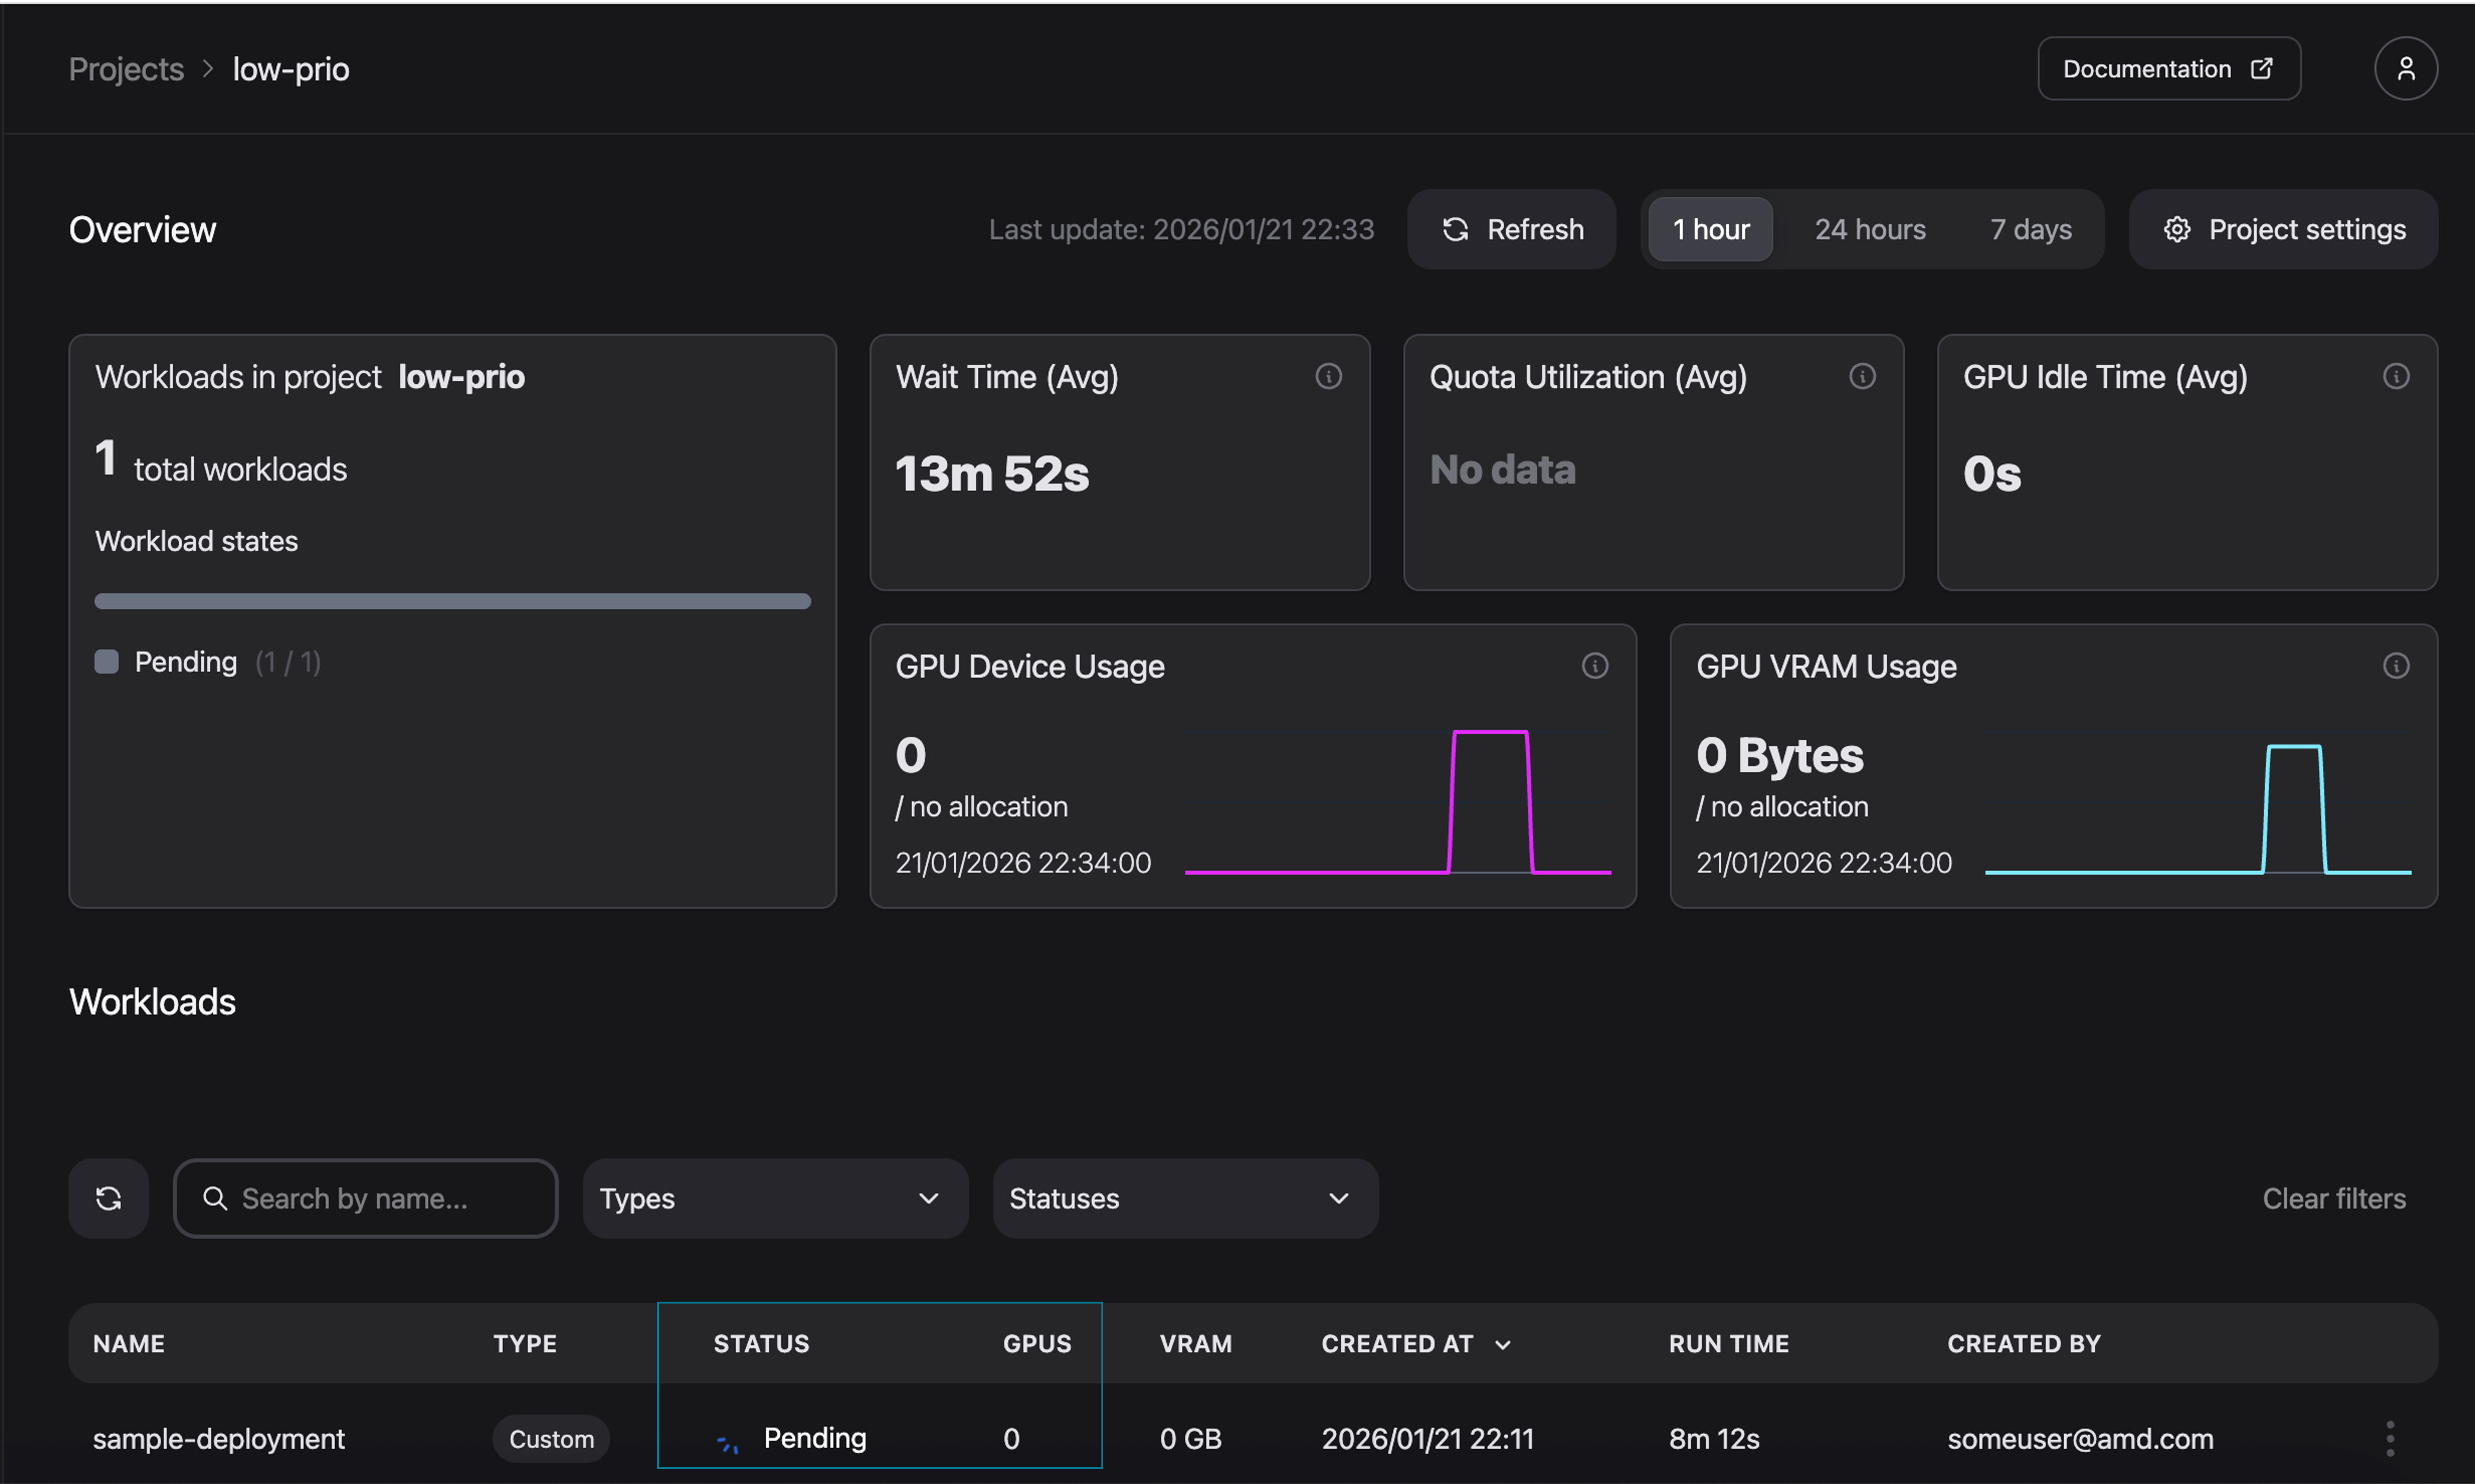
Figure 16: The previously running workload is now pending.
Monitoring the newly deployed workload in demo-blog-project confirms that the workload is now running (see Figure 17 for k9s and Figure 18 for AMD Resource Manager). Hence “demo-blog-project” is now using its ensured quota.

Figure 17: k9s - Sample workload submitted to a high priority project.
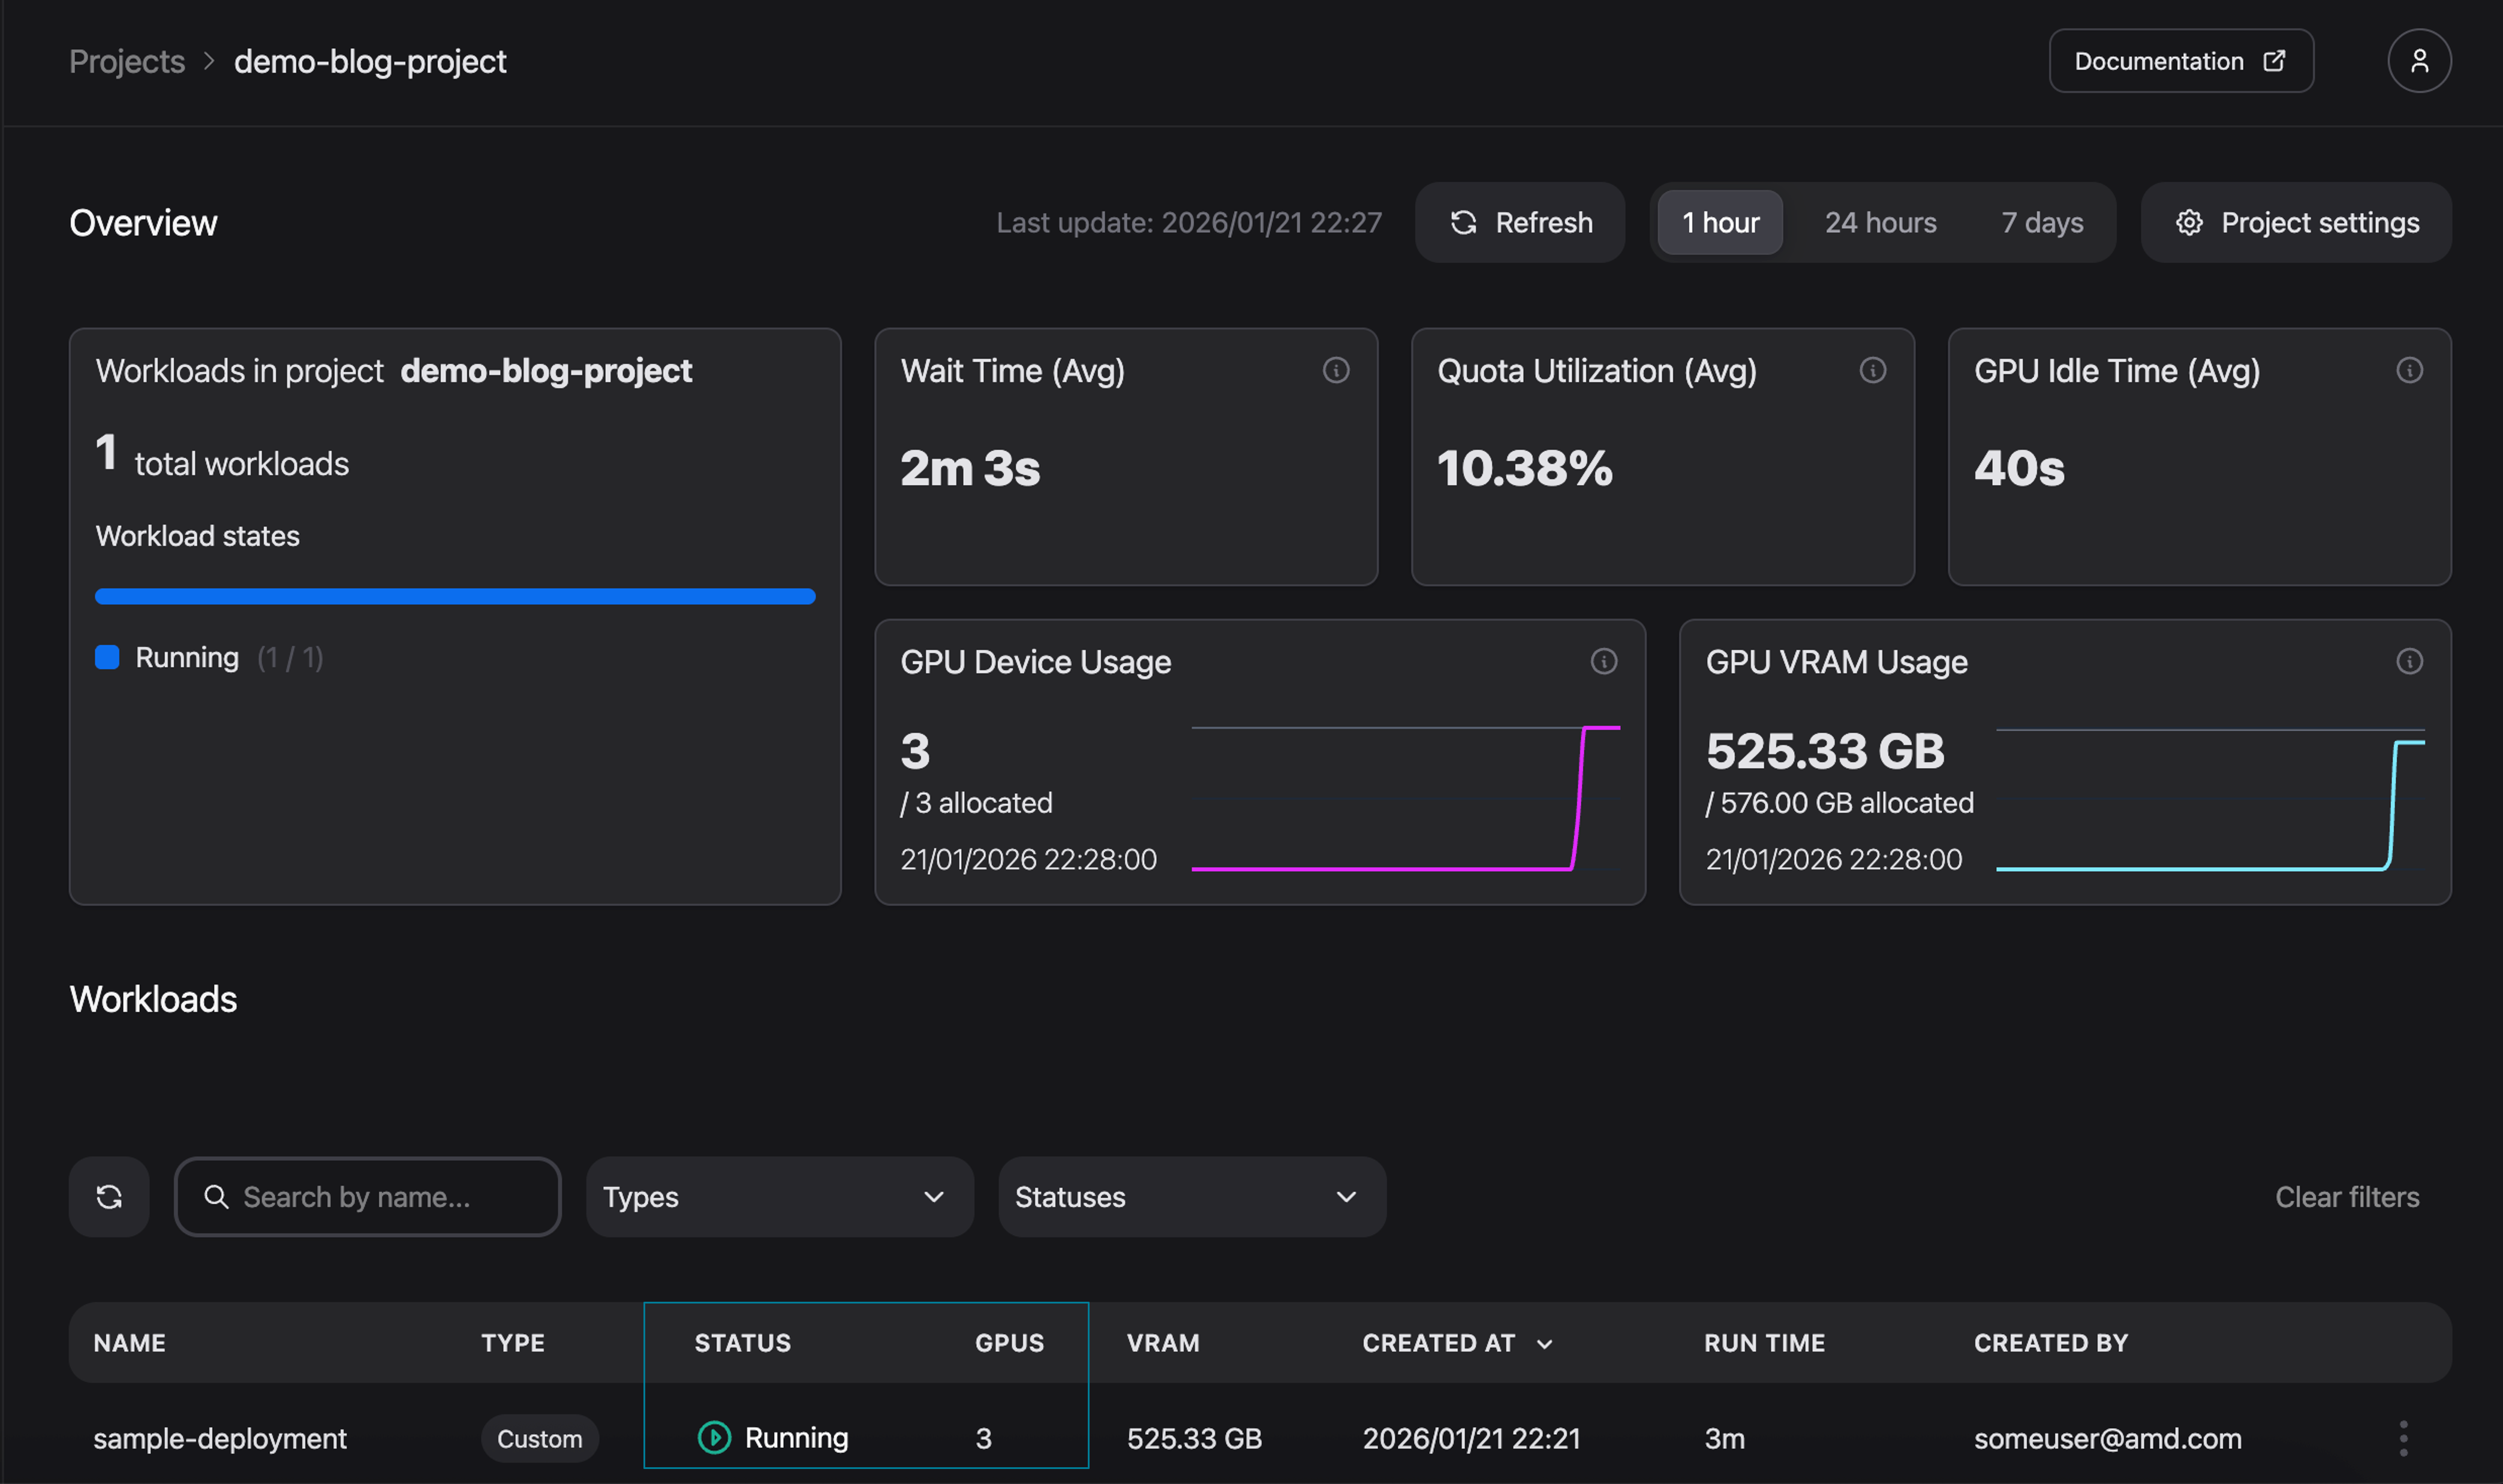
Figure 18: High priority workload is running.
You can now clean your environment by either deleting the workload from the AMD Resource Manager or by running the command below:
kubectl delete -f sample_deployment.yaml -n demo-blog-project
kubectl delete -f sample_deployment.yaml -n low-prio
Summary#
In this blog, we covered the basics of project and resource management within AMD Resource Manager. We began by creating and configuring a new project including the quota settings. We then deployed a workload to monitor utilization insights across various dashboard views. Finally, we created a second project to demonstrate the mechanics of resource sharing and pre-emption.
Now that you have configured your first project, try deploying your own custom AI workload or explore the AMD Enterprise AI Suite documentation to learn more about its capabilities.
Get started#
AMD Resource Manager is part of the broader AMD Enterprise AI Suite, which provides unified components for scalable inference, resource management, and practitioner tooling. For a greater understanding of the AMD Enterprise AI Suite, see the previous blog post.
Ready to build on what you have learned? Use the resources below to start your journey with the AMD Enterprise AI Suite.
For an overview of the AMD Enterprise AI Suite and AIM:
Visit the AMD Enterprise AI Suite product page
Visit the AMD Enterprise AI Suite developer page
Visit the AMD Inference Microservice (AIM): Production Ready Inference on AMD Instinct™ GPUs blog post
Visit the Getting Started with AMD AI Workbench: Deploying and Managing AI Workloads blog post
Additional technical documentation from installation to AIM deployment is readily available:
If you are interested in fine-tuning, see the following:
Disclaimers#
Third-party content is licensed to you directly by the third party that owns the content and is not licensed to you by AMD. ALL LINKED THIRD-PARTY CONTENT IS PROVIDED “AS IS” WITHOUT A WARRANTY OF ANY KIND. USE OF SUCH THIRD-PARTY CONTENT IS DONE AT YOUR SOLE DISCRETION AND UNDER NO CIRCUMSTANCES WILL AMD BE LIABLE TO YOU FOR ANY THIRD-PARTY CONTENT. YOU ASSUME ALL RISK AND ARE SOLELY RESPONSIBLE FOR ANY DAMAGES THAT MAY ARISE FROM YOUR USE OF THIRD-PARTY CONTENT.
© 2026 Advanced Micro Devices, Inc. All rights reserved.